My photo
Ontario, Canada
I am a wife, mother and grandma who enjoys the many aspects of homemaking. A variety of interests and hobbies combined with travel keep me active. They reflect the importance of family, friends, home and good food.
Cook ingredients that you are used to cooking by other techniques, such as fish, chicken, or hamburgers. In other words be comfortable with the ingredients you are using.
--Bobby Flay

For Your Information

Please watch this area for important information like updates, food recalls, polls, contests, coupons, and freebies.
  • [March 19, 2020] - Effective Mar 17, this blog will no longer accept advertising. The reason is very simple. If I like a product, I will promote it without compensation. If I don't like a product, I will have no problem saying so.
  • [March 17, 2020] - A return to blogging! Stay tuned for new tips, resources and all things food related.
  • [February 1, 2016] - An interesting report on why you should always choose organic tea verses non-organic: Toxic Tea (pdf format)
  • Sticky Post - Warning: 4ever Recap reusable canning lids. The reports are growing daily of these lids losing their seal during storage. Some have lost their entire season's worth of canning to these seal failures! [Update: 4ever Recap appears to be out of business.]

Popular Posts

Showing posts with label roasting. Show all posts

Sunday, April 14, 2013

Garlic Roast Beef with Roasted Garlic Mashed Potatoes and Home Canned Green Beans

Garlic has been richly entrenched in folklore for warding off vampires.  This likely stemmed from the practice of wearing garlic around the neck in days long ago.  Garlic is a tasty culinary herb but it also has medicinal properties.  It has antibiotic properties (contains the sulfur compound allicin), lowers blood pressure, is good for the circulatory system, promotes heart health, promotes a healthy immune system, increases bile production, decreases liver fat and reduces cholesterol.  Furthermore, ingesting garlic offers protection against mosquitoes which in turn protects you from contracting diseases via mosquito bites (eg. West Nile Disease).  Chewing on a raw clove of garlic releases allicin which kills the strep throat bacteria.  Other medicinal uses include relieving the pain of insect bites; treating sprains, toothache, tonsillitis, bruising, ringworm and clearing sinuses.  While you can buy garlic capsules, incorporating an abundance of fresh garlic into your diet works better and is less expensive.

searing the cross cut rib roast in Dutch oven
We are nearing that time of year again when our beef on the hoof will be ready.  This year the estimated time we will be getting it is the first week of June which gives me a bit more time to pare down our freezer contents.  Still, we are in high gear eating from the pantry and freezers!

I thawed a cross cut rib roast to cook for garlic roast beef  in my new enamel coated Dutch oven.  I often cook roasts without thawing so this was a bit different.  I let the roast thaw for a little over 24 hours in the refrigerator.  The roast was tied, very close to rectangular shaped.  I heated extra virgin olive oil in the Dutch oven then quickly seared the roast on all four sides.   Normally I don't sear roasts unless cooking is a slow cooking but this time I wanted to cook at a low temperature so seared for flavour.

seared cross cut rib roast seasoned
I pre-heated the oven to 200°F.  I seasoned the cross cut rib roast with Worcestershire sauce and garlic pepper then topped with whole cloves of garlic and slices of onion.  This gave me two elements of garlic, fresh and powdered for flavour.  The fresh garlic would roast as it cooked but not to the degree of plain roasted garlic that has a deeper caramelized note mingling with a hint of sweetness.  I added about a three quarter cup of water to the bottom of the Dutch oven.  The lid of the Dutch oven is designed to be self basting so reasoned that there would be just enough gravy for that night's dinner.  Once the roast was prepared, I covered it and place the hot Dutch oven into the pre-heated oven.  I cooked the covered  roast at 200°F for 1½ hr  then raised the temperature to 275°F for ½ hr. 

garlic roast beef
While the roast was cooking, I prepared the roasted garlic mashed potatoes (recipe below).   These would be reheated during the last ½ hr of the roast cooking.  The garlic mashed potatoes can actually be made ahead of time and refrigerated until you want to warm them for a meal. 

I was rather pleased with the results!  The roast was nicely browned for nice eye appeal with a rich looking au jus that could have been strained then used without thickening.  The aroma was divine!  I removed the roast to rest.  I lightly strained the au jus, mashing in the roasted garlic then thickened with a lightly seasoned corn starch slurry.  Really, there is nothing wrong with leaving the onion slices and garlic pieces in the au jus for serving.  Mashing the garlic just adds more flavour to the au jus.
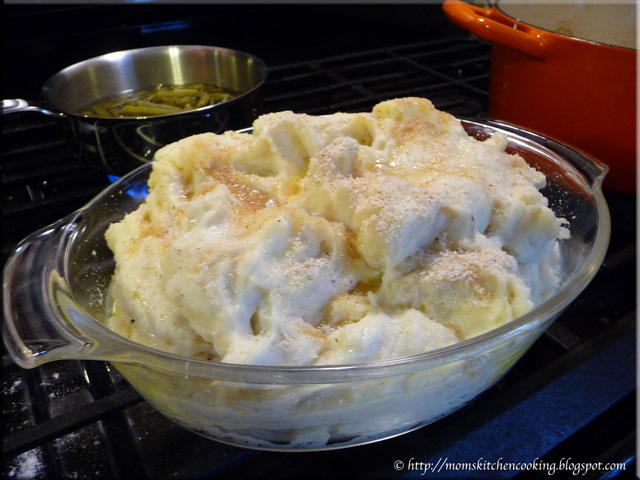
roasted garlic potatoes
Swedish potatoes have been a long time family favourite with their rich, creamy texture and just a bit of tang in the flavour.  I originally learned to make them from my Mother-in-Law and while I still make the original, I have developed several potato dishes based on the original.  The original Swedish potato dish is heavy on sour cream, cream cheese, butter and heavy cream all of which make this dish higher in fat content.  My roasted garlic mashed potatoes cut that fat significantly.  The potatoes are not as creamy as I purposely leave in smaller chunks of potatoes but the flavour is a sure winner!  These potatoes freeze and reheat well.

Roasted Garlic Mashed Potatoes
recipe by: Garden Gnome

8 - 10 medium sized potatoes
½ c sour cream
½ c cream cheese
½ small onion
2 cloves garlic
1 tbsp roasted garlic
½ tsp fresh cracked pepper
1 tbsp butter
½ c 2% milk

topping:
dry bread crumbs
1 tsp butter
garlic chives (optional)

Wash and peel the potatoes.  Cut into chunks.  Peel garlic cloves.  Thinly slice the onion.  Place potatoes, onion slices and garlic cloves into steamer basket.  Steam until the potatoes are fork tender.  Pour the potatoes, garlic and onion mix into stand mixer bowl.  Add the remainder of the ingredients.  Mix until semi-smooth (mainly smooth with some small chunks).  Spoon the mixture into an oven proof casserole dish.  Divide the topping butting into small dabs and scatter over top of the potatoes.  Sprinkle a light coating of dry bread crumbs on top.  Sprinkle chopped garlic chives on top.  Heat in oven until top is lightly golden.

garlic roast beef with roasted garlic mashed potatoes and home canned green beans
I served the garlic roast beef with the roasted garlic mashed potatoes, home canned green beans, and a side salad with homemade creamy garlic dressing.  Home canned green beans are one of our favourite side dishes so I can a lot of them.  I'm very much looking forward to the upcoming growing season as there are only 4 - 500ml jars of green beans left!

This was a sure to please, easy to prepare dinner packed full of garlic goodness!  Each of the layers of garlic (fresh, roasted, dry) added their own distinctive notes yet were not over powering.  Garnishing the potatoes with garlic chives will add another subtle garlic note.  The end result was delightfully delicious!  And no we did not have garlic breath :)


Wednesday, November 14, 2012

Our Thanksgiving Stuffed Chicken (Vacation Home)

The approach for cooking at our vacation home is a bit different than cooking at our permanent residence.  We don't have a well stocked pantry nor do we have storage space for a lot of food.  We don't have a large variety of seasonings and spices to use like we do at home.  We tend to shop for only a couple days of groceries at a time which ends up saving us a bit in food waste.  Quite often eating out is a spur of the moment decision especially when we have company visiting.  We don't have a lot of the small kitchen appliances I am used to using on an almost daily basis (eg. Kitchen Aid stand mixer) and those small kitchen appliances we do have are very much stripped down versions specifically bought with renters in mind meaning they don't have the features I'm used to having.  It is hot there as well so cooking indoors is not as desirable especially baking.  I have become very accustomed to cooking with natural gas and on charcoal for the outdoor grill, neither of which we have at our vacation home.  Instead I'm back to cooking with electricity and propane.  Don't get me wrong as I am definitely not complaining, just saying the the cooking style at our vacation home is rather different and by default adaptive than at home.

stuffed chicken
My husband's sister and our nephew spent the Canadian Thanksgiving with us at our vacation home.  I decided on making a meal that gave us the traditional flavours of home.  I bought a whole chicken then stuffed it as I normally would with turkey or whole chicken.  Unfortunately, I did not have any homemade poultry seasoning so had to buy a packet but it worked for our needs.  I do think I will buy a countertop roaster next trip as it won't heat the house like the oven does.

My stuffing is beyond easy to make.  I just break up bread slices into a bowl.  It is very much a guestimation as to how much it will take to stuff the bird.  Then I add chopped onions, dabs of butter, poultry seasoning, salt and pepper then mix well.  I form the stuffing into fist sized balls and stuff it into the bird in both the main and neck cavity.  Then I tie the legs together, dab the bird with butter and a little salt and pepper then roast as is.  The results are perfect every time with enough drippings to make a nice, rich gravy.  At home, I would normally serve the chicken or turkey with mashed potatoes and whole kernel corn but at our vacation home I substituted baked potatoes.  They cooked along with the chicken making it a frugal use of energy.  I also kept the carcass of the chicken to make chicken stock then froze it to be used during our next trip.  Normally, I would home can it but until I buy a pressure canner for the vacation home, it isn't an option.


Tuesday, April 03, 2012

Pot Roast with Fire Roasted Tomato Basil Gravy

Pot roast is an easy to prepare delicious meal perfect for Sunday night dinners during the winter months.  I pulled one of the last of our roasts from the freezer a couple of days ago.  We are getting the freezers ready for our beef on the hoof purchase this year so there isn't much beef left.  Our beef stock is down to a two packages of soup bones, three roasts and a package of stew beef.  I'm actually quite pleased we have been able to get our beef stock this low before we pick up our new beef.  In the meantime we will enjoy moose, chicken, pork, fish and seafood so it isn't like we have to go without meat.

pot roast prepared for oven
I traditionally make pot roast with a beef roast, potatoes, carrots and whole mushrooms.  The resulting gravy is rich and flavourful.  Most think of gravy as being meat or poultry based but there is the gorgeous sausage gravy for biscuits, brown gravy and mushroom gravy.  A very popular gravy with my Mennonite friends is tomato gravy. 

Tomato gravy is extremely easy to make as it is just lightly seasoned tomato juice thickened to a gravy consistency.  It is used much the same a meat based gravies.  I decided to kick tomato gravy up a notch by using a fire roasted tomato basil sauce to make a gravy.  Once the roast was seasoned (garlic pepper, Worcestershire sauce) and surrounded by potatoes, carrots and cabbage, I poured about 500 ml (2 c) of the fire roasted tomato basil sauce over the meat and vegetables. 

pot roast cooked ready to make the roasted tomato gravy
The roast was cooked in the clay baker at 300ºF until the vegetables were tender and the roast was starting to caramelize.  The internal temperature was 155ºF/68ºC which is medium.  Note that this is a lower temperature than that for ground beef which is done at 160ºF/71ºC.  The reason for this is a whole cut of meat has a smaller surface area than ground meat.  Any bacteria present on the meat will be killed off during the cooking process.  Ground meat has a high surface area and the grinding process itself allows surface bacteria to be transferred throughout the meat giving them a greater chance of multiplying.  This is one reason I prefer to grind my own meat just before wanting to use it.  This also explains why eating a blue steak (just barely cooked on each side) is fine because surface bacteria has been killed off but it is not fine to eat a burger that is still rare in the middle.

pot roast with roasted tomato gravy plated
Cabbage is an underused, inexpensive and nutritious vegetable.  It takes on a lovely sweetness when cooked!  The fires roasted tomato basil sauce accented the flavours nicely.  I simply thickened the juices from the roast using a cornstarch slurry to make a gravy.  We really liked the roast cooked this way.  It would be a wonderful wintertime comfort meal!

I will admit to starting out this meal with an end in mind.  I've talked of making my own convenience foods.  After I made a plate for my husband's lunch the following day, I set about making three packets of convenience foods.  Tomorrow I will share with you what those foods were and how I made them.


Tuesday, March 20, 2012

Grill Roasted Chicken with Grilled Vegetables

I recently posted about the whole chicken sale our local Wal-mart is having.  It is a one week sale of two whole chickens for $10, limit two packages (4 chickens) per customer per visit.  The trick with these types of sales is to get the largest weight possible to reduce the cost per kilogram (pound) as they are sold in multiples of two regardless of the weight.  The second trick is to get their early in the morning to get the heaviest packages possible.  Sunday's purchases were a bit lower in weight (6.492 kg)  because I didn't get there until after lunch.    Monday's purchases came in at 7.236 kg.  I intend to end up with 16 chickens total so the next few posts will discuss what I do with all this chicken. 

stuffed chicken on the grill
The weather has been beyond unseasonably warm with highs in the 70's (F) and lows in the 50's (F).  We have had the furnace off for over a week now and the heat wave is predicted to continue for the rest of the week.  The house has actually been rather on the warm side so I decided to roast on of the chickens on the grill. 

The chickens are trussed so they cook nicely.  I cut away the excess fat without disrupting the leg trussing so I could stuff the chicken.  This is our favourite way to have roasted chicken.  Once the chicken was stuffed, I added about a half cup of water to the bottom of the soaked clay baker, put the chicken in, finished with salt and pepper and butter then placed it on the pre-heated grill (300ºF).  The propane side of our grill has three burners.  I used the two outer burners with the centre one off until it was time to brown up the chicken.

grill roasted chicken with vegetables on the grill
I wanted to add flavour without adding calories.  One of the easiest ways to achieve this is to use a smoking bisquette (blue arrow).  I use 100% organic Bradley Smoker smoking bisquettes The bisquette is placed directly on the pre-heated grill.  After 10 minutes, the grill is ready to use where the smoking bisquette will add a delicious wood-smoke flavour without the calories. 

Once the chicken started browning up a bit, I put the potatoes, zucchini and grape tomatoes on to grill.  Roasted tomatoes are simply delightful!  The flavour is rich and intensive yet smooth.  I hollowed out the zucchini to make grilled zucchini boats.

grill roasted chicken ready for serving
Just look at that beautiful roasted chicken with just a slight hint of apple smoke.  The deep golden colour comes easier using the grill.  The beauty of roasting a chicken or any other meat on the grill is you can infuse it with delicious, natural wood-smoke flavour while keeping the heat outdoors.  In this respect, roasting on the grill is superior to roasting in the oven. 

While the chicken was gorgeous, nicely roasted, there wasn't enough juice to make gravy.  It could have been due to the clay roasted as there wasn't much in the way of tasty yum yums as Emeril Lagasse puts it.

grill roasted chicken with grilled vegetables and stuffing
I served, the moist and tender, wonderfully flavoured grill roasted chicken with grill baked potatoes and zucchini boats.  The meal was beyond delicious!  My husband couldn't stop raving about it so that means it was a really good meal.

Grill Baked Potatoes
recipe by:  Garden Gnome

Wash the desired number of potatoes.  Poke with a fork to allow steam to escape.  Place on the grill on indirect heat.  Bake until tender.

Zucchini Boats
recipe by:  Garden Gnome

Choose zucchini that are about 8 - inches long.  Wash then cut the stem and blossom end off.  Cut the zucchini in half longitudinally from stem end to blossom end.  Use a spoon to scoop out a shallow channel.  Brush with olive oil and sprinkle lightly with salt.  Turn cut side down onto grill on indirect heat.  Wash and cut grape or cherry tomatoes in half.  Place in a small foil baking dish.  Drizzle with olive oil.  Place on the grill on indirect heat.  Cook the zucchini until tender with defined grill marks.  Remove from grill and plate.  Fill the channel with cooked tomatoes.  Sprinkle lightly with sea salt,  fresh cracked pepper and fresh grated Parmesan cheese.


Friday, February 24, 2012

Drunken Blade Roast

It's a good thing the weather is still wintry as we still have several roasts in the freezer that need to be used before our next beef on the hoof purchase next month.  Roasts can be cooked using various methods ranging from cooking on the barbecue, in the pressure cooker, in the countertop roaster, in the slow cooker and in the oven.  I have been experimenting with a few creative ways to cook roasts in the oven.  Encouraged by the success of the 15 Garlic Clove Prime Rib Roast, I decided to get a bit creative with a blade roast. 

vegetables layered in clay cooker
Blade roasts can be a bit tougher because they are cut from the shoulder of the beef.  There is less marbling (aka less fat) that tenderizes the meat and more connective tissue.  I like cooking blade roasts using a wet method using some type of acid (eg. tomato stock, BBQ sauce) as a tenderizer.

I soaked my clay baker, one of my favourite vessels for cooking roast in the oven.  Then I layered celery, onions and carrots on the bottom of the cooker.  This combination is termed a mirepoix or trilogy or simply aromatics.  The total depth of the vegetables was about an inch thick.  While the vegetables would add flavour and serve as a side dish, they actually served a much more important function.

roast sitting on layered vegetables
This was a blade roast from our last bulk meat purchase.  The beef is hormone free from a cow one of a couple of farmers raise for us so all of our beef looks this good.  The abattoir we have dealt with for years really does a lovely job of preparing our roasts!  I place the thawed, prepared roast on the bed of vegetables which allowed any liquid I added to create a bit more steam.  The vegetables themselves add steam as they are cooking.  The steam for added liquid mixed with the vegetables rises up through the meat permeating it with flavour while tenderizing the meet.  The placement also allowed the juices from the roast to drip through the vegetables as they cooked not only adding a wonderful flavour but also creating the basis of a very rich, delightfully flavoured gravy.

blade roast seasoned and surrounded by mushrooms ready for the oven
I poured the liquids (Worcestershire sauce, pale ale) over the roast then seasoned with garlic pepper and surrounded the roast with whole white mushrooms.    The mushrooms added steam, a woodsy flavour, and helped to direct the steam from the lower vegetable and liquid layer towards the roast.  I place the lid on the clay cooker then placed in the oven to cook at 300ºF for about an hour and a half. 

I have to tell you that roast sure did fill the house with a delicious aroma!  I finished writing up the recipe and method in my cooking journal then waited patiently for the results.  As with any dish I create, the true test is in the tasting!

drunken blade roast plated for serving
Once the roast was cooked, I removed it for resting before slicing.  Resting allows the juices to settle keeping all that delicious flavour inside the roast.  Once the gravy was made, I plated with slices of the roast beef and sides of roasted vegetables and bake potato.  A small side salad rounded out the meal.

The end result was a deliciously, melt in your mouth roast beef with a deep, full bodied, rich gravy.  Usually when I'm creating a recipe there is always tweaking to be done yet there really isn't much I would change about the recipe itself.  It was a simple, easy recipe that gave good results.  As far as presentation, next time I will add fresh parsley sprigs or even sprinkle with dried parsley flakes to add a bit more colour.

Drunken Blade Roast
recipe by:  Garden Gnome

3 lb blade roast
1 medium onion
2 stalks celery
1½ c baby carrots or carrot sticks
2 c fresh whole mushrooms
1 c premium light ale
2 tbsp Worcestershire sauce
1 tbsp garlic pepper
1  tbsp browning
2 tbsp cornstarch
water

Soak clay cooker 30 minutes.  Wash celery, carrots and mushrooms.  Cut celery into thick slices.  Slice the onion into thin wedges.  Place the onion, celery and carrots in the bottom of the clay cooker to form a layer.  Place the roast on top of the vegetables.  Pour the ale and Worcestershire sauce over the roast.  Sprinkle garlic pepper over the roast.  Surround the roast with the whole mushrooms.  Cover and roast at 300ºF for 1½ hours.  Remove roast and allow to rest before slicing.  Ladle vegetables into serving bowl.  Stir the remaining liquid then pour into saucepan.  Stir in the browning.  Make a cornstarch slurry using the cornstarch and just enough water to easily pour.  Cook on medium heat until thickened.  Remove from heat.  Slice the roast beef then serve topped with the gravy.


Tuesday, January 10, 2012

Maple Herbed Roasted Chicken Breasts

My very first cookbook was Betty Crocker's Cookbook (circa 1969).  It remains my favourite recipe book for tried and true easy recipes for healthy meals.  In addition to my favourite cookbook, I have the newest Big Red Betty Crocker cookbook (2011),  Betty Crocker's New Cookbook (1996) and Betty Crocker Why It Works (2006).  Of interest is the 's is not always on the Betty Crocker cookbooks and it does not appear on the Betty Crocker products.  I am not sure why but at any rate I love the cookbooks.

maple herbed roasted chicken breasts
I've been working my way through the Betty Crocker Why It Works cookbook written by Kevin Ryan, PhD.  This is an amazing cookbook with lots of great recipes, each with an explanation as to why certain ingredients pair nicely or why the method works.  I decided to make the maple-thyme roasted chicken breasts on page 74.  However, my version took a different path.  I substituted herbes de provence for the thyme, omitted the vegetable oil, reduced the amount of butter used and changed the method entirely.

Pictured is my version of the dish using the great Canadian flavours of real maple syrup and old fashioned chili sauce paired with home canned green beans.  Home canned green beans is a Canadian favourite, right up there with dill pickles, strawberry jam, applesauce, peaches and old fashioned chili sauce from the canning pot.  The chicken was absolutely delighful!  It was nice an moist with a lot of flavour.  This is a definite keeper recipe.  The meat was lower in fat than the original recipe that when combined with the sides made for a delicious, healthy meal.

Maple Herbed Roasted Chicken Breasts
modified from: Kevin Ryan, PhD, Betty Crocker Why It Works, Maple-Thyme Roasted Chicken Breasts. Pp. 74.

4 large, bone in skin on chicken breasts
⅓ c pure maple syrup
2 tbsp balsamic vinegar
½ tsp sea salt
2 tbsp cold butter
1 tbsp Herbes de Provence
¼ tsp ground pepper

Pre-heat oven to 425ºF.  Place the chicken in a baking pan, skin side up.  Mix the remaining ingredients together.  Pour over the chicken.  Place a ½ tbsp of cold butter on top of each chicken breast.  Roast chicken uncovered for 35 minutes, basting with the sauce using a pastry brush every 15 minutes.  Brush again just before serving.  Serve additional sauce in a dipping bowl if desired.


Saturday, December 10, 2011

Blade Roast (Chuck Roast)

Yesterday I wrote about the chuck 7-bone roast (pot roast) that we broiled.  According to The Cook's Thesaurus, a chuck 7-bone pot roast is a cut from the shoulder and neck of the beef.  It is a tough cut of meat so should be braised or cooked in liquid.  Well it cooked up nicely under the broiler as we found out.  Even though we used a dry heat the meat was still nice and tender,

blade roast also known as chuck roast
We buy our beef on the hoof  from one of two local farmers.  While the term chuck is widely used in the US is is not a common term in our part of Ontario, Canada.  I like using a blade pot roast for making a pot roast dinner but quite frankly will use any cut, adjusting the cooking temperature and timing accordingly..  A blade pot roast is the same as a blade chuck roast.

When we visited the kids last, we offered to cook them dinner as they both had to work one of the days we were there.  We went shopping for a blade roast and other ingredients to make a pot roast dinner.  The grocery stores had nothing that looked decent so we stopped at a small specialty meat shop very similar to a butcher shop where we found a lovely blade chuck roast.  They put a light seasoning on the roast for us.  Note the nice marbling?  This gives a lovely flavour to the meat, roasting vegetables and resulting gravy.

blade roast with vegetables ready for the oven
My tradition method for making a pot roast is very simple.  I place the roast in the middle of the roaster then season with garlic pepper and Worcestershire sauce.  At home I add tomato stock for a richer gravy.  The tomato stock also acts as a meat tenderizer.  I didn't add any to this particular roast as we flew so I couldn't bring that sized jar of liquid on the plane.  I usually add a bay leaf as well.  [Not having checked bags has a few downsides! I couldn't bring them a few jars of home canned salsa either so will have to mail it to them.]  I added carrot and potato pieces, sliced onion and whole mushrooms to surround the roast.   Then I covered the roast and let it cook for about four hours at 350°F.

blade roast ready for serving
Once the roast was done to medium rare, I removed it to rest before cutting.  If you cut a roast or steak immediately after cooking, the juices will run out losing all that yummy flavour.  Allowing the roast to rest 5 to 10 minutes before slicing keeps the juices in the roast giving tender, juicy and tasty sliced beef.

Left over roast beef cooked this way slices beautifully for hot open faced or cold sandwiches the next day.  That is one reason  I prefer to use a boneless cut of roast.  Allow the roast beef to chill though before slicing.  Slice thinly with a knife or put thought a slicer for lovely fresh roast beef slices for sandwiches the following week.

roasted vegetables from the pot roast
I scooped out the roasted potatoes, then set about making a thin gravy with the pan drippings using a flour slurry.  A flour slurry consists of flour, dash of salt, sprinkle of pepper and water or milk  The slurry should be the consistency of maple syrup.  In this case, there wasn't a lot of liquid left so I stirred while scraping and poured into a small saucepan to make the gravy.  I brought the liquid to a boil then while stirring slowly poured in the slurry.

Vegetables roasted in this manner take on a rich depth in flavour that you can't get from other cooking methods.  They are truly delightful!  Part of that flavour comes from caramelization of the vegetables mixed with meat juices and seasonings.  They are perfect just the way they are topped with a little gravy.

Left over roasted vegetables can be used in soups as is or using the stick blender for a smooth soup.  Simply stir them in if using as is.  If using a stick blender make the basic cream soup then add the roasted vegetables, warm the blend with the stick blender.  Add a bit of extra seasoning if desired and garnish with dried parsley.


Sunday, November 06, 2011

Roasting Peeled Garlic

Roasted garlic is a must have staple in our home.  We use it in so many dishes to add an almost barely sweetness combined with a deep, rich garlic flavour.  It is nothing like fresh garlic!  I've roasted garlic in the oven, on the grill and in the countertop roaster will excellent results.  I've always just sliced the top of a head of garlic to barely expose the tops of the cloves then drizzled with olive oil and roasted as desired.  One of the grocery stores here is now selling 250 g packages of peeled garlic cloves for 97¢.  I bought another package yesterday then suddenly wondered if I could roast them.  I reasoned if it worked it would save considerable mess getting the roasted cloves out of the peeling later and there would be less of the delicious roasted garlic wasted.  The hopes were if it worked fine, I would do up a large batch of roasted garlic the first of the week.
 

peeled garlic cloves
The garlic cloves are peeled but I had to cut the root end.  I poured almost the entire contents of the package into a 7 c oven proof baking dish then drizzled with extra virgin olive oil.  I covered the dish with aluminum foil then set in the oven at 350ºF.  There was no need to pre-heat the oven.

I was quite hopeful this little experiment would work.  The peeled garlic was ultra simple to prepare, just snipping the stem end off of each clove.  I will be growing garlic in my new garden beds so this would be a great way to use them up.  I don't mind peeling garlic as that goes quick enough, it's the mess of getting the roasted garlic cloves out of the skins that would be nice to eliminate.

roasted peeled garlic cloves
Oh my gosh, did the house ever smell yummy!  I just love the smell of garlic roasting.  It is such a tantalizing smell.  I roasted covered for 40 minutes total, stirring once half way through the roasting process.

The cloves caramelized nicely.  There were a couple of the smaller ones that were what I would consider over roasted.  They were a bit harder but that happens with garlic roasted in the traditional manner as well.   This really doesn't affect the final product other than adding extra flavour and the harder bits soften once the product is allowed to sit for a short period of time.  I like to let my roasted garlic sit for an hour or so before preparing it for storage.

roasted garlic ready to use
Once the roasted garlic was ready, I spooned the garlic cloves into a smaller 2 cup bowl.  This left any extra oil in the baking bowl.  I mashed the cloves the set aside to cool before refrigerating.  The overall yield was about ¾ c of delicious roasted garlic with no muss or fuss.  It tasted just as good as garlic roasted the traditional way.

I'm very encouraged by this little experiment.  I am going shopping for garlic tomorrow to do a larger batch as well as canning a small batch of pickled garlic.  I would dearly love to can roasted garlic but can't because of the oil.  It does freeze nicely so after tomorrow my stocks will be replenished!


Friday, October 21, 2011

Rib Roast

We have been in our new house officially as owners for five weeks but for the two weeks prior to that we were essentially living between two houses and three days after the closing date we left for our vacation home for a much deserved rest.    We've been home from the vacation home two weeks now so we are working on getting settled.  I'd love to report that I'm cooking up a storm but the reality is there is still a good amount of my pantry stock in boxes.  The movers in their ultimate wisdom dismantled one of my large Alea industrial steel racks and a knock off smaller gauge one (Canadian Tire).  We have yet to find the locking clips to hold the shelves so I could gladly give them a piece of my mind not that it would help any.  My husband wants another of the industrial racks anyway so he came up with a plan.  My partially assembled rack and already loaded will be finished tonight with the new purchase then the new rack will be partially assembled.  Hopefully somewhere in the process we find the locking clips. 

rib roast
At the moment, getting into the freezers is a bit problematic.  I have to move boxes as well as clear the tops of the freezers.  I made a path to both then grabbed a plastic grocery bin and filled it with whatever I could reach.  That bin went into my new [to me, it was part of the house purchase]  kitchen side-by-side.  We are eating from whatever was in that bin as well as what I can reach from my home canned and dried food supply.  Needless to say, meals have been rather simple.  I've been picking up the odd extras just to make the meal not so plain.

There was a rib roast in the bin so I used it to make a pot roast dinner by adding cut white potatoes, whole baby red potatoes and cremini mushrooms.  We really like how the baby red potatoes roast up!  I made gravy to accompany the dinner.  It was a simple, easy meal that freed up time to continue with the organizing.  Just wait until you see pictures of my new pantry! 

I am so excited!  Not only is the pantry spacious there is no more ducking to miss hitting your head on beams.  I have lots of space for everything needed for a well stocked pantry.  A friend of ours is custom making a lighted shelf for my kitchen to house a small selection of my cookbooks so that will be really nice.  He's coming out early next week to install it.  Now if you see the work he does, it will be gorgeous.  He made my husband these amazing solid wood, triangle shaped drink tables on wheels for the games room.  He also custom making us a medicine cabinet for the main bathroom and framing in the mirror for a more custom look.  He's going to be rather busy around our house :)


Wednesday, September 21, 2011

Roasted Chicken in Gas Oven

Over the next couple of months I will seriously be putting my new gas range through it's paces!  My rule of thumb is whenever switching to a different cooking fuel is to revert to the tried and true recipes.  The reason for this is with a tried and true recipe or dish I know exactly what the results should be.  Using tried and true gives me a gauge to measure the performance of the new cooking fuel against.

Now I am not exactly new to cooking with natural gas.  I grew up knowing nothing else and one of the houses we rented before becoming homeowners had a natural gas built-in range.  While it is not exactly natural gas, over the years I have learned to cook on propane burners in our RV and the side burners of outdoor grills.  Really, I am rediscovering natural gas and adapting my cooking style.

roasted chicken in gas oven
Roasted chicken is an absolute culinary delight!  I always roast it with stuffing usually in the clay baker.  The sad thing is here in beautiful Ontario, Canada the pictured chicken cost us just over $12.  In the meantime we could have bought a rotisserie chicken from Walmart for $5.  Go figure!  The problem is unless I am in a real hurry or have a specific dish to make, I don't buy rotisserie chicken even though they are one frugal meat choice for dinner.

I soaked my clay baker in water for 15 minutes then stuffed the chicken with homemade dressing using homemade poultry seasoning.  I put a few pats of butter on the chicken then sprinkled with fresh ground pepper and Himalayan pink salt.  I roasted the chicken until golden brown and juices ran clear in a natural gas oven.  I was very pleased with the results!  If anything cooking with gas does give nicer results than cooking with electricity.  The chicken was tender and juicy, roasted to golden perfection.  Despite the cost I will be roasting chicken a bit more often in the future.  Isn't it scrumptious looking?


Wednesday, November 17, 2010

Rump Roast (Beef)

In many ways, the cut of meat determines how it should be cooked.  This is important with most cuts of meats.  For example it would be a huge waste of money to stew prime rib, not that you couldn't just a waste of money when a much cheaper cut of meat could be used for stewing.  Even though we pay a flat rate across all cuts of our beef bought on the hoof, I still try to cook the various cuts in the most appropriate method that will best enhance their flavour and texture.

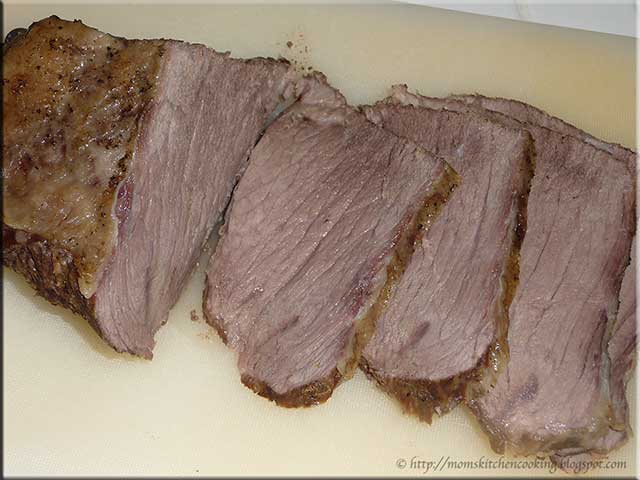
sliced rump roast
Rump roast is cut from the bottom round or fleshy hindquarter of the animal (beef, moose, elk or venison).  It is usually boneless.  Rump roast is considered a lower-quality cut of meat.  It lacks both fat and marbling resulting in a less flavourful and tender cut of meat prone to drying out if improperly cooked. 

Rump roast can be placed on a rack for cooking to allow juices to drip to the bottom of the pan.  The juices can then be used to baste and for making gravy.  Instead of this method I placed the rump roast in a roasting pan then poured tomato stock into the bottom of the pan, seasoned the roast lightly with garlic pepper and Worcestershire sauce then topped with Spanish onion wedges.  I covered and cooked the roast at 120ºC (250ºF) about 2 hours then added carrots, red potatoes and cabbage then adjusted the heat to 175ºC (350ºF), covered and continued cooking until the outside of the roast was nicely browned. 

rump roast dinner
The tomato stock provides nice flavour while tenderizing the meat.  The vegetables also help tenderize the meat via steam created while they are cooking.  Cabbage is an underused, frugal vegetable that when cooked this way has a wonderful sweetness without smelling up the kitchen.  Rump roast should rest about 5 minutes before cutting.  This roast slices ever so nicely!  Left-overs are ideal for roast beef sandwiches the following day.

Our rump roast dinner was scrumptious!  I served it simply with the roast beef slices and roasted vegetables topped with a thin pan gravy made from the drippings.  I used a cornstarch slurry to thicken the gravy.  It gives a silkier, thinner, clearer result than a flour slurry would.    It was a feast fit for the kings!


Tuesday, April 27, 2010

Roast Beef Dinner

Last summer I canned a few jars of tomato stock.  Tomato stock is the clear golden liquid that separates out of tomato purée.  It has a wonderful mellow tomato flavour so is ideal for adding a subtle flavour to soups, gravies, dressings and marinades.  The stock is slightly acidic so acts as a meat tenderizer as well.

roast beef dinner
I decided on a small (just under 4 lb) outside round roast cooked low and slow in the countertop roaster for dinner a couple of nights ago.  I seasoned the roast with Montreal Steak seasoning then added sliced onions and splashed on a little Worcestershire sauce.  Instead of adding a little water to the bottom of the roaster I added a 250 ml (half-pint) jar of tomato stock.  I set the roaster to 130ºC (250ºF) for about 3½ hours.  Then I removed the roast from the roaster to rest while I made the gravy.  Here's where things got a bit interesting.

The sliced roast beef was topped with creamy beef gravy then served with steamed potatoes, niblet corn,  freezer pickles and yogurt bread.  The creamy beef gravy got a lot of compliments.  It was just a bit different than plain beef gravy, quite rich and tasty.  The meat was tender, juicy and flavourful.  I really like the way the tomato stock enhanced the flavour of the meat and gravy.

Creamy Beef Gravy
There was about 2½ c tomato stock based reserve liquid from roaster.  I poured this liquid into a sauce pan then added 1 tsp Grace's browning and stirred in ½ c heavy whipping cream.  Then I brought this mixture to a low boil and stirred in a flour slurry and cooked until the gravy was thickened.  I strained the gravy before serving.


Sunday, December 27, 2009

Cranberry Roast Pork Loin

I very rarely buy foodie magazines although sometimes I am tempted by the food pictures on the front cover. The reason I avoid buying most foodie magazines is there ends up being one or two recipes worth trying but usually difficult to find in the midst of the copious advertisements. Instead, I get 2 free food related magazines that are put out quarterly - What's Cooking (Kraft Canada) and Food & Drink (LCBO, Ontario, Canada). Food & Drink leans towards a bit on the gourmet side but is a very valuable resource for enterainment cooking and cooking with beer, wine or spirits. I recently splurged one year subscriptions to Cook's Country and Cook's Illustrated. What I like about both of these magazines is the absence of advertisements. In addition to several recipes per issue there are great cooking tips and how-tos along with product reviews. These magazines will be a valuable resource in my kitchen!

roasted pork loin with cranberry sauceCranberry Roast Pork Loin

It is easy to get into a cooking rut when you preserve as much food as I do but the same can be said for anyone who keeps a very well stocked pantry. For example, fresh cranberries and commercially canned cranberries go on sale just before Thanksgiving so that is when I stock up. I freeze cranberries to cook fresh later or can as cranberry sauce. The majority of the time cranberries are paired with turkey but there is no reason they couldn't be used in another way, it's just I don't think to do so. So when it comes to cranberries I'm in a bit of a rut.

This month's issue of Cook's Country had a recipe for a roasted pork loin glazed with a cranberry sauce. Pairing cranberry with pork is not something I would have thought of immediately. I modified the recipe to half for a smaller cut of pork loin and I used home canned whole cranberry sauce. I also modified the roasting method. Of interest is the flavour of the cranberries was layered by using 3 forms as spoken about on Food Network Canada. Pictured is the roasted pork loin with the cranberry glaze just out of the oven.

Cranberry Pork Loin
source: modified from Cook's Country, December/January 2010, Pp. 10.

1½ lb pork loin roast
salt and pepper

1½ tsp butter
1 garlic clove, minced
⅓ tsp dried thyme
1 c whole cranberry sauce
¾ c cranberry juice
½ c dried cranberries
1½ tbsp ketchup
1½ tsp Dijon mustard
1 tbsp brown sugar
½ tsp white vinegar

1 tbsp cornstarch

Pre-heat oven to 220ºC/425ºF. Pat roast dry then season with salt and pepper. Score fat on top of roast in ½- inch intervals. Place pork, fat side up in baking pan. Roast 20 minutes. Combine the remaining ingredients except for cornstarch and about 2 tbsp of the cranberry juice. Bring to a low boil over medium-high heat. Reduce heat to medium low and simmer 5 minutes. Mix the remaining cranberry juice with the cornstarch to form a slurry. Slowly pour into the sauce while stirring. Continue to cook and stir until thickened. Spoon the mixture over the pork and continue to roast 20 to 25 minutes or the roast reaches an internal temperature of 63ºC/145ºF. Remove from oven. Let rest 10 minutes before slicing. Spoon sauce over slices for serving. Spoon the rest of the sauce into a serving bowl for passing at the table.

cranberry roast pork servedCranberry Roast Pork Dinner

Pork is considerably leaner than it was years ago due to the way pigs are raised in response to the demand for low fat meat alternatives. As a result the problem becomes keeping pork moist and tender after cooking. An easy way to do this is to use some type of sauce when cooking pork. I tend to use milk based sauces to help tenderize pork or fruit based sweet or savory glazes that add flavour when cooking pork.

The roasted pork smelled wonderful! I served the pork roast with baked Yukon gold and sweet potatoes and home canned green beans from the foodie road trip I made last summer. The meal itself ended up being low fat although that wasn't the original intention when I started putting things together. The cranberry sauce looked gorgeous and had good flavour but unfortunately lacked sparkle. I think it needed a touch of citrus specifically orange to brighten the flavour. The next time I make this I will substitute orange juice for the cranberry juice then garnish with orange zest. The white vinegar really didn't add any flavour so I would be tempted to use Basmatic or red wine vinegar instead. With a bit of tweaking to get that sparkle this will be a lovely cranberry sauce one that I may even can as a ready to use convenience product for the pantry.


Wednesday, November 18, 2009

Oven Roasted Spare Ribs (spareribs)

When it comes to home cooked comfort foods you can't beat spare ribs (spareribs, rack of ribs). We love visiting North American ribfests where we enjoy wonderfully barbequed racks of ribs. Our favourite cooking method for spare ribs at home is a long, slow barbeque. I have discovered that this method can be almost duplicated in the oven for those times during the winter months when running the outdoor grill for long periods of time is not all that appealing especially when you have to dig through the snow.

spareribs and sauce ready for ovenPreparation

Spareribs are the most inexpensive cut of pork and beef ribs. Typically they are a long cut from the lower portion of the pig or cattle, from the belly to breastbone, behind the shoulder including 11 to 13 long bones. Typically they are barbequed long and slow with or without a rub and quite often finished with a mop (wet sauce).

There was very little in the way of preparing the ribs.
I use both a slow braising and roasting method when cooking spareribs in the oven. I place the ribs in a roaster without a lid with about 2 c of water and sliced onions. I place the prepared on the lowest rack in the oven at 112ºC (250ºF) for 1½ hr. Then I pour on the desired barbeque sauce. This time I used Bulls-Eye Hickory flavoured barbeque sauce. I covered the ribs and continue cooking at the same temperature for 3 hours. Then I removed the lid, raised the temperature to 176ºC ª350ºF) and allowed the sauce to caramelize.

cooked spareribsCooked Rack of Ribs

The beauty of combining braising with roasting is you can enjoy great ribs without using the barbeque in the colder months. The end result using this method is richly flavoured ribs with meat that literally falls off the bone. The meat is very moist and tender. Pictured are the two steaming hot rack of ribs just out of the oven. There is not nearly as much sauce as it looks on the bottom but enough to spoon a little sauce over the ribs if desired.

Usually 4 - 6 ribs is a good sized serving although at ribfests and in many restaurants they sell full or half rack of ribs. A half rack of ribs would be about 6 ribs. Two rack of ribs are enough to feed 4 to 6 people but some have been known to eat an entire rack of ribs themselves.

Rack of Ribs Dinner

Dinner consisted of a 4 rib piece from one rack of ribs which was more than sufficient. I didn't cut it into individual ribs because cutting it is part of the fun of eating ribs. The ribs were served with home canned green beans and oven baked potatoes. Since the oven was already heated cooking the ribs it was only logical to put potatoes in for baking. Oven baked potatoes with their crispy skins and soft flesh are always delightful!

The sauce was true to form deep and richly flavoured while a nice hickory smoke aroma filled the house. The meat was melt in your mouth tender. It was a lovely, comfort meal that was easy to put together bringing the tastes of summer barbeque into the kitchen during the cooler weather.


Tuesday, October 27, 2009

Prime Rib Roast

Prime rib roasts are on sale here so despite having filled freezers my husband couldn't resist picking up one. Then he went online to find a different way to prepare the prime rib. What he found was rather humourous instructions as to how to cook the prime rib to perfection. Well the method looked like it would work so we decided to try it.

prime rib roastJust look at that beauty of a prime rib roast (1). My husband tubbed it with garlic and onion powder, Lawrey's seasoning salt, garlic pepper. Then he set it on a rack in the roasting pan roasted it for 28 minute 500ºF then turned off the oven for 2 hours as instructed. Here is where things when wrong. Our oven has a fan specifically meant to cool the oven quickly when it is turned off something the instructions did not take into consideration. The instructions said not to open the oven for 2 hours under penalty of death for any reason. After an hour we couldn't smell any roast smell so we left it a bit longer before making the executive decision to change the instructions. So from that point we were on our own. We turned the oven to 350ºF and continued roasting the prime rib until it was medium rare (2). The roast had a nice crust but was moist, tender and cooked to perfection inside (3). We served the prime rib slices (4) with the au jus (not shown), steamed potatoes and niblet corn. The meal was simple enough with a fair amount of prime rib left over.


Wednesday, September 30, 2009

A Bit of Kitchen Chit Chat

It's been a steadier, do something daily kind of a main preserving season this year. The kitchen has been a whirl wind of activity for much of September. The main focus has been on preserving foods to restock the pantry, using garden produce and rather simple, homestyle meals. At the same time we have still been able to get away for a meal out or a couple of days away.

gourmet pizzaGourmet Pizza

Last weekend we decided to take a couple of days off to visit the grandbabies and their parents in the GTA. We decided to keep the travel time to a minimum by not stopping to eat on the road. The first night at the home of oldest and youngest grandbabies we enjoyed homemade French fries and deep fried chicken wings. It was a lovely, homestyle meal. The following day after a hot breakfast we were on the road again to visit middle grandbaby and parents. They took us to Home Depot® in the afternoon then we ordered delivered gourmet style pizzas and chicken wings for dinner.

We very seldom order in pizza at home because we are out in the boonies with the cheapest delivery charge in the $10 range. However, we make homemade pizzas from scratch quite often. What I love about ordering pizza in the GTA is the choice of toppings. I always get great ideas for our homemade pizzas! You can even choose from several cheeses rather than the regular mozzarella cheese! Pictured is one of the pizzas we ordered. It has Asiago cheese, Portabello, zucchini and hamburg on it. This really was a nice tasting pizza one that could easily be duplicated at home.

California style blineNew Blind

We have been in this house a little over two years now and despite a lot of work that we have accomplished, window treatment has until now been pushed to the back burner. Our house is such that window treatment is not needed for privacy and for some windows hinders the massive water view so we've basically just left it. In the interests of energy efficiency though we are now dealing with this issue. We want window coverings that can help minimize heat loss during the winter nights yet be opened completely during the day to enjoy the water. At the same time we want something that reflects the flavour of the house.

We decided on California 2-inch wide wood blinds for the kitchen window. My husband spent a good portion of the afternoon hanging the blinds which were a bit more complicated than expected. I think they look rather spiffy! The next set of blinds to go up will be on the patio door in the kitchen. They will match but we aren't sure whether they will be the same style or vertical. Following that the window in the family room in front of the dining table is next that will be wood 2-inch wide blinds to match the woodwork. I'm looking forward to even lower heating costs this year!

pot roastPot Roast

Doing a trip to the kids spending only one night is extremely tiring. We arrived home about 11 pm Saturday night to find that the router was acting up when powered up. So it was after 1 am before we went to bed frustrated with the whole situation. The following morning was spent trying to fix that problem then in the afternoon hanging the blind. Ee were both exhausted!

Honestly the weather has turned cold enough here that it really feels like winter. It is quite cool in the house so I put a sirloin tip roast into the countertop roaster for dinner. I kept it quite simple by pouring a little Diana Sauce® over the roast and topping with onion slices. An hour before dinner I added small, whole white potatoes and niblet corn. It was a simple yet homestyle meal that took very little effort yet gave that cozy, comfort effect with enough leftovers for lunch and dinner on Monday.


Friday, September 04, 2009

Pot Roast and Stuffed Mushrooms

Oh my gosh! Looking back over the two main summer months they were dismal to say the least. It was unseasonably cool with above average rainfall. Our main living level hovered around at a balmy 20ºC (68ºF) for most of the summer. Several nights the temperatures dipped down to 15ºC (60ºF) tempting me to turn on the gas fireplace but I didn't. Instead I curled up in a cozy, homemade knit afghan. Most days I wore sweaters and long pants indoors. It definitely was a summer unlike our normal hot, humid weather! Unlike other summers where most food is cooked outdoors it became a summer of finding excuses to cook indoors just for a bit of extra heat.

stuffed mushroomsStuffed Mushrooms

Sunday afternoons are usually set aside for family and in the summer boating. The cooler temperatures meant less boating and more home time. My husband had picked up mushrooms for one of his he said/she said contest recipes (Burgers with Mushroom Sauce) so the following day I decided to use half of the remaining mushrooms to make stuffed mushrooms topped with Asiago cheese. I posted earlier about escargot stuffed mushrooms, one of our favourite appetizers.

I stuffed the mushrooms for the pictured appetizers using a simple bread stuffing. The stuffing consisted of a couple of left-over hamburger buns broken into small pieces, chopped onion, homemade poultry seasoning, salt, pepper and a few dabs of soft butter. Then I pressed the stuffing into walnut sized balls and placed them in the prepared mushroom caps, topped with Asiago cheese and baked at 176º C (350ºF) until the cheese was golden brown and bubbly. This is a simple yet sure to please appetizer!

pot roastPot Roast

Later that same afternoon we debated hauling our our winter jackets, gloves and hats so we could go out on the boat. We had planned on a day of boating and eating out but it was seriously one of the coldest days of the summer, more like a very crisp fall day! I took one look at my husband curled up in an afghan on the couch watching golf and made the executive decision we were staying home. I pulled a small rump roast from the freezer and popped it into the countertop roaster set to 120ºC (250ºF) with a bit of water and seasoned with sliced onion, Montreal steak seasoning and a couple of small bay leaves. About and hour before dinner I added potato and carrot pieces. The gravy was thickened in the roaster once the roast and vegetables were removed. This was a very easy meal to put together on a very unseasonably chilly, lazy summer day!


Wednesday, March 04, 2009

Roasted Chicken Dinner

The traditional family meal for many families is roasted chicken in cooler months but you know roasted chicken makes an excellent weekday meal as well. Chickens are generally small enough that they can be roasted in about an hour in a conventional oven depending on the size of the chicken. The perfect weekday to roast a chicken is one that you either don't have to work or a day that either yourself or another family member can put the chicken on about 4 pm if you normally eat at 5:30 pm. If you are a WAHM, SAHM or homemaker roasting a chicken on a weekday makes perfect sense. Why would you want to roast a chicken on a weekday? The reason is quite simple. Not only will you enjoy a lovely, comfort meal but there will likely be enough left overs for the following day's lunch not to mention the carcass for when you want to make stock.

roasted chickenRoasted Chicken

We love roasted chicken but whole chickens are expensive here averaging over $8 each. I can actually buy a cooked, ready to serve rotisserie chicken from the deli for $5! For a few dollars more about the $12 range I can buy a turkey in the US when they are on sale so I don't roast whole chickens very often. Whole chicken can be roasted unstuffed on a broiling pan or stuffed using a simple stuffing made with homemade poultry seasoning.  The roasting time for chicken is 20 minutes per lb at 135ºC (350ºF) in a conventional oven. Internal temperature should be 75ºC (165ºF) using a meat thermometer. Do not over cook as this will dry out the chicken.

I have mentioned several times on this blog how much I enjoy using my Hamilton Beach® 6.5 quart countertop roaster. What I have noticed is that foods cooked in this roaster cook considerably faster and that includes roasted chicken. Using a countertop roaster of this size can easily shave off a good half hour of roasting time for chicken something that is appreciated when roasting chicken anytime. Roasting using a countertop roaster saves both time and energy costs!

roasted chicken gravyGravy

Some people pour the drippings and any liquid from the roasting pan through a strainer into a sauce pan then thicken for gravy. This is not a good idea for a few reasons. First and foremost you are losing a lot of flavour by using this method. Always make your gravy in the roasting pan. The only time this will not work is if you roast in a clay baker. For that reason a clay baker is not the best choice for roasting. Straining the gravy before making it removes all those little tasties that add to the flavour of the gravy as well. Leave these bits and pieces in the pan while you make the gravy. Pour your gravy through the strainer into a gravy separator before serving the gravy.

roasted chicken dinnerRoasted Chicken Dinner

Monday I roasted a chicken for dinner using the countertop roaster. I served the roasted chicken with stuffing, steamed spinach and reheated sour creamed potatoes left over from Saturday's dinner. It was a lovely, comforting meal on a cold, blustery March night.

Often vegetables are overcooked which is a shame. When you overcook vegetables not only do they lose visible appeal, the texture becomes mushy and they also lose valuable nutrients. One of the worst offenders is boiling vegetables to cook them. Instead, I prefer steaming vegetables to al dente (meaning with bite) to keep their beautiful bright colours and nutrients. Steaming your vegetables also saves you energy costs. So instead of covering those vegetables with water to cook them, try steaming instead. I'm sure you will love the results!

I reheated the left over sour creamed potatoes in a covered glass casserole dish for about 20 minutes at 135ºC (275ºF). Quite often reheated potatoes can be drier in texture and that is because they lose moisture during the reheating process. Covering the casserole dish with a lid ensured any moisture in the potatoes stayed in the potatoes to keep them moist. They warmed up nicely!


Sunday, February 22, 2009

Roasted Garlic Revisited

Roasted garlic is a true culinary delight! The problem with roasting garlic is it takes a long time for a little bit. For that reason I like to roast up a lot of garlic at one time then freeze it for later use. I posted my method for making roasted garlic on the grill. When we were at Sam's Club I picked up a large sleeve of garlic so decided to roast garlic except the grill is under a good foot of snow. I decided to use the countertop roaster. Why? My oven costs 27.6¢ per hour to operate whereas the countertop roaster costs 9¢ per hour. Now this isn't a lot of money but it does add to the overall costs.

Roasting

I only needed the countertop oven roaster, a large sleeve of garlic and extra virgin olive oil (1). I had 19 large heads of garlic but only 18 would fit in the roaster pan. I removed the excess skin and cut across the heads to reveal part of the garlic cloves (2). The tips of garlic cloves were saved for another use so as to not waste while the heads were drizzled with extra virgin olive oil. The roaster was set to 200ºF then left alone to roast until the house smelled of wonderful garlic and the cloves were a golden carmelized colour (3). The only way I know of being able to get the luscious roasted golden garlic nuggets (4) out of the skins is to use your fingers. A bit of pressure or a little persuasion will have those beauties right in the bowl ready for freezing.

Freezing

Once I had all of the roasted garlic cloves into the blow I washed my hands well then was on to mashing them up. The cloves mash nicely. Then I spooned the roasted garlic mash into a mini 1" cupcake tin for freezing (5). This gave me a 1" diameter by ½" high or about 1½ tbsp of roasted garlic. This is just the perfect size for adding into soups or stews. If you haven't had potato soup with roasted garlic you seriously do not know what you have been missing! Once the garlic was frozen I transfered the small pucks into two freezer bags. I like using zipper style bags for this purpose but what I do to protect the garlic is to pack with a soft vacuum until frozen then place that bag inside a freezer vacuum bag and vacuum seal. This protects the flavour and prevents any freezer burn.


Monday, November 26, 2007

Roasted Chicken & Wild Rice Soup

There's nothing more comforting than a hot, steamy bowl of homemade soup on cold, wintery days. We have our tried and true family favourites but it is always fun trying new soups. Quite often we will find one we like enough to add to our family favourite recipes. So it was with the roasted chicken and wild rice soup.

Roasted Chicken & Wild Rice Soup

The weather has turned colder here. We've had wet snow flurries but no accumulation yet. Friday night we made roasted chicken and wild rice soup. This is another great recipe from our soon to be daughter-in-law. Like all recipes, I made a few modifications. The end result was a rich, creamy soup with a lovely flavour. I think turkey could easily be substituted for the chicken for an equally tasty soup. This one is a definite keeper!

Roasted Chicken & Wild Rice Soup

3 c cooked organic long grain and wild rice mix
1 tbsp olive oil
1 ½ c chopped red onion
1 c chopped celery
1 c carrot coins
2 garlic cloves, minced
2 c sliced mushrooms
¼ c unbleached flour
1 ½ tsp Herbs de Provence
2 c water
2 tbsp dry Sherry*
2 L homemade chicken stock
1 12 oz can evaporated milk
3 c roasted skinless chicken cut into small pieces
3 drops Natural Hickory Liquid Smoke**

Cook rice in rice cooker and set aside. Prepare vegetables. Heat oil in stock pot over medium heat. Stir in onion, celery, carrots, garlic and mushrooms. Sauté about 5 minutes until onion is tender. Stir the flour and Herbs de Province into the onion mixture. Cook for one minute, stirring frequently. Add water, sherry, broth and evaporated milk. Bring to a boil. Reduce heat and simmer about 20 minutes or until slightly thing. Stir in cooked rice and chicken. Cook for 10 minutes or until thoroughly heated.

* I used Bright's Classic Cream Canadian Sherry. This is a smooth "round" sherry that has been matured in small casks.
** Go easy with the liquid smoke as it can be overpowering if you add too much so it is best to add one drop at a time, stir and taste before adding more. Repeat until you get the desired effect.