Cook ingredients that you are used to cooking by other techniques, such as fish, chicken, or hamburgers. In other words be comfortable with the ingredients you are using.
--Bobby Flay
For Your Information
Please watch this area for important information like updates, food recalls, polls, contests, coupons, and freebies.- [March 19, 2020] - Effective Mar 17, this blog will no longer accept advertising. The reason is very simple. If I like a product, I will promote it without compensation. If I don't like a product, I will have no problem saying so.
- [March 17, 2020] - A return to blogging! Stay tuned for new tips, resources and all things food related.
- [February 1, 2016] - An interesting report on why you should always choose organic tea verses non-organic: Toxic Tea (pdf format)
- Sticky Post - Warning: 4ever Recap reusable canning lids. The reports are growing daily of these lids losing their seal during storage. Some have lost their entire season's worth of canning to these seal failures! [Update: 4ever Recap appears to be out of business.]
Popular Posts
-
Yesterday I wrote briefly about our recent road/camping trip that took us from southwestern Ontario through the thumb of Michigan, across L...
-
Meats and fish that are smoked are packed full of flavour. You can buy a wide variety already smoked or smoke your own meats using a stand ...
-
Pork is the remains a popular meat of choice for curing with bacon and ham being the most popular. What many don't realize is curing me...
Home canners by nature tend to be a rather frugal segment of the population. While the primary goal is to put safe, healthy, additive food on the table as well as provide a cushion in the form of a well stocked pantry, the economics of home canning cannot be overlooked. Home canning can save a considerable amount of money and more so if you know how to use the waste or excess from home canning that might otherwise be discarded.
I canned
peach slices using a light syrup (2¼ c sugar in 5¼ c water). There was about a cup of the syrup leftover so I let it cool then refrigerated. The following day, I made another solution of the light syrup and added to the first to cook peaches for a batch of
candied peach slices. Essentially the wonderful flavour of peaches was infused into the remaining syrup. Many would be tempted to discard the syrup but why?
This delicious syrup is perfect for topping ice cream, pancakes or waffles and it can be used in baking and cooking. I brought the syrup to a boil and ladled into hot jars then processed for 15 minutes in a boiling water bath canner. The yield was 7 - 250 ml jars of peach syrup. That's not bad considering I took a waste product of canning and turned it into a usable, delicious product for the pantry.
My gosh have you ever had one of those total duh moments when you could easily made a homemade substitute for a store bought item at the fraction of the cost. I posted awhile ago that one of my new favourite drinks was London Fog that is supposed to use vanilla syrup but I was just using a little pure vanilla extract. After doing a bit of research I realized there were a multitude of beverage syrups available for flavouring teas and specialty coffees. Most were priced in the $10 price range but since you use so little that didn't look like a bad price until my frugal bone reminded me that flavoured syrups are quite easily made at home at a fraction of the cost of store bought.
 Vanilla Syrup Ingredients
I decided to make vanilla syrup for my London Fog drink. The general ingredients for any syrup are sugar, water and flavour. I had two 100% pure vanilla extracts to work with, one a clear and the other dark vanilla extract my husband brought back from the Dominican. I reserve the clear for those dishes where I don't want an off colour imparted to the dish. I decided to use the dark extract for this syrup.
I keep most bottles and jars especially the cute ones to reuse just for this type of purpose. A funnel is really helpful for filling the bottle. Other than that no special equipment is necessary.
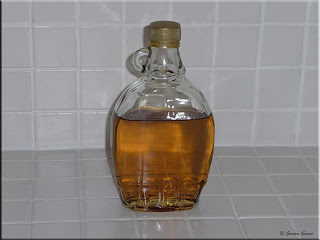 Homemade Vanilla Syrup
Making an unflavoured syrup is as easy as mixing equal amounts of granulated cane sugar and water in a saucepan. Bring that to a low boil then reduce heat and simmer 5 to 7 minutes until it slightly thickens. Remove from the heat and let cool until the outside of the saucepan. Using a funnel pour the syrup into a bottle of your choice. Add ¾ tsp pure vanilla extract. Cap the bottle then gently shake. Allow the syrup to cool completely then refrigerate. Use as desired for flavouring beverages. The dark pure vanilla extra gave a light amber hue to the syrup but that is fine for the purposes it will be used.

Saturday was a blueberry day! I started a bit early working on the blueberries I picked up on the foodie road trip. The kids were arriving shortly with the grandbabies so I knew there would be little time to spend on canning. It's always such a pleasure when the grandbabies come as the are all turning out to be real foodies not that we could expect anything different. For those who do not know we have 3 grandbabies, the oldest is 30 months, the second is 16 months and the youngest is almost 4 months. The oldest and youngest are sibs and the second is an only. All are just as cute as a they can be, simply adorable! Ok, so onto blueberries. Oh I should mention the two oldest grandbabies love blueberries!
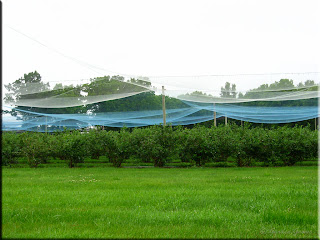 Blueberry Field
I mentioned in one post about U-picks. Pictured is a U-pick blueberry farm. Blueberries grow on bushes about 4' - 5' tall. As U-picks go this is rather nicely laid out with nicely grassed paths. Don't let that fool you. Sturdy shoes preferably with socks are a must. As you move through the paths picking your berries you will encounter dust and insects. You may even spot the occasional snake or toad. When you arrive at a U-pick you park then register to get your baskets. This does vary from U-pick to U-pick as some will simply weigh your pail then calculate the weight of what you picked and charge based on kilograms rather than L. You will notice from the picture there is no actual shading which means you will need sunblock and hat. I always advise carrying a refillable water bottle with you when you pick to prevent dehydration. The netting above the blueberries is to keep the birds from enjoying a free meal.
 Fresh Picked Blueberries
When blueberries are ripe they are a deep bluish purple with a dusty blue haze. They are firm to the touch with a sweet, almost tangy taste. Blueberries will keep well for several days after picking. For best canning results process the berries as soon as possible after picking for optimal nutrition.
Cleaning blueberries is quite easy. When you pick blueberries the stem may stay attached to the berry. Remove this while cleaning. Do not use any unripe blueberries that are more of a red colour. Any over ripe or squished berries should not be used either.
A bit of a warning should come with blueberries. The juice stains! I advise wearing an old t-shirt that you don't care about when processing blueberries and keep plenty of wet dishcloths on hand to clean-up any spatters as you go.
 Blueberry Products
Pictured are 3 of the blueberry products I made. They are blueberry syrup (3), blueberry juice (2) and blueberry pie filling (1). You will note the jars are arranged from last to first batch meaning the blueberry syrup was the last batch out of the canner. There is a reason for this. The last batch is always closest to the canner to save on the distance I have to move jars. The jars are always arranged in rows according to what they are. I know what they are but using this method ensures that they are kept straight prior to labelling. As you can see in the jars these 3 products look quite similar!
The blueberry pie filling (1) is one you really will want to keep a few jars on hand. It's easy to make and tastes delightflur! As always please read the notes at the end of the recipes.
Blueberry Pie Filling
source: Bernardin Ltd. Bernardin Guide to Home Preserving, 2006. Toronto, Ontario. Pp.43.
7 c blueberries
1⅔ c granulated sugar
⅔ c Clear Jel® starch
2 c water
2 tbsp lemon juice
1 tsp grated lemon peel (optional)
Wash and stem blueberries. Bring a large saucepan of water to a rolling boil then add blueberries. Blanch 1 minute. Drain the blueberries [reserving the liquid*] and keep warm. Combine sugar and Clear Jel® in a large sauce pan. Whisk in the water and bring to a boil. Cook and stir until the mixture thickens. Stir in lemon juice and peel. Cook 1 minute. Fold in the blueberries mixing well. Ladle into prepared jars leaving 1 - inch headspace. Wipe rims. Adjust 2 piece lids. Process 30 minutes in BWB at altitudes below 1,000 ft above sea level. At higher altitudes refer to the processing times on the altitude adjustment chart.
*My Notes: reserve the liquid to make blueberry syrup
I canned one jar of the reserve blueberry juice to use for baking. Then I used the remainder to make another batch of blueberry syrup modified from the recipe in the Ball Blue Book. If you recall the last batch of blueberry syrup I made was from Jean Paré's Preserves. As always when canning you may want to try two or three recipes to see which one you prefer.
Blueberry Syrup
source: modified from Alltrista Corp., Ball Blue Book, 2001. Pp. 76
5 c blueberry reserved juice (from pie filling)
2½ c sugar
1 tbsp lemon juice
Combine juice and sugar in large saucepan. Bring to a boil then boil 1 minute. Stir in lemon juice. Ladle into prepared jars ¼ - inch headspace. Wipe rims. Adjust 2 piece lids. Process 10 minutes in BWB at altitudes below 1,000 ft above sea level. At higher altitudes refer to the processing times on the altitude adjustment chart.




 Vanilla Syrup Ingredients
 Homemade Vanilla Syrup
 Blueberry Field
 Fresh Picked Blueberries
 Blueberry Products
 Preparations
 Blueberry Pulp
 Out of the Canner