Cook ingredients that you are used to cooking by other techniques, such as fish, chicken, or hamburgers. In other words be comfortable with the ingredients you are using.
--Bobby Flay
For Your Information
Please watch this area for important information like updates, food recalls, polls, contests, coupons, and freebies.- [March 19, 2020] - Effective Mar 17, this blog will no longer accept advertising. The reason is very simple. If I like a product, I will promote it without compensation. If I don't like a product, I will have no problem saying so.
- [March 17, 2020] - A return to blogging! Stay tuned for new tips, resources and all things food related.
- [February 1, 2016] - An interesting report on why you should always choose organic tea verses non-organic: Toxic Tea (pdf format)
- Sticky Post - Warning: 4ever Recap reusable canning lids. The reports are growing daily of these lids losing their seal during storage. Some have lost their entire season's worth of canning to these seal failures! [Update: 4ever Recap appears to be out of business.]
Popular Posts
-
Asparagus, Yellow Wax Beans, Kentucky Wonder Pole Beans, Herb Glazed Carrots, Corn Natalie made a comment on yesterday's entry reques...
-
As a result of milder fall temperatures the pepper plants were still producing nicely through the mid portion of last week. The plants were...
-
Peameal bacon is a cured pork loin that has not been smoked. It is not to be confused with bacon sold as "Canadian Bacon" which i...
We do not grocery shop on any type of regular schedule. Rather we cherry pick the sales to replenish fresh fruits/vegetables, certain dairy and dried food products and any in store specials. On average we spend $25 per week although there are some months we may only spend that amount. Both of us always check the meat sales but only buy if it is a good sale.
Yesterday my husband stopped at the grocery store to pick up green onions, spinach and celery. He is really good at getting only the items on his list but like me cannot pass up a good meat sale. T-bone steaks were on sale so he picked up 2 for dinner bringing his grand grocery total to $12.37 bringing our total grocery purchase for the week to $28.25. Toilet paper was on sale 30 rolls for $3.97 so he picked up 4 packages earlier in the week. Not bad eh?
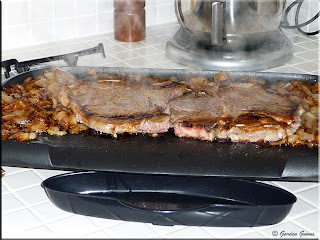 T-bone Steaks
We buy beef on the hoof that includes steaks custom cut to 1 - inch thick. This is a great thickness for grilling but in my opinion a bit too thick for pan frying or cooking on the griddle. Store bought steaks are usually cut to ½ - inch or a bit thinner making them ideal for pan frying but making it easy to over cook them on the grill. Cooking a thinner steak so that it maintains that melt-in-your mouth tenderness can be a challenge so we borrowed an idea we have long used when cooking liver and that is to cook the steak with the onions. This method always works! The end result is a nice flavourable, very tender piece of meat.
Method: Peel and chop Spanish onion. Heat griddle to 185ºC/365ºF. Place two generous pats of butter on the griddle then pour the onion pieces onto the griddle. Allow to cook until just lightly caramelized. Push the onions to the sides. Place the steaks on the griddle then surround with onions. Cook the steaks 5 minutes each side. Remove from griddle. Serve with choice of sides and caramelized onions.

I have been steadily going through the freezers cooking at least one thing from the freezer for each dinner in preparation for the arrival of our bulk beef purchase this coming weekend. The cow goes to the abattoir on Thursday so with any luck we will be able to pick it up Saturday morning. Now, the biggest problem me being away for 2 weeks I am really juggling to free up freezer space. I cooked up the last of the Cowboy steaks in the freezer. I previously posted on Cowboy Steaks (here and here).
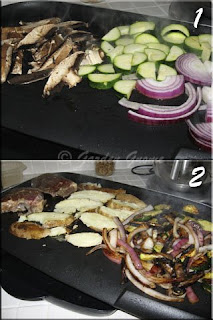 Cooking on Griddle
Cooking cowboy steaks on the griddle was nothing new. What I did for these steaks was a bit different. I decided to cook the entire meal on the griddle. In order to do this on the griddle the food was actually cooked almost in reverse order to what you would expect.
I prepared the vegetable side first that consisted of portabello mushrooms, zucchini and red onions on the griddle set to 180ºC (350ºF) and a little extra virgin olive oil (1). Once the vegetables started caramelize I added sliced baked potatoes and the steak (2). The steak was cooked to medium rare just when the vegetables were ready.
What really impresses me about using a griddle to cook a full meal is anyone can do it. It does not matter if you live in an apartment or it's the middle of winter you can have close to the taste of grilling without the smoke of an indoor grill. I have two indoor grills, one a stove cartridge and the other a tabletop model. Smoke is controlled on the stove by using the downdraft whereas smoke is controlled on the tabletop by adding water to the bottom reservoir. The griddle is different. You won't get anything more in the way of smoke than you would using large skillets. You have a bit more temperature control and less clean-up using the griddle.
 Cowboy Steak Dinner
The griddle cooked meal came out perfectly! I really liked the way the potatoes crisped up just a bit. The vegetables were nicely caramelized and the steak wonderful. I added fresh sliced tomatoes that enhanced the flavour of the meal.
Cooking on an indoor griddle offers a few new possibilities. It will not replace an outdoor or indoor grill but it does do a nice job without much in the way of smoke. I think the best meats for this purpose are boneless, skinless chicken breast or lean boneless pork chops or lean boneless steak. I wouldn't suggest using any cuts of meat with bone in. I would recommend choosing vegetables like mushrooms, onions and zucchini instead of harder root vegetables unless they are pre-cooked and just need warming through with a little caramelization. Add a fresh vegetable side like a salad to round out the meal.
Enjoy!
Garden Gnome
©2006-2009
My husband is currently working some very long hours, leaving between 4 and 5 am daily and arriving home between 7 and 8 pm. There have been quite a few times that we eat dinner that late but right now by the time he gets home he doesn't feel like a big meal. What I've been doing is making dinner as normal then plating his up for his lunch. So his big meal is mid-day with a smaller meal when he gets home. I'm relying heavily on the freezers and pantries because growing season is just around the corner and our beef bought on the hoof will be ready soon. That means I need to clear space especially in the freezers. Wednesday night I cooked up a couple of cowboy steaks using the griddle.
 Using the Griddle
I previously wrote about the cowboy steaks we bought to support a local group. Pan frying is actually recommended because these steaks are marinaded but they were good prepared that way. This time I decided to try using the George Forman Griddle we were gifted with. Yes I have an indoor grill cartridge for my stove and a tabletop indoor grill but I wanted to see exactly how the griddle would perform. I know it performs well for breakfast foods and making English muffins. The best way to test this is to see what else it can cook well!
The meal consisted of a cowboy steak with a side of sautéed onions and zucchini, nothing that could not have been prepared using a couple of frying pans. I set the griddle to 350ºF and added just a little olive oil. First on were the steaks followed by the onion slices and zucchini pieces.
 Cowboy Steaks
Cooking these marinated steaks on the griddle was entirely different than cooking in a fry pan. I found the steaks caramelized better without losing much in the way of moisture. The onions even crisped up and caramelized better. The zucchini that was added last maintained its great green edging. In terms of taste this meal was a real winner hands down. The meat was cooked nicely to medium rare and the vegetables were nicely caramelized. It was a very nice meal.
In terms of energy usage the griddle used 1500 W per hour (18¢/hr) per hour compared to using the large burner at 2000 W (24¢/ hr) and the small burner at 1250 W (15¢/hr). For 18¢/hr I cooked a meal that would have cost me 39¢/hr to cook my conventional means. That's not a lot of saving but every time you can save on cooking costs it is one more way of reducing those food costs. Don't forget you are saving those all important kWh and every kWh does count!
The meal tasted great and I saved energy so what was the negative? There really wasn't a negative. In fact I enjoyed using the griddle so much for this purpose that I will likely choose it over the frypans in future. Clean-up was ever so easy so that was not a negative. However, I wiped down my back splashes simply because cooking this way will add a bit of a greasy film into the air that will settle on surfaces. This really is minor but still more than what you would get using splatter screens on a frypan.




 T-bone Steaks
 Cooking on Griddle
 Cowboy Steak Dinner
 Using the Griddle
 Cowboy Steaks

 English Muffins
 Breakfast