Strawberries are in season! We have been enjoying them fresh or sliced with fresh whipped cream. But the strawberry season is so short that we really need to preserve them for winter enjoyment. The first things that come to mind are jam, drying and freezing. This lovely batch went to making a gourmet, low sugar jam.
Local Strawberries
It's been a rather cold and wet spring in our area so the berries are a bit smaller. Our strawberry bed has not been re-established since the move. There was a small bed here but it was overgrown and weaving through evergreens so that was one of the beds we had to remove. My last beds were producing almost 2 quarts per day not quite enough for a batch of jam. Like many I go to a local U-pick for strawberries for larger quantities when my beds are not producing enough. Picking your own is cheaper than buying the strawberries already picked. The current price for already picked strawberries is $15 per flat (16 quarts). I seldom pick my own there simply because I like to get the jamming done in the early morning before the day heats up. What I look for when buying strawberries from the U-pick aside of the quality of the berries themselves is the temperature of the berries. I usually hit this one before 9 am. If the berries are cold to the touch it means they were picked the day before then refrigerated overnight. I don't want those. The berries picked that morning don't feel chilled and have a better flavour for making jam.
The first thing that comes to mind when you mention canning to anyone is jam followed by pickles. The question whether you are saving money making jam always arises. The answer is both yes and no. If you are buying at a U-pick, yes you will save a bit but per jar the cost will not be as low as jam bought from a dollar store. However, what you are getting is a high end, gourmet type jam so in that respect you are getting a high quality product for about half the price of store bought.
Low Sugar Strawberry Jam
My conventional recipe using regular pectin can be found here. here. For this recipe I use Pomona's Pectin for a few reasons. This pectin means you do not have to rely on sugar for the jam to set. That means I can use less sugar (cost savings) but end up with a higher quality fruit laden product. The down side is because unlike regular pectins that would call for 7 c of sugar per 5 c of fruit there is a lower yield. But that is more than acceptable for me given that I'm going after quality not quantity. This jam is well worth the extra costs.
I used organic sugar for this recipe. It was considerably less than the 7 c of sugar per 5 c of fruit the regular pectin called for. I only used 2 c of organic sugar per 4 cups. Even at that I think the next batch will be using 1½ c per 4 cups and I plan on making at least one batch using honey.
Low Sugar Strawberry Jam
8 c mashed strawberries*
2 c organic sugar**
4 tsp Pomona's pectin
4 tsp calcium water
Wash, hull and mash berries.
* Four quarts of strawberries.
** A sugar substitute can be used for this recipe. If using Spenda, use the same amount of ¾ - 2 c per 4 c of prepared fruit. If using honey, use ½ - 1 c per 4 c prepared fruit. Add the calcium water to the fruit and stir well. Measure the sugar or honey into a separate bow. Mix the pectin with it. Bring the fruit to a boil. Add the pectin mixture stirring vigorously for 1-2 minutes. Cook to dissolve pectin. Return to a boil then remove from the heat. Fill hot, sterilized jars leaving ¼-inch headspace. Wipe rims. Adjust tow piece lids. Process 10 minutes in boiling water bath canner.
Yield 4 - 500 ml jars.
Welcome to our kitchen that truly is the heart of our home! One of life's greatest pleasures is enjoying good food with family and friends. Here you will find recipes, tips for frugal cooking, how-tos for food preservation especially canning and anything else food related. Tea is brewing and warm cookies are fresh from the oven. Please sit a spell and enjoy your stay.
Pages
▼
Monday, June 30, 2008
Sunday, June 29, 2008
Three of My Favourite Sandwiches
We are not big sandwiches eaters not that we don't like sandwiches. I'd have to say that the majority of sandwiches we eat are during the summer months when the garden is producing nicely. We use both store bought and homemade breads for making sandwiches. Sandwiches are perfect summer food because they don't heat up the kitchen. They are also easy to make under 15 minute meals that are sure to please. The beauty is in their simplicity. The only negative that can be said about sandwiches is they are a no no if you are restricting your carbs. Other than that they can be quite healthy for you especially if you use whole grain breads.
Fried Egg Sandwich
Fried egg sandwiches have long been a family favourite and not just for breakfast. There is just something comforting about them. They aren't fancy but they sure are good any time of the year.
Method: You will need one egg per sandwich. Heat a little vegetable oil* in a fry pan to medium. Fry eggs until the white is starting to turn opaque. Prick the yolk with a fork and spread a bit through the white. Cook until set enough that the egg can be turned. Turn the egg and lightly fry on the other side. Lightly butter** two pieces of toast. Place a fried egg on one piece of the toast. Sprinkle on a little sea salt and fresh ground pepper. Add a slice of cheddar cheese if desired. Top with the other slice of toast. Cut as desired.
* To reduce fat use a non-stick fry pan and healthy spray oil mister.
** The butter enhances the flavour not as a spread so only use a small amount on each slice of toast.
BLT
Tomatoes are one vegetable you really do need to grow even if only in containers on a balcony. Step away from those pale, tasteless tomatoes in the grocery store and discover the wonderful varieties of tomatoes out there. They fall into three categories (sauce, slicing, grape/cherry) and can be heirlooms or hybrids. Some hybrids taste wonderful but might be lacking in disease resistance whereas others pack a punch of taste. As a gardener there are reasons for growing both and for saving seeds from both although hybrids do not breed true but you can get some interesting outcomes.
By far our favourite summertime sandwich is plain toasted tomato made with a thick slice of beefsteak tomato plucked fresh from the garden moments before slicing. One tomato (eg. beefmaster) can easily give slices large enough to cover the bread yielding enough slices for five or six sandwiches. Never, ever refrigerate your tomatoes! It will turn them mealy and lessen their flavour.
A BLT (bacon, lettuce and tomato) is simply just that but made with home made sourdough toast, well it it excellent! Of course home grown tomatoes and romaine lettuce are a must but in a pinch you can use store bought local romaine lettuce. The real key is you want the ingredients as fresh as possible. Don't be shy on the slice of tomato either. Slice to almost ½ - inch thick. Bacon should be cooked to just under crispy.
Mom's Power Sandwich
Family must have recipes tend to be named Mom's meaning that's the way I do it and that's the way they want it. That becomes Mom's Lasagne, Mom's Chicken Soup and those dished the kids insist on making the same way. This is one of those sandwiches that made it into the Mom's must haves and yet there is no cooking involved other than the 12 grain bread.
Method: I really recommend using homemade 12 grain bread. I start with spreading a little Miracle Whip® on each slice of bread. On one slice I layer romaine lettuce or mesclun mix picked just before making the sandwich. I top that with thin sliced ham and turkey along with by just a little Dijon mustard then add a thick slice of tomato also fresh picked. Thin red onion slices form the final layer before adding the top slice of bread. Serve with a couple of homemade dill pickle spears.
Saturday, June 28, 2008
Friday, June 27, 2008
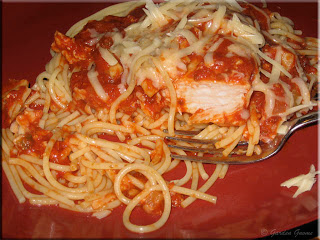
Chicken Cacciatore
Boneless, skinless chicken breasts are the ideal chicken starter whether using whole or in chunks or in strips. They can be prepared ahead by any desired method then froze ready to use as needed or they can be frozen raw to be prepared as desired. A quick and easy meal to make is chicken cacciatore using ingredients from the pantry shelf and freezer.
Chicken Cacciatore
Chicken cacciatore is simply chicken in a tomato sauce generally served on a bed of spaghetti.
My method: I use boneless, skinless chicken breasts that I had flash froze previously. The method for cutting the bones from the meat are in the archives. One boneless, skinless chicken breast is needed per person. Heat about 1 tbsp of olive oil in a fry pan then add the chicken breasts with burner set on medium. While they are browning chop one celery rib, 1/4 green onion, 1 small onion and about 1 1/2 c fresh mushrooms. Turn the chicken breasts and stir in the vegetables. Continue cooking until vegetables are tender and the other side of the chicken breasts are browned. Stir in 1 L crushed tomatoes (about 4 c) and one 500 ml (2 c) roasted tomato sauce for 6 boneless, skinless chicken breasts. Bring to a slow simmer and let simmer about 15 minutes. At the same time bring salted water to a boil. Cook spaghetti to al dente. Drain. Top with one chicken breast and a ladle of sauce per serving.
Thursday, June 26, 2008
Mashed Potatoes
I know it sounds a bit corny but seriously neither of us are into gifts for special occasions. What really means more to both of us is good food and spending time together. On my special days my husband makes his famous breaded pork chops. These beautiful chops are custom cut to one and a half inches thick at the butcher shop the day he is going to make them. They are then given his special treatment, baked in the oven resulting in luscious pork chops anyone would die for! There are always left overs because one of the pork chops is simply too large to eat. My husband managed to make the chops for one of my special days recently despite the kitchen being under renovations. That really meant a lot to me!
Herbed Mashed Potatoes
The following day I was left with the expected left overs. Now the problem with left overs is unless you do something different they are left overs. Not that there is anything wrong with left overs as any frugal cook will tell you but that doesn't mean they have to be the exact same as the meal before. Always make your meals interesting even left overs.
The meal: I took one of the left over pork chops and sliced it about a quarter inch thick being careful to keep the breading in tact. Then I placed the slices in a baking dish, added a couple of tablespoons of water as pork has a tendency to dry when reheating and covered. I wanted something different for the potato but not an in your face different. I steamed 6 medium peeled potatoes then hand mashed them with sour cream, herb & garlic cream cheese and a small amount of half & half. [The next time I do this I will just use regular cream cheese and an herb blend to match the meal.] Served with a tossed salad and nibblet corn it was a nice meal that wasn't too taxing on the kitchen given its condition.
Sorry, it not a fancy meal but when doing kitchen renovations it's better than nothing :)
Wednesday, June 25, 2008
Grilled Chicken Medallions
Kitchen Update: The weather has played havoc with refinishing the cabinet doors but most of them are now back where the belong. The rest are expected to be up before the weekend if the weather holds. We were waiting on the new hinges ordered online at a savings of almost $3 a pair. They arrived on Saturday. The sink (Moen) sized to fit our exactly where we want it instead of in the corner where the old sink is arrived yesterday. It is only a single bowl but since we cannot have a food disposal here and we have space issues in the kitchen that is one thing I'm willing to bend on. The new taps are gorgeous with a nice curve that says function can have style. Oh and I will have a sprayer as well. We are hoping to start the tiling this weekend. I'll update as it happens but for a more in depth look check here.
The kitchen has now been in an upheaval for four weeks. During that time I have managed to host two larger events, have a houseful of family two weekends, sneak in one load of asparagus for canning and put relatively decent food on the table. I am relying heavily on the countertop roaster and crockpot that can be set outside the kitchen area, the gas grill and my well stocked pantry. It is important to me that meals during this stressful time be comforting and home cooked.
Grilled Chicken Medallions
You really cannot get much simpler than grilled chicken medallions for a meal that looks like it took a lot of time but it didn't. Chicken medallions are available pre-wrapped with bacon from your local butcher shop. Some larger grocery stores sell them in the frozen food section. You can easily make them at home yourself using boneless, skinless chicken breast and bacon which is what I normally do but in this case I cheated and bought them from the butcher shop.
From scratch: Each medallion will require one boneless, skinless chicken breast, one slice of bacon and one large toothpick. With your fingers, carefully form the chicken breast into a pattie shape, tucking as you go. Hold a piece of bacon short side on one outer edge of the round the wrap somewhat tightly securing with a toothpick. The medallion is now ready to cook as is or season. If desired you can make several of these in advance, flash freeze then vacuum seal.
I decided to grill the chicken medallions. The trick to grilling is to have the heat not set too high as you want the chicken to cook thoroughly but you also want to avoid flare-up that will cause charring. You also don't want to overcook the chicken as it will be dry. Grill time for chicken medallions is about 8-10 minutes on medium low with resting on indirect heat. Served with grill baked potatoes (essentially the same as oven baked) they make for a nice easy meal that sooths the soul.
Enjoy!
Garden Gnome
©2006-2008
The kitchen has now been in an upheaval for four weeks. During that time I have managed to host two larger events, have a houseful of family two weekends, sneak in one load of asparagus for canning and put relatively decent food on the table. I am relying heavily on the countertop roaster and crockpot that can be set outside the kitchen area, the gas grill and my well stocked pantry. It is important to me that meals during this stressful time be comforting and home cooked.
Grilled Chicken Medallions
You really cannot get much simpler than grilled chicken medallions for a meal that looks like it took a lot of time but it didn't. Chicken medallions are available pre-wrapped with bacon from your local butcher shop. Some larger grocery stores sell them in the frozen food section. You can easily make them at home yourself using boneless, skinless chicken breast and bacon which is what I normally do but in this case I cheated and bought them from the butcher shop.
From scratch: Each medallion will require one boneless, skinless chicken breast, one slice of bacon and one large toothpick. With your fingers, carefully form the chicken breast into a pattie shape, tucking as you go. Hold a piece of bacon short side on one outer edge of the round the wrap somewhat tightly securing with a toothpick. The medallion is now ready to cook as is or season. If desired you can make several of these in advance, flash freeze then vacuum seal.
I decided to grill the chicken medallions. The trick to grilling is to have the heat not set too high as you want the chicken to cook thoroughly but you also want to avoid flare-up that will cause charring. You also don't want to overcook the chicken as it will be dry. Grill time for chicken medallions is about 8-10 minutes on medium low with resting on indirect heat. Served with grill baked potatoes (essentially the same as oven baked) they make for a nice easy meal that sooths the soul.
Enjoy!
Garden Gnome
©2006-2008
Tuesday, June 24, 2008
Guest Blog by Caleb of RamenDays
Many readers may not realize that bloggers form online communities. We get to know one and other, comment on each other's blogs and help each other out when we can. I joined Entrecard (see sidebar under Today's Dinner Guests) a few months ago and have had an opportunity to chat with other bloggers. Since my kitchen is torn apart although less so than the past couple of weeks a guest blogger sounded ideal. To become a guest blogger on this blog please see the instructions at the end of the guest blog.
I came across Caleb and Tory-T's blog, RamenDays. When I saw they were interested in doing a guest blog entry I contacted them. Caleb sent me a recipe with a lot of step-by-step photos. I accepted the article so I hope you enjoy their contribution. If you have a chance please stop by and say hello to them. Their style is a bit different than mine but the end result is still good food. So please welcome Caleb as a guest blogger here today. Thanks so much for your recipe and pictures. I'm sure my readers will enjoy it!
A Bit About RamenDays: Caleb is a bachelor living in San Diego, California who is learning to cook. He was disappointed at the lack of step-by-step cooking instructions and I can't say as I blame him especially when learning to cook. He started blogging his adventures on RamenDays. The chef's introductions are not clear as to how Tory-T as far as cooking but I think they must be friends. Their slogan is Getto Recipes. Good Eatin'...Food for Your Mouth, Food for Thought.
Enjoy!
Garden Gnome
©2006-2008
Wash your potatoes and let them boil. Poke the potatoes a couple times with a fork so the insides cook thoroughly.
You can tell potatoes are done when the skin starts to crack on its own.
Throw all your soy sauce, water, ground pepper, salt, chopped onion and minced garlic in a small bowl. You don't want to use too wide of a bowl because the marinade will be spread too far apart from the meat. You'll want to use a bowl that allows the ingredients to touch each other so they can play on each other's juices and into the meat.
Wash your hands and massage the meat into the ingrediants for 2 minutes. PLEASE WASH YOUR HANDS! haha.
After 2 minutes.
Put in the fridge for an hour or so.
Transfer everything from the bowl (even the marinade) and boil to cook. Mix every so often.
Cover so that beautiful moisture stays in.
While the meat is cooking throw a bunch of peas in a small pot and cook with a scoop of butter. Add two teaspoons of water to make sure the peas don't dry out while cooking. Stir occasionally. DO NOT cook the peas on high. You want to cook the peas on medium heat and cover so the moisture will stay in the peas. If you don't let moisture get into your peas you'll basically be eating peas with the consistency of dry almonds...not very good at all.
This is how your mixture will look when it's done. The onions and meat will darken.
Serve with rice and pour a little of the sauce on top of the rice for an extra kick.
**NOTE** You can make a batch of the meat marinade and just store it in the fridge overnight. So, when you get home from work you don't have to prepare. You can just pop the mixture in a pot and have a quick meal. Don't let the meat marinade sit in the fridge for more than 2 days because your meat will get too flakey.
Cheers,
Caleb
*****
Please Note: If you are interested in becoming a guest blogger on this blog please leave a comment and I will email you. The requirements are very simple. The article must be family friendly - no profanity or adult related material! The recipe or dish should be tried and true. If possible please include at least one photo of the recipe or dish sized to 640 x 480. I do not edit pictures your pictures or write-up so please check for grammar and spelling although if I find a blatant error I will contact you to see if you would like it corrected. In return for your guest blog you will receive a brief introduction with a link to your website.
Disclaimer: Submitting an article does not guarantee acceptance. If I don't accept your recipe, photo or article I will clearly tell you why. Acceptance of your recipe, photo or article does not mean I endorse websites with profanity or adult content. It only means I like your recipe, photo or article.
*****
Enjoy!
Garden Gnome
©2006-2008
I came across Caleb and Tory-T's blog, RamenDays. When I saw they were interested in doing a guest blog entry I contacted them. Caleb sent me a recipe with a lot of step-by-step photos. I accepted the article so I hope you enjoy their contribution. If you have a chance please stop by and say hello to them. Their style is a bit different than mine but the end result is still good food. So please welcome Caleb as a guest blogger here today. Thanks so much for your recipe and pictures. I'm sure my readers will enjoy it!
A Bit About RamenDays: Caleb is a bachelor living in San Diego, California who is learning to cook. He was disappointed at the lack of step-by-step cooking instructions and I can't say as I blame him especially when learning to cook. He started blogging his adventures on RamenDays. The chef's introductions are not clear as to how Tory-T as far as cooking but I think they must be friends. Their slogan is Getto Recipes. Good Eatin'...Food for Your Mouth, Food for Thought.
Enjoy!
Garden Gnome
©2006-2008
THE EASIEST MEAL IN THE ENTIRE WORLD
Greetings human beings, Mom's Cafe Home Cooking has blessed me with letting me bless her audience with a recipe from my fun bag. Let me give you a little background on this recipe. Yes, the rumors you heard on CNN and NBC are true, I am a bachelor. As you fellow bachelor (and bachelorettes) know, we have to fend for ourselves no matter how weathered the storm is. Who here comes home after a hard day's work only to find a jar of olives waiting for you in the fridge? If you want your life to be a long one, you know you can't eat fast food for the duration of your stay here on Earth. So, I came up with this recipe as a dedication to all my fellow bachelor and bachelorettes of the world. You don't have to spend hours in the kitchen and have a degree in culinary to fend for yourself in the kitchen. I present to you:
"THE EASIEST MEAL IN THE ENTIRE WORLD"
INGREDIANTS
Half pound of beef eye of round steak
Frozen bag of green peas
2 red potatoes
Soy sauce (1.5-2 cups)
Water (.05-1 cup)
Ground pepper (to taste)
Garlic salt (to taste)
Half a white onion (chopped)
3-4 garlic cloves (minced)
Crushed red pepper or Cheyenne pepper (optional for spicy-ness)
Wash your potatoes and let them boil. Poke the potatoes a couple times with a fork so the insides cook thoroughly.
You can tell potatoes are done when the skin starts to crack on its own.
Throw all your soy sauce, water, ground pepper, salt, chopped onion and minced garlic in a small bowl. You don't want to use too wide of a bowl because the marinade will be spread too far apart from the meat. You'll want to use a bowl that allows the ingredients to touch each other so they can play on each other's juices and into the meat.
Wash your hands and massage the meat into the ingrediants for 2 minutes. PLEASE WASH YOUR HANDS! haha.
After 2 minutes.
Put in the fridge for an hour or so.
Transfer everything from the bowl (even the marinade) and boil to cook. Mix every so often.
Cover so that beautiful moisture stays in.
While the meat is cooking throw a bunch of peas in a small pot and cook with a scoop of butter. Add two teaspoons of water to make sure the peas don't dry out while cooking. Stir occasionally. DO NOT cook the peas on high. You want to cook the peas on medium heat and cover so the moisture will stay in the peas. If you don't let moisture get into your peas you'll basically be eating peas with the consistency of dry almonds...not very good at all.
This is how your mixture will look when it's done. The onions and meat will darken.
Serve with rice and pour a little of the sauce on top of the rice for an extra kick.
**NOTE** You can make a batch of the meat marinade and just store it in the fridge overnight. So, when you get home from work you don't have to prepare. You can just pop the mixture in a pot and have a quick meal. Don't let the meat marinade sit in the fridge for more than 2 days because your meat will get too flakey.
Cheers,
Caleb
*****
Please Note: If you are interested in becoming a guest blogger on this blog please leave a comment and I will email you. The requirements are very simple. The article must be family friendly - no profanity or adult related material! The recipe or dish should be tried and true. If possible please include at least one photo of the recipe or dish sized to 640 x 480. I do not edit pictures your pictures or write-up so please check for grammar and spelling although if I find a blatant error I will contact you to see if you would like it corrected. In return for your guest blog you will receive a brief introduction with a link to your website.
Disclaimer: Submitting an article does not guarantee acceptance. If I don't accept your recipe, photo or article I will clearly tell you why. Acceptance of your recipe, photo or article does not mean I endorse websites with profanity or adult content. It only means I like your recipe, photo or article.
*****
Enjoy!
Garden Gnome
©2006-2008
Tuesday, June 17, 2008
Doughnuts
Well if there is anything Canadians like it is their doughnuts. Seriously there is likely a doughnut shop on every corner right next to the pizza joint. Doughnuts are so easy to make at home and they taste so much better piping hot from the deep fryer. They are also considerably cheaper to make at home for those wishing to save a bit of money. My husband called from the golf course Saturday about 7 pm to say a bunch of the guys were coming over to play poker. Ok the first thought was what could I make for the guys because they really do expect home cooked food when they come here. The second thought was how could I pull this off with the kitchen in such a disarray? By the time the guys arrived I had a plan - doughnuts!
That Night
Sounds complicated for a kitchen torn apart with utensils and whatnot scattered throughout the family room doesn't it. But it really wasn't. I needed a dry and wet measuring cup, the KitchenAid® stand mixer and the deep fryer. I couldn't find my doughnut cutter either so I improvised by cutting the doughnut rounds out using a wide mouth mason jar lid and omitting the hole. This suited the guys just fine as apparently eating the holes is a waste of time when you can be eating a whole doughnut although I do hear Tim Hortons® would differ of that opinion. Anyway, the picture does not really do justice to the doughnuts. They were large and fluffy. I coat them in organic sugar or organic sugar mixed with cinnamon.
Doughnuts
1 ¼ c milk
1 egg, beaten
¼ c butter
¼ c granulated sugar
1 tsp salt
3 ½ c white flour
1 ½ tsp instant yeast
Place dry ingredients into KitchenAid® stand mixer bowl on setting 2. Mix briefly on setting two. Stir wet ingredients together. With the mixer set to setting 2 slowly pour in the wet ingredients. Continue mixing until the dough is smooth and elastic. Let rise until double. Roll the dough ½ - inch thick. Cut into desired shape. Let rise until double. Deep fry at 375ºF (190ºC) turning as the doughnuts rise to the surface.
The Next Day
I made a double batch of the doughnut dough. The problem was the guys ended up not eating as many as I thought they would. So what I did was package up about ¼ of the double batch into a plastic container then put it into the fridge. What I was really thinking is there's no point wasting the dough but I didn't have any idea as to whether the dough would work fine the next day.
I pulled the dough out of the fridge the following morning for breakfast. Being rather lazy or the coffee not kicking in quick enough I simply formed the dough into a flat round the cut into pieces. Once the dough doubled in size I fried as normal. These sure didn't look like doughnuts but they tasted just fine. My family game them a two thumbs up while smacking their lips and looking for more. Now I'm not one to not experiment with food. I just simply never thought of refrigerating the dough but it does work quite nicely.
Monday, June 16, 2008
Homecanned Asparagus Revisited
A brief update on my kitchen: Today marks the start of the third week of renovations. The kitchen is not put back together yet although the staining is finished and the last of the doors are in the process of getting their final finish coats. Weather has dramatically impeded the process because most of the staining and finishing was being done in the garage where hot and humid conditions affected both application and drying times. This sink and hinges have not arrived yet but we expect them later today or tomorrow. We will be starting the countertops and walls Wednesday.
By now you are likely tired of hearing about Las Vegas but I do have at least one more post to share with you sometime this week. There has been a lot of activity going on in the kitchen despite the total chaos. Anyone who home preserves knows that whether the kitchen is torn apart or not the preserving must go on. It is more important when preserving fruits or vegetables in season.
Asparagus
Asparagus is in season right now so the price is good. I had to buy mine this year because my asparagus bed has not been established here yet. For those who don't grow asparagus, a bed takes 3 to 4 years to become established. After that the bed just gets better when properly maintained. Asparagus does not grow well in containers so this is not a good plant if container gardening.
Despite the kitchen turmoil of having no drawers or cupboards in the kitchen I had no choice but to do up asparagus. Asparagus is one of those things that really is best fresh but freezes some what nicely. I can a half load or so, method here. Please note the altitude changes for altitudes higher than 1,000 ft above sea level. I know some eat canned asparagus but seriously I don't care for it as a ready to serve vegetable. What I can it for is to use for Cream of Asparagus Soup. We went through enough of this soup that I will likely can another small batch of asparagus.
Strawberries are also in season so I will be making jam but this year with a bit of a twist to I will point you to the original recipe as well as the new recipe so do watch for that coming soon. Watermelon is also in season so I will post how I put up watermelon later this week. Oh and tomorrow's post is about doughnuts :)
Tuesday, June 10, 2008
French Market Buffet at The Orlean's Casino
Our final day in Las Vegas was exhausting mainly because we were so tuckered out from a very busy vacation. We took our time checking out of the Four Queens then decided to find a slightly lower keyed casino to spend the afternoon then have dinner. The Orlean's was just perfect for this purpose being sufficiently busy but not over crowded. This casino has a New Orlean's theme heavy on the crocodiles and Mardi Gras, laid back and fun with an 18 screen movie theatre on the second floor and a 70 lane bowling alley for those wanting other entertainment. Like most casinos, The Orlean's buffet is impressive so I thought I would post a few more pictures just so you have a better idea of what Las Vegas buffets look like.
French Market Buffet
Huge green gator statues greet visitors to the casino. Througout the casino more huge character statues form part of the decor. Outside of the French Market Buffet two larger than life chef statures great you just before the wonderful aromas hit your senses. This is in an all-you-can eat restaurant served buffet style. It features Italian, Mongolian, Barbecue, American, Seafood, Mexican and Chinese cooking. The inside of the restaurant is spacious and the staff is very friendly. It's has a nice glittery glam with a lot of shiny surfaces but the mood is comfortable and relaxing.
Food choices are divided into stations. The large salad bar and dessert bar is in the centre of the serving areas with the food stations around the end perimeter of the restaurant.
It was all you could eat sirloin steaks for $14.95 but again we had a two-for-one coupon. The meal came with complimentary non-alcoholic drinks or wine. As with most buffets it included a lovely soup and salad bar, many options for the main course and a good selection of desserts including fruits and ice cream. You can't go wrong with all all you can eat steak buffet providing the steaks are cooked the way you like them.
Steak, Ribs & Seafood
I should mention that proper etiquette when photographing inside any restaurant and even the facade is to get permission. I've never been turned down yet but it is always nice to ask first. I have some wonderful pictures of me with various chefs that make for great scrapbooking layouts. Don't worry about what other diners might think either. Just get some good photos and enjoy your meal!
The salad bar is quite large with a substantial offerings of salad greens, salad vegetables, dressings and toppings. Prepared salads such as macaroni are also available. Soups were at one end of the salad bar. Peel and eat shrimp was chilled on ice ready for plating. They were a nice sized shrimp with shrimp cocktail sauce and lemon wedges available. The crayfish were also abundant, cooked to perfection. House smoked ribs were available from a server in the barbeque station. He cut off the desired number for you. They were as promised finger-licking good!
What was impressive was the sirloin steak because immediately one would suspect that any steak on a buffet wouldn't be all that great. The steak was cooked to varying degrees of doneness then placed in a large warmer. What this did was to allow the steak to rest slightly before being plated and since steak continues to cook for a brief period after removing from the grill, I suspect the chef slightly under cooked each steak.
Casseroles
One of the best features of buffets is you can pick and choose what you want combining cuisines to your heart's content. It's also a good way to do a small sample test without taking a whole serving. I often browse through a buffet with plate in hand for this very purpose taking only a table spoon of a few things I would like to try. Two casseroles that caught my eye on the buffet were turkey enchilada and lasagne. There were other combination dishes but these two had wonderful eye appeal and looked mouthwatering! Lasagne has long been a family favourite here so I make it fairly often using 9 cheeses and homemade spaghetti sauce with meat. The turkey enchilada is something a little different. Buffets are wonderful for this because they will tempt you to try something you might not otherwise try. Chances are with a bit of tweaking you can come very close to the dish when making at home. The important thing is this really gives you a basis to start with.
I simply had to have a little taste to see if this would be a possible family favourite. I think it has the potential even though my husband wouldn't eat it with black olives. That means a bit of tweaking. So I'm going to be searching for a tried and true recipe as well as doing a bit of experimentation for turkey enchilada casserole to fine tune at home. I'll post my version once tweaked.
Desserts
Talk about tempting eye candy! Never mind fighting the urge to resist and you know they do say two desserts are better than one. The French Market Buffet, located so you have to pass it to get to the main course offerings has a large selection of scrumptious desserts including sugar free versions. The various beautifully decorated cheesecakes are sure to tempt but it doesn't stop there. Cream puffs, chocolate eclairs and other pastries line display cases. Slices of luscious fruit, cream and meringue pies enticingly fill a counter. If you are looking for something cold there is soft ice cream with the option of various toppings. Fresh fruit is always an option for those who don't want a heavier dessert.
Plated
I decided on a tossed salad followed by the sirloin steak (medium rare) with crayfish, baked potato, mixed vegetables and glass of house wine. Sour cream was available for the baked potato as was drawn butter for the crayfish. I skipped the heavier desserts opting instead for a nice bowl of watermelon. It was a lovely meal!
I should mention a couple of things about buffets. First there is so much that there is the temptation to over eat. The second problem is sticking to the tried and true bypassing anything you are not familiar with. Buffets are certainly the time to indulge but that doesn't mean you have to over indulge. It is quite possible to enjoy a buffet while staying within any dietary restrictions. Other than that experiment and try new things.
Saturday, June 07, 2008
Cobb Salad at Magnolia's
It is amazing how presenting the same ingredients in a new fashion makes them taste different. Remember you eat with your eyes first! Now we are huge salad eaters so I'm always looking for new ways to present the common salad.
Cobb Salad
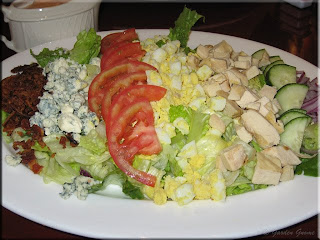
The Cobb salad according to Wikipedia was created in 1937 by robert H. Cobb. It is a garden salad that became a signature menu item of the legendary Brown Derby in Hollywood. So why is it that this is the year 2008 and I had never heard of a Cobb salad? It's not like I don't eat out and I always order salads with lunch or dinner. Actually when eating out lunch generally is a salad. How could this possibly be?
Magnolia's Veranda (Four Queens) had a nice selection of salads with a lunch salad for $7.95 without a player's card and $5.95 with the player's card. Their salads are huge, much more than one person can eat. They come out on a small oval shaped platter. So it was with the Cobb salad. I had to order this salad just to see what it was.
The salad consisted of a thick bed of lettuce with the toppings arranged in a linear fashion. Toppings on this Cobb salad consisted of red onions, English cucumbers, turkey, hard boiled eggs, tomatoes, blue cheese and bacon pieces all arranged to form stripes across the lettuce. It was served with a small pitcher of desired dressing which of course is Thousand Island for me. This really was a presentation thing with the toppings forming neat stripes. I really liked the presentation so will be trying this at home.
Thursday, June 05, 2008
Steak & Lobster at Binion's
Are you getting tired of hearing about the food we enjoyed in Las Vegas? I hope not as I'm not doing a lot of cooking with the kitchen literally torn apart. The good news is the cabinets are pretty much on schedule (pictures here). I had hoped to have them completely finished for Saturday but it does look like it will end up taking the full two weeks. The sink and hinges are en route via UPS. We ordered them online which ended up saving a fair amount on gas that would have been used shopping for them. Monday or Tuesday I will be starting the countertops and wall. If all goes well with tiling and sink installation in its new location, the kitchen should be back in full swing by the following Saturday.
Ok, back to Las Vegas food. Today's feature is the steak & lobster at Binion's Original Coffeeshop at Binion's Gambling Hall & Hotel, kitty corner from the Four Queens on Fremont Street. The coffeeshop is on the lower level. It reflects the atmosphere of the casino with lots of wood and pleasant, friendly wait staff. Their menu is available on their website in pdf format but the steak & lobster is not on it. Now what I really like about Binion's besides playing craps is the way the points add up on the player's card. I usually have enough points for breakfast for two a couple of days and that's with only playing the penny slots, specifically the fish slot machine.
Steak & Lobster
We had two-for-one coupons for the steak & lobster special. This is an ask for special priced at $15.99 per person. That meant our meal total without tip for two people would be $15.99! The meal came with soup or house salad, a generous piece of New York strip steak, large lobster tail with drawn butter, vegetables of the day and bread basket. As steaks go in Las Vegas this steak was a bit smaller but nicely cooked. The lobster tail did not disappoint. The baked potato as in most casino restaurants was a good size with sour cream on the side. It was a nice meal.
Paying for meals in the coffee shop is done at a cashier's desk where you can give them your player's card. Well now, my husband gave his then I gave mine. The two-for-one brought our meal total to $15.99. The player's cards brought the total meal price to $4.58 without tip! Binion's is one of the better casinos for comps so had my husband been playing black jack there the meals would have been free.
Tuesday, June 03, 2008
Steak Special at Ellis Island
Part of the fun of Las Vegas is finding those small, out of the way locals casinos. They tend to be very, very friend, offer very good meal deals while being on the rather smallish side. We discovered Ellis Island Casino & Brewery several years ago shortly after making our first trip to Las Vegas. This was by sheer word of mouth! Ellis Island is off of the strip behind Planet Hollywood on Koval Lane one block south of Flamingo Rd. Seriously it is so small you could easily pass it by but that would be a real shame. It's definitely a locals casino!
Micro Brew
Ellis Island has a micro brewery which is part of it's charm. The brewery is visible from the casino and snack bar. They put out a lovely micro brew as well. If you order the prime rib a glass of micro brew comes with the meal. You do have to order the micro brew if ordering other meals. Trust me on this one even if you have to pay, do order the micro brew. The amber (ales) is smooth and silky with a lovely flavour that compliments beef nicely. They also server a Hefe Weiss (ale), a dark (lager) and a light (lager). For those not wishing to drink alcohol they have a love old-fashioned root beer made on site. All of their beer and root beer is made with 100% natural ingredients.
Tossed Salad
The steak special is an Ellis Island special served 24 hours a day, 7 days a week. The only way to find out about this special is word of mouth. It is not advertised anywhere and I think we found out about it by following a Las Vegas newsgroup years ago. This is a you must ask for special. It is not on their sign or menu. There is nothing anywhere to indicate that there is a steak special.
Once your are seated and depending on the time of day this may take upwards of a half hour the friendly waiter will come by with menus. Simply ask for the steak special. Trust me you will not be able to eat everything!
The steak special comes with either soup or salad. I chose salad with thousand island dressing. This is a large salad with just a bit too much dressing for my liking but otherwise is rather in line with other plain tossed salads. The best bet is to eat about a third of the salad then set it aside just in case you are hungry after the main course. It's doubtful but it could happen. Buns also come with the dinner.
The Steak
The bun basket included a variety of yeast buns, melba toast and bread sticks. Butter pats were included. It was a rather standard bun basket served by many restaurants.
The 10 oz New York strip steak comes with a large baked potato and vegetables of the day. Sour cream is served in small squeeze triangular packages but steak sauce and butter is on the table. The steak is quite large, cooked to your specifications. I ordered mine medium rare while my husband ordered his rare. They did a lovely job of cooking the steak. The potatoes were fluffy but not over cooked. The green beans were almost al dente.
Ok, so by now you are likely curious as to price? Folks this lovely meal will set you back $4.95. That's it. You must ask for the steak special and it is a good idea if you are hungry. This is one of the very few meals we pay for in Las Vegas. It has become tradition for us to make a stop at Ellis Island simply for the steak. Sometimes we play a bit at the smallish casino and sometimes we don't but the steak is always worth the trip!