My photo
Ontario, Canada
I am a wife, mother and grandma who enjoys the many aspects of homemaking. A variety of interests and hobbies combined with travel keep me active. They reflect the importance of family, friends, home and good food.
Cook ingredients that you are used to cooking by other techniques, such as fish, chicken, or hamburgers. In other words be comfortable with the ingredients you are using.
--Bobby Flay

For Your Information

Please watch this area for important information like updates, food recalls, polls, contests, coupons, and freebies.
  • [March 19, 2020] - Effective Mar 17, this blog will no longer accept advertising. The reason is very simple. If I like a product, I will promote it without compensation. If I don't like a product, I will have no problem saying so.
  • [March 17, 2020] - A return to blogging! Stay tuned for new tips, resources and all things food related.
  • [February 1, 2016] - An interesting report on why you should always choose organic tea verses non-organic: Toxic Tea (pdf format)
  • Sticky Post - Warning: 4ever Recap reusable canning lids. The reports are growing daily of these lids losing their seal during storage. Some have lost their entire season's worth of canning to these seal failures! [Update: 4ever Recap appears to be out of business.]

Popular Posts

Saturday, March 31, 2012

Mini Carrot Bran Muffins

We did a lot of camping when our kids were young.  Our favourite camping locations were Pinery Provincial Park (near Grand Bend, ON), Cypress Lake part of Bruce Peninsula National Park system (just south of Tobermory, ON) and Algonquin Provincial Park (near Huntsville, ON).  These are all rustic campgrounds with limited RV connections, something we preferred to the commercial campgrounds.  We also did a fair amount of camping at state parks in Michigan and Ohio.  Our kids were allowed a special treat each time we went into town which really amounted to once or twice  during a camping trip.  They were allowed to spend their camping money as they wanted and yet even back then they did not buy candy or chips.  They would buy something they couldn't get at home.  Well, one camping trip in Michigan, we stopped at a Hostess outlet.  Our kids did not buy the frosted cupcakes, Twinkies, or Snowballs.  They excited bought a snack sized package each of mini blueberry muffins.  At that time, mini muffins was not something I made and they thought mini muffins were better than anything else!  On the way home from the camping trip, I bought a mini muffin pan and the start of mini muffin making began in our home.

mini carrot bran muffins
Easter is quickly approaching so I have been testing a couple of new Easter recipes.  I needed a dessert type muffin for Easter brunch.  I made a test batch of carrot bran muffins that will be perfect for brunch when topped with a cream cheese icing.  This recipe uses home canned pineapple that not only adds flavour, it keeps the muffins moist and tender.  Pineapple does pair nicely with carrot so I was not surprised at the wonderful flavour of these mini muffins.  My husband gave them the two thumbs up!  The cream cheese icing will dress the muffins up for Easter brunch while adding an extra flavour dimension.  The grandkids are going to love these mini muffins!

Mini Carrot Bran Muffins
modified from: Jean Paré, Company's Coming Muffins & More, 1983, Pp, 14.

1½ c unbleached flour
¾ c packed brown sugar
¾ c natural wheat bran
1 tsp baking powder
1 tsp baking soda
½ tsp sea salt
1 tsp ground cinnamon
2 eggs
½ c canola oil
1 c grated carrot
1 cup home canned crushed pineapple with juice

Pre-heat oven to 400ºF/200ºC.  Combine the dry ingredients in a large mixing bowl.  Make a well in the middle.  Stir to mix well.  Put the eggs into the bowl of a stand mixer and beat until frothy.  Stir in the oil, carrot and pineapple. Pour the egg mixture into the well.  Using a fork, mix just until wet.  Spoon into mini muffin cups.  Bake for 20 minutes or until a toothpick inserted is clean.  Remove from oven.  Cool 5 minutes then remove from pan.

Yield: 36 mini muffins


Friday, March 30, 2012

Mini Zucchini Muffins

Our kids were in the kitchen from the time they were born because we have always felt that the earlier you get a child involved in cooking the better.  Cooking with kids is more than just cooking!   It is a family bonding time that provides ample learning moment opportunities both for parent(s) and child.  It can form a life-long interest in food as well as foster healthy eating habits.  Seriously, getting your child involved in food and cooking is one of the best things you can do.  Besides it is just down right plain fun!

mini zucchini muffins
If you go to the donut shop, muffins are so huge that they can actually have more calories than some fast food sandwiches.  We eat a lot of muffins but I like making them small so they are more of a snack size unless making them for breakfast.  Mini muffins make a lot of sense.  They pack nicely for lunches and are kid friendly after school snacks.  Wilton, the leading cake experts has a lovely 24 cup mini muffin tray that you can pick up for under $10 if you watch the sales.

Mini Zucchini Muffins
inspired by:  Jean Paré, Company's Coming Muffins & More, Pp. 33

1 c unbleached flour
1 c whole wheat flour
1½ tsp baking powder
1 tsp baking soda
1 tsp cinnamon
½ tsp allspice
1 tsp sea salt
1 egg
¼ c vegetable oil*
½ c granulated organic sugar
1 c grated zucchini
½ c milk

Measure the dry ingredients into the mixing bowl of a stand mixer or regular mixing bowl.  Mix well.  In a separate bowl, beat the egg until frothy  then mix in the oil*, sugar, zucchini and milk.  Stir the egg mixture into the dry ingredients until just mixed.  Spoon the batter into mini muffin cups.  Bake at 400ºF (200ºC) for 20 minutes or until a toothpick inserted into a muffin tests clean.  Let cool slightly then remove from the pan. 

Yield: 24 mini muffins

*Note: You can reduce the fat in these muffins by substituting applesauce for the vegetable oil.


Thursday, March 29, 2012

Kitchen Quick Tips - Protect Knife Blades

kitchen quick tips

Chef's knife blades should be protected from getting nicked but also for safety to prevent accidental cuts.  Store in a knife block, on a magnetic strip or use a knife protector cover.  Make an inexpensive knife protector using the spine of a report cover.  Just cut the spine to the correct length and slip on the knife blade.


Wednesday, March 28, 2012

Homemade Miracle Whip Clone Recipe

Our family is a Kraft Miracle Whip family or more specifically a Kraft Miracle Whip clone recipe family.  The debate as to whether Miracle Whip is or is not a mayonnaise is still on going.  Kraft Miracle Whip was introduced in 1933 but the FDA ruled it had a couple of ingredients (water, cornstarch)  in it that should not be to be classified as a mayonnaise so ruled it had to be classified as a salad dressing.  The bottom line is Miracle Whip really is a mayonnaise, made like a mayonnaise but using a cornstarch slurry extender and kicked up a notch with lemon juice for tanginess and seasonings for added flavour.

homemade MiracleWhip clone recipe
The ingredients for Kraft Miracle Whip are: water, soybean oil, sugar, vinegar, mustard, spices, modified cornstarch, potassium sorbate, colour, calcium disodium EDTA and dried garlic.  From a profit point of view, Kraft added the water which would result in more product without added cost then used the cornstarch (very inexpensive) to thicken the thinner version to the same consistency of mayo.  The water and cornstarch  do not change the flavour so really is not necessary in the homemade version.  When I was looking for a clone recipe I came across several that cooked the water, cornstarch, mustard and vinegar to a thin slurry then added the hot mixture to the egg mixture.  That was a horrible disaster that ended up with a curdled mess that I could not salvage.  It did however smell like Miracle Whip.  Encouraged  by that, I came up with my own recipe based on my basic homemade mayonnaise recipe.  If you want the homemade version to taste like Miracle Whip be sure to use fresh squeezed lemon juice and sunflower oil.  You will be pleasantly surprised at how easy it is to make this clone recipe for Miracle Whip.  Store bought Miracle Whip current price is 84¢ per 250 ml (1 c).  The homemade version is about 44¢ per 250 ml (1 c).

Homemade Miracle Whip
recipe by:  Garden Gnome

1 egg
1 tsp dry mustard
2 tbsp organic sugar
½ tsp sea salt
2½ tbsp fresh lemon juice
1 tbsp white vinegar
1 c sunflower oil
¼ tsp garlic powder
¼ tsp paprika

Put all of the ingredients but half of the oil into a food processor bowl. Process for 15 seconds. While the food processor is running, slowly pour the remaining oil into the mixture in a thin stream. Use a spatula to transfer the Miracle Whip to a storage jar. Store in the refrigerator and use as you would store bought.


Tuesday, March 27, 2012

Homemade Mayonnaise

Mayonnaise is a thick, creamy condiment used on sandwiches or as an ingredient for other dishes like potato salad made from an emulsion of egg and oil.  I don't buy mayonnaise as we prefer MiracleWhip, well actually a clone recipe (see tomorrow's post for that) so I make my own as needed.  Mayonnaise is one of those recipes that once you make it and realize the savings combined with gorgeous flavour you will not go back to store bought.  All you need is a blender or a food processor and a couple of minutes of time to whip up enough mayo to last a week or two at less than a third of the price of store bought.

homemade mayonnaise
My homemade mayonnaise is a bit yellower than store bought because I use free range chicken eggs.  The yolk from free range chicken eggs which has a deeper colur and the flavour richer.  Other than that the homemade version tastes fresher and performs in other dishes just as well as the store bought.  The current price for brand name mayo is $1.40 per c whereas the homemade version is 44¢ per c using the more expensive free range chicken eggs.  This mayo will seriously take you about 2 minutes to make which is a rather tidy savings for time invested.  If you want a whiter mayo use just the egg whites and not the yolk.  This will also reduce the dietary cholesterol if that is a concern.  Of note, the type of oil and vinegar you use will change the flavour slightly so do keep that in mind.

Homemade Mayonnaise
recipe by: Garden Gnome

1 egg
½ tsp dry mustard
½ tsp organic sugar
½ tsp sea salt
2 tbsp vinegar (apple cider, tarragon, white)
1 c oil (half extra virgin olive oil, half vegetable oil)
dash cayenne pepper

Put all of the ingredients but half of the oil into a food processor bowl.  Process for 15 seconds.  While the food processor is running, slow pour the remaining oil into the mixture in a thin stream.  Use a spatula to transfer the mayonnaise to a storage jar.  Store in the refrigerator and use as you would store bought mayonnaise.


Monday, March 26, 2012

Frugal Kitchens 101 - Avoid Junk Foods

Frugal Kitchens 101

Over the years the food industry has pushed what many frugalistas term as junk foods at us.  Many think of junk foods as being candy, carbonated drinks and snack foods like potato chips, but the category of junk is considerably broader.   The problem is many families consume a fair amount of junk food on a daily basis without realizing it because some of them have been promoted as healthy.  Essentially many of these are foods that mimic or serve as substitutes for real foods.  There are a lot of issues associated with these types of foods.  First, they tend to be high in preservatives, artificial colourants and flavouring making them a nightmare for those with food allergies and food insensitivities.  They also tend to be high in sugar and/or HFCS, salt, fats and calories.  Simply put they are a poor nutritional value for your dollar while causing potential health problems.  Eliminating or greatly reducing your use of junk foods will save a considerable amount of money on your grocery bill.   Here is my hit list of some of the foods we consider junk foods:

  • processed cheese spreads, dips, and sauces- This included Cheez Whiz and similar cheese spreads as well as shelf stable cheese products.  In order to make the cheese spreadable the manufacturers add oil and to make them shelf stable, preservatives are added.  As with many convenience foods, HFCS or maltodextrin (a corn starch) is added.  While maltodextrin is considered safe by the FDA it does pass into the blood stream quickly resulting in enhanced habit forming tendencies. The biggest side effect to maltodextrin is developing food cravings for those products containing it, aka mainly junk foods.
  • processed cheese slices - In order to make processed cheese slices, oil and I do mean copious amounts of oil is added to cheese that is melted then formed into slices and wrapped in plastic wrap.  It is a dietary disaster aimed at fattening folks up while destroying the environment.  At one time cheese slices were less expensive that actual, non-modified cheeses but that is no longer the case.  In terms of convenience, it takes less time to actually slice cheese than it does to open that testy wrapping and if you really are pressed for time you can by non-modified cheese slices in the very same aisle as the processed cheese slices. 
  • aerosol anything - This includes whipped cream, cheese, and vegetable oils sold in aerosol cans.  The propellant is problematic for many with lung disorders and they are a respiratory tract irritant.   The cans themselves are not eco-friendly.  Besides, the food inside those cans have already been tainted with the propellant and if you think about it, none of the products they use it for were ever meant to be sprayed!  If you need an oil spray, buy a re-usable health mister (under $5) and fill with any edible oil desired.  It's low cost and considerably healthier for you.
  • margarine - Margarine actually was called oleo and sold with a little colouring capsule to give the yellow colour.  There are two problems with margarine aside of it being one of the most advertised fake foods there is on the market today as being a 'healthy food'.  It really is beyond junk food yet margarine has long been tooted as being a healthy substitute for butter!  Margarine is made with solidified vegetable oils, artificial flavours, artificial colours including Yellow Dye #5 and margarine does add calories.  You are further ahead eliminating margarine entirely.  If you need a spread try a little natural butter or other natural spread like cream cheese, homemade mayonnaise.  If you want a margarine substitute for topping vegetables try one of the following: a little butter, plain yogurt (lower in fat than sour cream), a little butter with parsley flakes or sesame seeds, salsa, old fashioned chili sauce,  or herb blends.  Trust me, your health with thank you for eliminating margarine from your diet.
  • artificial whipped cream - I admit to using CoolWhip from time to time but the bottom line is it really a junk food as is the powdered alternative.  It takes all of 2 minutes or less to whip actual whip cream from heavy cream without the added flavours, bulking agents, preservatives, additives or propellants.
  • imitation and artificial foods - Some foods and food ingredients are clearly labeled as being imitation (eg. imitation crab meat or seafood, imitation vanilla extract, bacon bits) while others a imitation by lack of the 'pure' notation on the label (eg. some apple cider vinegar)  and others simply contain too many artificial flavours, colours, salt and sugars to make them a good value for your nutritional dollar.  The rule of thumb is to buy the actual real food or ingredient and use less of it if you have to instead of settling for imitation or artificial.  For example, substitute real crab meat with tinned or frozen crab meat instead of imitation crab meat that has sugar, artificial colours and flavours added then use in a dip or salad to compliment the meal rather be the meat oprtion of the meal.


Sunday, March 25, 2012

Grilled Chicken Breast with Mango Pepper BBQ Sauce

I have to confess that I buy very little in the way of barbeque sauces.  In fact, the three main ones I buy occasionally are Dianna Sauce and Sweet Baby Ray's simply because I have not cloned them yet.  The bottom line is, homemade barbeques sauces are fresher and can be tailored to your taste buds while saving you a bundle of money.  I understand wanting the convenience of a ready to use bbq sauce though so what I do is work on a recipe until it is just right, then home can it.  That gives me the convenience, cost saving and a lovely, preservative free product that is ready to use.  This is the time of year I like to start experimenting with bbq sauces that may make it to the canning pot.

mango pepper bbq sauce
Mango goes nicely with pork, poultry and fish.  Since chicken was on sale I decided to prep a couple of the chicken breasts for the grill.  This is the time of year here where mangos are fairly inexpensive as well so using them to make a bbq sauce made a lot of sense.

This tasty sauce takes a bit more work but it is worth it.  The sauce would have to be thinned somewhat for home canning and I would pressure can it.  The mango pepper bbq sauce will more likely be a sauce I make fresh to use when mangos are in season.

Mango Pepper BBQ Sauce
inspired by: Better Homes and Gardens, New Grilling Book, 2005., Pp. 35.

1 c red sweet peppers, chopped
1 sm onion, chopped
1 mango, seeded, peeled and chopped
2 tbsp packed brown sugar
1 tbsp rice vinegar
¼ tsp chili powder
1 tbsp green pepper, finely chopped

Heat oil in non-stick skillet.  Stir in peppers and onion.  Cook until just tender.  Stir in remaining ingredients.  Bring to a low boil.  Reduce the heat then simmer about 10 minutes.  Cool mixture.  Pour into food processor bowl.  Process until smooth.  Brush on meat or poultry during the last 10 minutes of grilling.

grilled chicken with mango pepper bbq sauce, zucchini boats and grilled beet
Once you start making your own bbq sauces you will seriously be amazed at how easy and inexpensive it is.  I served the grilled chicken breast with mango pepper bbq sauce with a zucchini boat stuffed with grilled grape tomatoes, carrots and mushrooms as well as a grilled beet.  What is nice about this meal is the absence of starches aka low carb (eg. potatoes, pasta, rice) giving it a nice, clean, healthy approach.  It was very low fat as well with less than a quarter ounce of fresh grated Parmesan cheese used as a garnish and flavour boost.  Beets roasted on the grill are simply delicious too!  All away around, this healthy meal was a real family approved pleaser!


Saturday, March 24, 2012

New Food Processor and Creamy French Dressing

Many of my small kitchen appliances are rather old.  For example, the percolator (circa 1950's), yogurt maker (circa 1970's), blender (circa 1980's) and food processor (circa 1980's).  My small kitchen appliances are well cared for but after a period of time any small kitchen appliance will fail.  Plastic parts become brittle rendering them easier to break or crack.  As they start to fail, I keep my eyes out for a replacement at a good price with comparable features.

broken Moulinex food processor
My Moulinex food processor was bought in the late 1980's.  The appliance was made in France and featured 180 W with 3.2 c/.8 L maximum capacity.  The outer casing had began to yellow but the design of the blade attachments was the real problem.  The blade fit into a slot on the plate then the post twisted in to hold everything together on the stem of the food processor.  The centre portion where the post twisted on became brittle enough it simply broke off (red arrow).  Essentially, it was no longer possible to use the shredder or slicer blades at all, only the chopping blade (just above the arrow).

My food processor doesn't get a lot of use other than during bulk cooking and some canning sessions so I wasn't concerned about replacing it immediately.  Well, it actually has been broke for a couple of years but I reasoned that with the KitchenAid food slicer and shredder attachment, I didn't need to replace the food processor.  The reality is a knife is ideal for smaller jobs, the KitchenAid attachment is ideal for the large jobs where I don't want to have to keep stopping to empty the bowl, and a food processor is nice for the mid-sized jobs.

Black & Decker food processor bought on sale
I mentioned a couple of days ago that Canadian Tire has been running some rather nice sales on kitchen items.  While I was waiting for the emissions test to be completed on one of our vehicles I did a bit of shopping.  Talk about being at the right place at the right time!  The Black & Decker wide mouth food processors were marked down to $34.93 from $99.  Well for that price, I decided it was time to put my old food processor out of it's misery.  Right beside the Black & Decker food processors, the were two other brands, one prices at $129.99 and the other at $349.99 with basically the same features.  My total purchases including the food processor was under $80 so I was rather pleased.

Black & Decker food processor
The Black & Decker was made in China.  I know some frugalistas warn not to buy anything made in China but when it comes to small kitchen appliances that is virtually impossible.  The food processor has an 11 c/2.6 L capacity bowl with 500W power.  What I really like is the wide mouth chute with pulse action food pusher.  I especially like the larger bowl capacity which will make this food processor a bit more useful to me.  The speed settings are high, low, pulse and off.  There is a reversible shredder/slicer blade, a chopping blade and a dough blade.   A nice added feature are suction cups on the base to prevent the food processor from moving when in use.  I used the food processor to make a creamy French dressing.  My only complaint is the noise level.  This appliance is loud enough to warrant wearing ear plugs!  Other than that it does a lovely job.

creamy French dressing
Most restaurants and professional chefs make their own house dressing.  Some of them actually make their way to the store shelves.  One local restaurant is in the process of getting their house dressing into the stores.  I seldom buy commercially made dressing because homemade salad dressings are very inexpensive and easy to make.  For example this creamy French dressing costs a third of the price of store bought and even that is on the high side because the sweetener used is honey which tends to be a more expensive ingredient.  Doesn't it just divine?

Creamy French Dressing
recipe by:  Garden Gnome

1 - 10 oz can condensed tomato soup*
1 lemon, juice only
⅓ c local honey
½ small onion, chopped
2 tsp Worcestershire sauce
2 tsp prepared mustard
¾ c sea salt
1 tsp paprika
¼ tsp garlic powder
½  tsp celery seed
¾ c vegetable oil
½  tsp xanthum gum

Set up the food processor to use the chopping blade.  Put all the ingredients except the celery seed, vegetable oil and xanthum gum into the food processor bowl.  Process on low until smooth.  Continue processing while slowly pouring in the vegetable oil in a thin stream.  Add the celery seed then the xanthum gum.  Pour the mixture into container and refrigerate 1 hour  before using.  Store left over salad dressing in the refrigerator.

Makes 750 ml/3 c

*Home canned tomato soup can be substituted for a more flavourable salad dressing.

garden salad with creamy French dressing
We eat a lot of salads and we use salad dressings as sandwich sauces as well as meat or poultry marinades.  The vast majority of the salad dressings we use are homemade.  To me, stocking the raw ingredients that can be used to make several different products or dishes makes more sense than buying a product that really is used for one purpose.  At the same time it is an eco-friendly approach by eliminating disposable containers while being frugal in cost savings.  More importantly, homemade salad dressings taste so much better than store bought plus there are no artificial colours or flavours.  Homemade salad dressing will store in the refrigerator up to two weeks.


Friday, March 23, 2012

Yoshiblade™ Ceramic Knife

[Note:  This is not a paid post.  The opinions expressed with respect to this product are mine based on my personal experience.]

I mentioned earlier that while our house was on the market and before moving that I pared down any food spending to the bare minimum, eating from the pantry and freezers rather than buying food.  The money that would have been spent on food was tucked away to re-stock after our move.  Some of that money is being used to buy a few cooking goodies.  I have really lucked out between Home Hardware and Canadian Tire, both of which have been running sales on kitchen items of up to 70% off!  The next couple of posts will share those great finds.

Yoshiblade ceramic knife
A few days ago, I had to take one of our vehicles to Canadian Tire for an emission test so did a bit of shopping while I waited.  One of my purchases was a Yoshiblade™ ceramic knife with bonus ceramic vegetable peeler and protective cover.  There are warnings to keep the protective cover on the knife when not in use and to use extreme caution as the knife is very sharp. 

I've seen these knives before but would never pay full price for one simply because I have good knives to begin with.  The Yoshiblade is made of natural eco-friendly ceramic materials that stay sharp 10x longer than stainless steel blades.  It won't rust or peel but then good quality stainless steel won't either.  The santoku design is ideal for precision cutting and thin slicing but is not designed for chopping.  I have to tell you when I first saw these knives on television, I was skeptical.  The price has gone down considerably since they were first introduced.  They can be purchased for about $20 regular price but Canadian Tire had them on for $8.73 so I bought one.

thin sliced ciabatta bread using Yoshiblade
The blade really does not look like it would cut anything but don't let that fool you.  I was pleasantly surprised at how well the Yoshiblade™ performs.  It cut through Ciabatta bread nicely creating thin, even slices without a problem.  I was able to slice a potato very thinly, suitable for potato chips and it sliced through a tomato with ease.  As a specialty slicing knife, the Yoshiblade™ performs much better than expected.  The knife has a nice handle feel, fitting my hand perfectly but substantial enough to fit my husband's larger hands nicely as well.  The Yoshiblade™ is a nice addition to our chef's knives.  It will be great for cutting a few thin slices of meats, vegetables and breads without getting out the food processor or KitchenAid attachments and it is a bit more versatile than the mandolin or box grater. 

The bonus vegetable peeler is just that, a bonus and one that will not see much use.  I have a nice commercial grade stainless steel vegetable peeler but I have to be honest in that I don't peel fruits or vegetables unless absolutely necessary.  I basically use a vegetable peeler for carrots, parsnips, potatoes that will be home canned and apples for apple pie filling.  That's about it.  The reason being, removing the peel lowers both nutrients and fiber.  Even apples that are being made into applesauce are cooked with skins on to extract the nutrients and natural pectin that helps to thicken the sauce then they are put though the KitchenAid food strainer attachment.  I simply use a knife to remove the skins of melons, squashes, and some varieties of cucumbers.

In my opinion, there are two problems with the Yoshiblade™.  First, the blade itself is rather short at 4½ - inches long, a good ½ - inch shorter than my smallest serrated knife that slices nicely as well.  The second problem is the blade almost looks like a white plastic.  Our kids and now are grandkids have been taught knife safety but my fear is with the blade looking like plastic, younger kids may think it is a toy knife unlikely to harm.  For that reason, this knife like my heavy cleaver will be stored well out of reach of younger kids.  The grandkids know they are not to touch the knives in the knife block and only the forks and spoons in the cutlery drawer but I'd rather be safe than sorry. 


Thursday, March 22, 2012

Kitchen Quick Tips - Burn Relief

kitchen quick tips

Keep a potted aloe vera in your kitchen.  For minor burns, cut a piece from the aloe vera and rub the juice over the burn for relief while starting the healing process.


Wednesday, March 21, 2012

Using Left-over Grill Roasted Chicken

Our Wal-mart had a sale of two whole chickens, regardless of the weight for $10 so I started stocking up.  My goal was 16 whole chickens total but when I stopped yesterday they were sold out so unfortunately I only managed to get 8.  Out of my first purchase of four chickens, one was roasted on the grill.  Half of the grill roasted chicken was for that night's dinner.  The other half was de-boned for wraps and stock.

de-boned grill roasted chicken
Grill roasted chicken has a lovely, light smokey flavour.  I de-boned the chicken reserving fat, cartilage, skin and bones for the stock bag (right).  This is one time where a bit of extra fat is desirable.  It adds a richness and flavour to the stock that can't be beat.  The same is true of the chicken skin.  Since the stock is de-fatted prior to canning anyway, the end result is a lovely flavoured stock without the fat but all the flavour.

The weather has been unseasonably warm here with highs in the 70's (F) and lows in the 50's (F) which is unheard of in Ontario this early in the year.  The only difference between now and early summer is the humidity levels haven't risen.  Still, I am using summer meals to keep the heat from cooking out of the house.  I cut the remaining meat into strips to make wraps for the following night's dinner.

grill roasted chicken wrap
Wraps are a delicious, easy summer meal that can be enjoyed for any meal depending on the filling.  The grill roasted chicken strips were perfect for wraps adding a delicious flavour boost.  I added a little homemade mayonnaise, iceberg lettuce, grape tomatoes cut in half, a little Italian dressing and light sprinkling of grated cheddar cheese to complete the wraps.

Normally I tuck both ends end then wrap and cut in half on a diagonal for presentation.  This time I tucked in one end then rolled, leaving the 10 - in wraps whole, secured with a toothpick for a bit different presentation.  There was just enough chicken left over for my husband's lunch the next day.


Tuesday, March 20, 2012

Grill Roasted Chicken with Grilled Vegetables

I recently posted about the whole chicken sale our local Wal-mart is having.  It is a one week sale of two whole chickens for $10, limit two packages (4 chickens) per customer per visit.  The trick with these types of sales is to get the largest weight possible to reduce the cost per kilogram (pound) as they are sold in multiples of two regardless of the weight.  The second trick is to get their early in the morning to get the heaviest packages possible.  Sunday's purchases were a bit lower in weight (6.492 kg)  because I didn't get there until after lunch.    Monday's purchases came in at 7.236 kg.  I intend to end up with 16 chickens total so the next few posts will discuss what I do with all this chicken. 

stuffed chicken on the grill
The weather has been beyond unseasonably warm with highs in the 70's (F) and lows in the 50's (F).  We have had the furnace off for over a week now and the heat wave is predicted to continue for the rest of the week.  The house has actually been rather on the warm side so I decided to roast on of the chickens on the grill. 

The chickens are trussed so they cook nicely.  I cut away the excess fat without disrupting the leg trussing so I could stuff the chicken.  This is our favourite way to have roasted chicken.  Once the chicken was stuffed, I added about a half cup of water to the bottom of the soaked clay baker, put the chicken in, finished with salt and pepper and butter then placed it on the pre-heated grill (300ºF).  The propane side of our grill has three burners.  I used the two outer burners with the centre one off until it was time to brown up the chicken.

grill roasted chicken with vegetables on the grill
I wanted to add flavour without adding calories.  One of the easiest ways to achieve this is to use a smoking bisquette (blue arrow).  I use 100% organic Bradley Smoker smoking bisquettes The bisquette is placed directly on the pre-heated grill.  After 10 minutes, the grill is ready to use where the smoking bisquette will add a delicious wood-smoke flavour without the calories. 

Once the chicken started browning up a bit, I put the potatoes, zucchini and grape tomatoes on to grill.  Roasted tomatoes are simply delightful!  The flavour is rich and intensive yet smooth.  I hollowed out the zucchini to make grilled zucchini boats.

grill roasted chicken ready for serving
Just look at that beautiful roasted chicken with just a slight hint of apple smoke.  The deep golden colour comes easier using the grill.  The beauty of roasting a chicken or any other meat on the grill is you can infuse it with delicious, natural wood-smoke flavour while keeping the heat outdoors.  In this respect, roasting on the grill is superior to roasting in the oven. 

While the chicken was gorgeous, nicely roasted, there wasn't enough juice to make gravy.  It could have been due to the clay roasted as there wasn't much in the way of tasty yum yums as Emeril Lagasse puts it.

grill roasted chicken with grilled vegetables and stuffing
I served, the moist and tender, wonderfully flavoured grill roasted chicken with grill baked potatoes and zucchini boats.  The meal was beyond delicious!  My husband couldn't stop raving about it so that means it was a really good meal.

Grill Baked Potatoes
recipe by:  Garden Gnome

Wash the desired number of potatoes.  Poke with a fork to allow steam to escape.  Place on the grill on indirect heat.  Bake until tender.

Zucchini Boats
recipe by:  Garden Gnome

Choose zucchini that are about 8 - inches long.  Wash then cut the stem and blossom end off.  Cut the zucchini in half longitudinally from stem end to blossom end.  Use a spoon to scoop out a shallow channel.  Brush with olive oil and sprinkle lightly with salt.  Turn cut side down onto grill on indirect heat.  Wash and cut grape or cherry tomatoes in half.  Place in a small foil baking dish.  Drizzle with olive oil.  Place on the grill on indirect heat.  Cook the zucchini until tender with defined grill marks.  Remove from grill and plate.  Fill the channel with cooked tomatoes.  Sprinkle lightly with sea salt,  fresh cracked pepper and fresh grated Parmesan cheese.


Monday, March 19, 2012

Frugal Kitchens 101 - Implementing Making Homemade Convenience Foods

Frugal Kitchens 101
The last two Frugal Kitchens 101 have focused on the equipment needed to make homemade convenience foods, the reasons why you should make your own convenience foods and gave you two short exercises to do in preparing for making your own convenience foods.  Armed with the two lists you created last week and the list of equipment needed from the first article you are now ready to proceed.  I have two very important points to consider before embarking on making your own homemade convenience foods.  First, think big but act small or in other words count your pennies and the dollars will follow.  You do not need to go out and buy all the supplies to make every convenience food to stock your pantry.  Remember, Rome was not built in a day!  You need to take baby steps realizing that each step you take is a step towards saving money while putting a healthier product in your pantry.  The second consideration is to never make a large batch of anything unless it is a family tested and approved recipe.  That means, it is fine to make 5 trays of your homemade lasagna for the freezer but not ok to make 10 cups of a taco seasoning blend you have never tried.  Make a test batch.  If it works, fine then go ahead and make a larger quantity but if it doesn't you are out little and can still do some tweaking.  Here are a few tips to get you up and running, making your own homemade convenience like a pro:

  • equipment -  Equipment can be a limiting factor for some types of preserving (eg. canning, dehydrating, freezing).  Check Kijiji, your local Freecycle and thrift shops to get your own equipment or check with family or friends to see if you could borrow a piece of equipment you need from them for a day or two.  The cheapest source for zipper style freezer bags is Sam's Club (8¢ per gallon bag) and for vacuum bags is The Sweet Attack (17¢ per quart bag).  Ask friends and family to keep food jars with lids they would otherwise be putting in the recycle bin.  These are excellent for storing your homemade mixes in.
  • always cook extra - I cannot stress this philosophy enough.  There are very few times I ever cook 'just enough' of anything.  The reason being it takes the same time and energy to cook 2 roasts or double the amount of rice as it does for the just enough amount.  In fact cooking multiples saves both time and money.   If you cook one roast, cook a second which gives you meat for dinner and left-overs from the first roast with hopefully enough left-over for a quick meal start and the second roast can be thin sliced then packaged for the freezer to be used as lunch meat.
  • aim for one bulk cooking session per month - Bulk cooking is a great way to build your stash of homemade convenience foods.  I love cooking but I'm the first one to say a OAMC session isn't for me.  Basically, this makes all the meals you need for a month over a hectic two day period.  I use a modified bulk cooking session where I focus on one or two dishes.  For example, I may take a bit of time to cook up 10 lb of meatballs or make 5 trays of lasagna.  It helps to add to my convenience foods without tying up and entire weekend.
  • enlist family and friends - One of the great things about actual OAMC sessions is they encourage you to get help from family or friends.  More helping hands makes the work go by quicker.  Even in your own home, get your family to help.  Tell them Saturday is cookie making day and each one has to come up with the recipe they want to use.  If you are a family of four, that should give you more than enough cookies for the month while spending a bit of quality time with your family.  Don't be afraid to delegate.  During busy bulk cooking and canning sessions, my husband's jobs are to bring up the canners and jars, use the KitchenAid attachments to grate the huge bowls of cheese we go through, take filled boxes and trays of food to the pantry and run to the grocery store if need be.  When the kids were home running to the grocery store was their job because my bulk cooking sessions are seldom planned, they just happen.  Even little ones can help get things out like measuring spoons, bags, wrap, containers and they love helping with some of the prep work.
  • assembly line - While the assembly line method should never be used for home canning it lends itself nicely for assembling mixes and dishes for the freezer.  Using this method I can easily make 10 homemade cake mixes in under 10 minutes!  That is less time than it would take me to drive to the grocery store, get the mixes, check-out and come home.  The same thing applies to most dried mixes.   It also applies to a lot of freezable casseroles, tv-style dinners, and packaging dried herbs or seasoning blends.
  • make what you use, use what you make - Never, ever make a homemade convenience product that you know you will not use.  For example, your family detests boxed mac & cheese.  Even though you can easily clone this using powdered cheese, if your family won't eat it, it is wasted food which translates into wasted money.  If you are unsure about a homemade convenience food substitute for a commercial one, always do a test run then tweak before making in bulk.
  • comfortable use - I eluded to this in my opening paragraph.  Only make in bulk what you know you can comfortably use from a family tested and approved recipe.  All new to you and your family convenience foods should be put through test runs.  Never make more than you can comfortably use within the safe food storage guidelines.  Tossing expired food is not very frugal.  Try to figure out your usage.  You make tacos once a week.  Each batch takes 3 tbsp of taco seasoning which means you need a total of 156 tbsp or about 10 cups for the year.  You are further off to make 4 batches per year for freshness rather than make the seasoning mix all at once.


Sunday, March 18, 2012

Wal-mart Chicken Sale

Our last house was rural, about a 30 minute drive from the closest grocery store.  That meant a lot of times I passed by the sales because driving a total of 1 hour just to save a few cents or even a couple of dollars was not justified with the current price of gasoline.  We now live within walking distance of one grocery store and a 7 minute drive from Wal-mart and another grocery store.  It is quite possible to walk or bike to either on nicer days.  What this means is I can easily take advantage of cherry picking the sales without having to drive plus I'm getting a bit of fresh air and exercise at the same time. 

We let our food stock dwindle somewhat while the house was on the market and once the house sold.   We essentially bought only the bare essentials and mind you that wasn't much.  What I did was take any money that I would have spent on groceries to create a restock fund.  We normally spend about $50 per week on groceries if that and that is mainly dairy, fresh produce and the occasion splurge item.   While the house was on the market and during the move we pared that down to about $20 per week so over the 18 month ordeal I managed to stash away a tidy sum for restocking, not that I will use anywhere near that!

whole chicken on sale two for $10
Wal-mart (Canada) has a sale on chicken this week where we live.  The last time they did this it was imported from the USA but this time it is chicken produced in Canada.  We always support our Canadian growers whenever possible.  The chicken is priced at two whole chickens for $10, limit two per customer per visit.  

The total weight for the two packages was 6.492 kg (14.312 lb) which works out to $3.08/kg or $1.40/lb.  This is an excellent price!  In comparison chicken breasts with skin and bones is $6.59/kg ($2.99/ lb) and boneless skinless chicken breasts are $13.82/kg ($6.25/lb).  A cooked rotisserie chicken is $7.47 with clearance after 5 PM but I can easily cook it and still realize a savings of about $2 per chicken.  I am stopping tomorrow to pick up a couple more packages and may even stop again on Tuesday.  Each chicken is enough for two meals for us with a bit of left-overs and bones for stock but the number of meals can be stretched if the chicken is used for soups, casseroles, and stews.

whole chicken cut in half for grilling
I prepared one of the chickens for roasting on the outdoor grill (will post later this week).  Then I cut one chicken in half.  Why would I do this?  Cutting the chicken into pieces as desired is saving me at least $1.50/lb.  While we do have a gorgeous dual fuel (charcoal/propane) grill, it is not equipped with a rotisserie given the design so cutting some of the chicken destined for the grill makes sense.  Half chicken is a cut that is very difficult to find in the stores but it is delicious cooked on the grill.  The trimmings (left) went into the scrap bag I keep in the freezer to make stock when I have enough and time permitting.  The chicken halves will be grilled on the outdoor grill likely on the charcoal side.  I froze them for later use. 

whole chicken ready for freezing
The whole chickens are already tied to keep the wings and legs looking nice when roasted.  I put two of the chickens in freezer bags for later use.  These will end up being roasted either in the oven or more likely on the outdoor grill.

Tomorrow's purchase will be cut into chicken pieces then packaged in meal sized portions.  I will end up with BLSL chicken breasts, chicken legs with backs attached, ribs and wings.  Wings tend to be rather expensive here but using the wings from the sale chicken will give me 16 pieces at a rather inexpensive price per kilogram.

At any rate I am pleased with the price per kilogram for the sale chicken.  With any luck I will be able to pick up enough chicken to last us the summer.  Watch for Tuesday's post of roasted chicken on the outdoor grill.  It was phenomenal!


Friday, March 16, 2012

Peanut Butter Swirled Brownies

The weather has been unseasonably warm here to the point it is mid-March and we have had the furnace off for three days now.  These temperatures this time of year are virtually unheard of here!  So yesterday, I decided to tackle a few boxes in the garage.  It is an attached garage but unheated so this heat wave was perfect timing.  I came across a box of various recipes I had kept dating back to the mid-1990's.  As I sorted through the box I pulled a couple of recipes to try out.

uncut peanut butter swirled brownies
The peanut butter swirled brownies recipe was on a 1996 promo offer by Baker's.  I had to do a substitution for some of the chocolate as I only had four squares of Baker's unsweetened chocolate and my ankle still isn't strong enough to do a lot of walking and I didn't feel like starting up the truck to drive a couple of blocks and back.  Both the batter and icing are marbled.   I used a knife to marble the thicker batter and a toothpick to marble the icing.   Once the icing set up it was time to cut the brownies.   It almost seemed a shame to cut the brownies as the icing looked lovely! 

Chocolate and peanut butter is a very popular flavour combination so I'm not surprised the brownies tasted every bit as good as they looked.  I will warn you they are on the rich side but oh so yummy!  These brownies are sure to a hit with your family and they would go over well for parties or get-togethers.  It definitely is a keeper recipe. 

Peanut Butter Swirled Brownies
source: Baker's special offer pamphlet (circa 1996) 

Brownies
2 squares Baker's unsweetened chocolate*
⅓ c butter
⅔ c unbleached flour
½ tsp baking powder
¼ tsp sea salt
2 eggs
1 c organic sugar
1 tsp vanilla

½ c smooth peanut butter
 c organic sugar
¼ c 2% milk

Icing
4 squares Baker's semi-sweet chocolate
¾ c smooth peanut butter, divided

Brownies: Heat oven to 350ºF (180ºC).  Heat chocolate (or * substitute below) in microwave on high for 1 minute until butter is melted.  Stir until the chocolate is completely melted and mixture is smooth.  Cool completely.  Combine flour, baking powder and salt together in small mixing bowl.   In a separate mixing bowl, beat eggs.  Gradually beat in the sugar.  Beat until well blended.  Blend in the chocolate mixture and vanilla.  Stir in the flour mixture.  Spread into a greased and floured 8 - inch square baking pan.  Blend the peanut butter, sugar and milk together.  Top the brownie mixture in the baking pan with spoonfuls of the peanut butter mixture.  Draw knife through the batter to marble it.  Bake 35 to 40 minutes or until the brownies begin to pull away from the sides of pan.  Cool in pan on a rack.

Icing:
Melt the chocolate with ½ cup of peanut butter in microwave on medium power for 3 minutes.  Stir until well blended.  Spread over the top of the cooled brownies.  Melt the remaining peanut butter and drop by spoonfuls onto the icing.  Swirl with a toothpick to marble.  Chill until icing is set.

* I substituted the squares with 6 tbsp powdered cocoa stirred into 2 tbsp melted butter.


Thursday, March 15, 2012

Kitchen Quick Tips - Nix the Antibacterial Kitchen Cleaners

kitchen quick tips

Anti-bacterial kitchen cleaners are expensive, cause indoor air pollution and must be left on the surface anywhere from 30 seconds to 10 minutes.  Use 50% ethyl alcohol (rubbing alcohol), a dollar store find, instead.  Pour the alcohol into  spray bottle then spray on kitchen surfaces to kill germs instantly while it sparkles surfaces.


Wednesday, March 14, 2012

Custom Kitchen Bulkhead and Trim

Yesterday was a whirlwind of activity here rendering my kitchen inoperable for a little over eleven hours without the clean-up today.  I will apologize in advance for the glare on the pictures.  This kitchen is absolutely horrid for taking pictures in due to the natural lighting and reflections from the marble tile floor.  Our friend who is doing a lot of custom woodworking in our home arrived with his crew of one at 9 AM.  Now this is my husband's busy time of the year meaning he works 16 to 18 hours a day.  He came up with a plan to skirt some of his DIY projects and that was to get our friend and his crew to do them.  At the end of the day, the kitchen bulkhead and trim were finished, the front door was fixed, the replacement garage door opener was installed and I had a nice, new central vacuum cleaner to play with.  Had we waited, none of this would have been done until after tax season (April 30) but in reality likely not until after our spring vacation.  Anyway, this work was finished in one day and while I didn't get any cooking done, I am pleased with the results.

kitchen prepped for renovations
Marble tile flooring is a bit  more on the delicate side than I thought it would be.  I can't even use my standard vinegar solution for washing it as the pH needs to be neutral so the steam mop works nicely.  The guys protected the floor with a heavy quilted throw.  This was to be the kitchen scene for the next almost eleven hours.  It doesn't show the two ladders being used or the guys standing with work boots on my counter or even remotely describe the sound of the power nailer powered by the air compressor (bottom centre).

All of the cutting was done in his mobile workshop which is quite impressive!  At least most of that mess stayed outside.  It was a very long day though!

kitchen bulkhead over sinks and stove
We moved here last September.  The original kitchen was taupe tones.  Our friend made a custom shelf for my cookbooks giving a home to some of my most used cookbooks.  I recently painted the kitchen the same colour as my dinner plates, a colour that matched nicely into the colour scheme I chose for the house. 

The kitchen cabinets had an open bulkhead, the space between the cabinets and ceilings.  One of our houses had the same open bulkhead as does our vacation home.  When our friend suggested enclosing it, I was all in favour.  An open bulkhead is a work-maker, dust collector, and borderline clutter collector.  Anyone with an open bulkhead knows it is a greasy dust collector as well.  Our friend recommended building in the bulkhead.  True we would lose a bit of storage space and we could have designed it to have extra storage but we chose not to.

Pictured is the finished bulkhead along the long wall of the kitchen.  There is a slight tone difference in the woods, something our friend is really not happy about but quite frankly I think the new tone suits the kitchen better.  In reality, the tone difference shows more in the pictures than it does in the kitchen.  At this point we have a few options.  We decided to take the kitchen cabinets from their yellow tones to the taupe tones of the new trim.  While this does mean more work to be done, the end results will be nicer.  Seriously, we dealt with this very same problem at our last house.  The fix is not as complex as it sounds.  So, the kitchen isn't completely finished but that's ok.

kitchen bulkhead on refrigerator wall side of kitchen
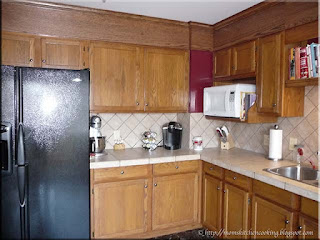
The refrigerator wall of the kitchen had a bank of cabinets separated by jut out wall we cannot change.  At first, the plan was to leave that wall with no trim but then I thought it would look better with the same trim.  What do you think? This is one good reason why the homeowner should be there when any custom work is being done especially in the kitchen.

All in all, I am quite pleased with building in the bulkhead.  While it removes a bit of storage, it removes a dust collector that is much appreciated given my allergies.  Ideally, kitchen cabinets should go to the ceiling eliminating this problem entirely but if they don't this is a viable option.  In vacation homes that you rent out when not using this is a great spot to build in secured storage for items you don't want your renters to use. 

ceiling trim in the kitchen
We extended the oak trim around the entire kitchen.  This added continuity and character to the kitchen.  The deep cove molding added a touch of elegance without being pretentious as well.

This was a very long day of workers in the house.  In the end, everything was done that needed to be done that day.  True, it has led to more work but that is the nature of any home renovation.  The next step is the cabinets, bringing them to the tone of the new bulkhead.  And with that the kitchen should be finished but is it?  My husband wants to add a sunroom off of the kitchen making that portion of the deck usable three seasons or year round.

This is precisely what happens when two people who love to cook are faced with a brand new kitchen.  Nothing happens in one fell swoop and the plans keep getting changed but in the end we get what works for us.  I will post a picture of the finished cabinets and keep you updated on the sunroom.


Tuesday, March 13, 2012

Charcoal Grilled Rib Steak

[An Aside: As I type this our custom woodworker is here doing the finishing touches in our kitchen.  Oh my gosh, I am so pleased with the results!  I'll post a picture or two tomorrow.]

We a huge fans of grilled foods, especially meats and poultry.  Our grill is used year round but sees heavier almost daily use during the hot summer months.  We have had plain charcoal grills, hibachis, propane, natural gas and electric grills ranging from tabletop/countertop, stove cartridges and full sized stand alone units.  Each type of fuel gives good results but each behave differently.  Electric built-in and stove cartridges don't give the depth of flavour when compared to gas or charcoal grills.  Propane runs hotter than natural gas so gives better grilling results.  Propane and natural gas are convenient giving good results but by far, the best fuel for flavour is charcoal.

charcoal grilled rib steak
Sunday night we grilled rib steaks for dinner.  It was the second last package of steaks in the freezer.  We are getting ready for our beef-on-the-hoof order so I want the freezers cleaned out.

The steak was grilled on charcoal to between blue and rare.  At one point I would not eat steak this way and still like it medium rare but grilled this way is delicious!  Now this is the way steak is meant to be cooked!   I served it with steamed asparagus garnished with sesame seeds and grill baked potatoes garnished with parsley flakes.  It was a delectable meal to welcome in the warmer spring weather.

No doubt there will still be a few chilly days but we are quickly approaching the ADLF (average day last frost) here.   That means my windowsills are filled with seedlings and trays waiting for germination.  All is good!


Monday, March 12, 2012

Frugal Kitchens 101 - Homemade Convenience (2)

Frugal Kitchens 101

Last week's Frugal Kitchens 101 discussed homemade convenience and some of the equipment needed and what to focus on.   Store bought convenience foods are more expensive and often filled with artificial colourants, flavours, fillers and other additives.  In short, most of them are over price while being unhealthy.  Homemade convenience foods, on the other hand avoid all the negatives of store bought while saving you both time and money.  Let's face, we can all appreciate saving both!  This article will expand on homemade convenience a bit further.  I have two short exercises for you to do:

  • check your pantry - Go through your cupboards, refrigerator, freezer and pantry.  Make a list of every single store bought convenience food you have on hand.  If you are the average consumer it will include store bought convenience foods like pasta mixes, canned pasta, canned beans, frozen pizza, fish sticks, condensed soups, boxed cookies and those types of foods. 
  • scout out your grocery store - The grocery store is filled will a multitude of convenience products.  If you need inspiration for making your own, just wander through the canned, snack and frozen food aisle.  Make a list of what you could make yourself at home as a homemade convenience product (eg. make a huge batch of pancakes then freeze them for a quick breakfast warmed up in the toaster during the week).
Ok, you now have two lists so let me comment on those first.  The pantry check will give you a good idea of the store bought convenience foods you use and what products to focus on when making your own homemade convenience products.  Chances are good, these are the very same products that make their way into your grocery cart every time you do a large grocery shopping.  If these foods are mixes (eg. rice or pasta mixes) about 20% of the cost is for actual food with remaining 80% going towards mark-up and packaging.  If you use one box of boxed mac & cheese a week at $1.29 for brand name the cost works out to $67.08 per year.  If you make from scratch at 20% of that cost you only pay $13.14 for a year for better quality product even if using powdered cheese bought from a bulk food store.  Now that is just one store bought convenience product.  Imagine if you do the same cost analysis for all the store bought convenience foods you buy.   If you really want to save money then you have to look at all the convenience items you use in the same light.

Let's consider commercially canned foods.  In comparison to home canned they are considerably more expensive even taking into consider the hydro, gas or propane used to process the food.  A jar of gourmet style roasted tomato sauce cost me about 20¢.  A similar store bought tomato sauce (with sugar and/or HFCS added) costs over $3.  Both are just as convenient but the homemade is healthier and a lot less expensive.  But consider what the commercially canned foods are giving you that home canned foods are not - exposure to BPA (bis-phenol A) which has been linked to breast cancer, in over 130 studies as well as hardening of the arteries, depression and diabetes.  Campbell's the dominant company making condensed soups is finally making the move to stop using BPA in the plastic coating, mandatory in all commercially canned products manufactured in North America.  France, the European Union, Canada, Denmark and Japan have taken action in banning or partially banning BPA.  The USA FDA may ban the use of BPA in food packaging in their decision on March 31 of this year.  Consider too the CFIA (Canada) and USDA (USA) both have set standards for allowable bug parts in commercially canned foods meaning you are getting more than what you bargained for aside of food in the form of additives, preservatives, carcinogens and even bug parts.

Onto the next list, the one you made at the grocery store.  First, if you are shopping mainly in the centre aisles rather than the perimeter of the store you are spending too much money.  So looking at the convenience products you can easily and rather effortlessly make at home, here is a short list to consider.  Your list should be individualized based on those two lists - what you regularly use and what you can easily make yourself.
  • tv dinners or individual dinners - Use left overs to create your own.  Freeze for later use.
  • seasoning blends - Grow and dehydrate the herbs yourself (right on your windowsill) then buy what you can't grow (eg. salt, peppercorns, bay leaves, cinnamon, etc.) to make your own seasoning blends.  Two good examples of homemade seasoning blends that take seconds to make yet are considerably less expensive than store bought and taste better are: poultry seasoning and taco seasoning.
  • frozen or refrigerated dough - Make your own from scratch then use as you would store bought.  You can even freeze bread dough so you can enjoy fresh baked bread when you don't have time for all the prep.  One trick I use is if I'm making dough, I double the recipe.  Half goes for that day's use and the other half goes for later use.
  • frozen breakfast foods - Take an hour or so to stock your freezers with ready to heat and serve breakfast foods like breakfast sandwiches, omelets, breakfast burritos, pancakes and waffles.  You can use a large batch muffin mix to use as needed or simply make a couple of trays of muffins then freeze for use later.
  • dump and pour meals - These include condensed soups and stews, canned pastas, and any other food that you basically open the can and serve.  Substitute with homemade soups and stews that freeze nicely or you can home can them for the same heat and serve convenience.  
  • the starches - Beans (eg. kidney, navy, etc.), rices, potatoes (sweet and regular) and some pastas can be cooked ahead then froze in meal sized portions or as part of other dishes.  Beans and potatoes can be home canned but rice and pasta should be added to soups when reheating.
  • the snacks - Dollar for dollar this is the second biggest portion of food costs next to meat and for some families might even exceed what is spent on meats.  Ideally, divert away from commercially prepared snacks if favour of healthier choices like fruits, nuts, vegetables and popcorn.  It takes less than 10 minutes to pop a huge batch of popcorn at home which is a healthier choice than potato chips and coated popcorn treats.  Most cookies and cakes freeze nicely.  Some pies freeze nicely as does individual fruit pies (eg. turnovers). 


Sunday, March 11, 2012

Oven Braised Sweet Baby Ray Ribs

I recently wrote about some of the frugal deals we found during our last trip to Sam's Club. While warehouse shopping is not for everyone, a considerable amount of money can be saved, more than enough to recoup the cost of membership even if you don't buy any food.  I am very picky about what foods I do buy there because some foods (eg. fresh fruits) can be a problem trying to bring them back into Canada and some purchases like dairy, meat and poultry have restrictions as to how many pounds can enter when returning to Canada.  Compounding the problem is US prices have come closer and in some cases exceed the Canadian price.  In general (for us), commercially canned foods (which we buy very little of), most bread  cannot be bought cheaper at Sam's Club and dried cereals are getting rather close to Canadian prices.

A couple of days ago, I was watching FoodNetwork Canada, when three of the programs showed ways to cook ribs.  There was no denying it, the craving for ribs was sparked.  I pulled out a large rack of ribs from the freezer, grabbed a bottle of Sweet Bayb Ray's Barbecue Sauce (2 - 40 oz bottles $5.98 at Sam's Club) from the pantry and the stainless steel roaster.  Dinner was in the makings!

Sweet Baby Ray's Barbecue Sauce is an award winning sauce that we discovered at a ribfest.  It is one of our favourite purchased barbecue sauces.  The deep, spicy, smokey rich flavour is perfect for using with any cut of pork but it was perfected for use on ribs.  The trick for cooking pork spare ribs is long and slow.  I like to add a bit of moisture during this process before adding the sauce later.  The ribs can be seasoned if desired but this time I didn't.  They went into the oven at 200ºF to slowly cook for the afternoon (about 5 hours).  About 4 PM I poured half a bottle (about 20 oz) of Sweet Baby Ray's Barbecue Sauce over the ribs and let them cook at 275ºF for one hour then raised the heat to 400ºF, removed the lid and cooked for 20 minutes to caramelize the sauce a bit.

Ribs cooked in the oven this way are mouth-watering delicious with wonderfully tender, fall-off-the bone texture.  The caramelized crust give a texture similar to that found on ribs cooked on the grill.  I served the ribs simply with a side of rice and mixed vegetables.  We are eating more rice now that I stopped using the rice cooker.  I am quite pleased that I finally learned how to cook rices on the stovetop.  The results are considerably better than rice cooked in the rice cooker!  I now longer need to add a bit of butter when cooking rices like I had to do with the rice cooker and I can still use a wide variety of liquids for cooking the rice.

It was a delicious, easy to prepare meal with the taste of summer just perfect for a chilly, late winter's day.  Spring is in the air so we will be doing a lot more outdoor grilling. Tonight we are gilling steaks on the charcoal side of our grill.  Gardening is just around the corner so there will be more canning to do.  I'm looking forward to getting busier in the kitchen as well as enjoying more opportunities for entertaining in our home!


Friday, March 09, 2012

Rotini with Roasted Tomato Basil Seafood Sauce

Michael Smith is my favourite Canadian chefs.  I am particularly fond of his wholesome philosophy of cooking without a recipe using whole foods (aka cooking from scratch).  Being laid up, I have enjoyed watching a bit of Food Network Canada so was quite intrigued by his seafood chowder with dill.  My dill has just been started so I have no fresh to use meaning I have to wait to try that yummy sounding recipe.  What stood out was his comment that anything that swims in water is fair came for a seafood chowder.  I decided to take this ideal a step further to create a roasted tomato basil seafood sauce for pasta.

cooked cod and shrimp for the seafood sauce
I really started this recipe with a vague idea of what I wanted the end result to be.  We has recently dined at a local restaurant where I enjoyed spaghetti topped with a seafood blush sauce so that was my inspiration for this dish.  I used cooked seafood in my recipe, focusing on cod, shrimp and crab meat.  The premise was each would add texture and flavour without being overcooked and rubbery.  I used a piece of cod fillet that was about 5 - inches long, simply brought to a boil in salted water and cooked to opaque.  The shrimp was pre-cooked and frozen so all I had to do was thaw, peel and cut into pieces.  It was left over from our holiday celebrations so I wanted to use up some of it.

cooked crab knuckle
The crab knuckle is the joint where the crab legs attach.  It is a nice meaty section ideal for making seafood based soups, salads, dips and chowders.  The meat is not quite as sweet as the legs themselves but there is a lot of it.  One crab knuckle will give a yield of about ¾ cup of prepared crab meat.  The taste difference between using the crab knuckle even cooked from frozen when compared to store bought canned crab meat is far superior!

Method for cooking:  Pour about 3 cups of water into a small sauce pan.  Season with about a teaspoon of salt.  Bring the water to a boil then put the frozen crab knuckle into the water.  Allow to cook until the meat is opaque.  Remove the knuckle from the water with a slotted spoon and allow to drain before preparing.

peeled crab knuckle
The crab knuckle yields a nice sized piece of crab meat that has a lovely flavour.  Now doesn't this piece of crab meat from the knuckle look divine?  I was so tempted just to eat is as is but I resisted!

The easiest way to get the meat out of the knuckle is to use a pair of kitchen shears.  Cut horizontally from across the knuckle from narrow end to narrow end.  The meat shell can easily be peeled off leaving the tender, juicy crab meat.  Any remaining crab meat on the knuckle can be removed using the tines of a fork.  Cut the crab meat into bite sized pieces if using for soups, stews or chowder.  If using for dip, shred with the tines of a fork.

rotini with roasted tomato basil seafood sauce
Home canned fire roasted tomato basil sauce formed the base for this seafood blush sauce.  I love basil and quite frankly grow several varieties because there is no such thing as too much basil!  You know that commercial where the lady says "I put the F on everything"?  Well I could say the same thing about basil.  The end result was a yummy, zesty seafood sauce just perfect for topping rotini.  If you notice, I generally do garnish homemade pasta dishes with fresh chopped vegetables that help to add nutrition along with texture.  I also garnished with a little Parmigiano Reggiano (aged over 24 months) and fresh ground pepper for flavour without adding a lot of calories or fat as well as fresh parsley for colour, flavour and digestive properties.

This sauce was a winner hands down!  I think the only thing I would change the next time is to reduce the amount of the roasted tomato basil sauce.  That would allow the seafood flavour to shine through a bit more.  Other than that, it really was an excellent sauce perfect for topping most pastas!

Roasted Tomato Basil Seafood Sauce
recipe by: Garden Gnome

12 jumbo cooked shrimp
1 small cod fillet (or other white fish)
1 crab knuckle

2 c 2% milk
¼ c evaporated 2% milk
1½ c roasted tomato basil sauce
8 oz pk sliced mushrooms
2 tbsp extra virgin olive oil
1 tbsp butter
2 tbsp flour
2 tbsp water or milk
1 tsp

½ small onion
½ small tomato
1 sprig fresh parsley per serving
1 tbsp fresh grated Parmigiano Reggiano
fresh cracked pepper


Cook the cod fillet and crab knuckle in separate small sauce pans and cook until opaque.  Cool, then cut into bite sized pieces.  Sautée the mushrooms in the olive oil and butter mixture.  Drain.  Bring the milks to a simmer then stir in a slurry of flour and water or milk.  Allow to cook until thickened.  Stir in the roasted tomato basil sauce and mushrooms.  Bring to a simmer.  Stir in the shrimp, cod and crab meat.  Remove from heat.  Ladle the sauce over your pasta of choice.  Sprinkle on fresh grated cheese and fresh cracked pepper.  Garnish with fresh chopped onions, tomatoes and sprig of parsley.