My photo
Ontario, Canada
I am a wife, mother and grandma who enjoys the many aspects of homemaking. A variety of interests and hobbies combined with travel keep me active. They reflect the importance of family, friends, home and good food.
Cook ingredients that you are used to cooking by other techniques, such as fish, chicken, or hamburgers. In other words be comfortable with the ingredients you are using.
--Bobby Flay

For Your Information

Please watch this area for important information like updates, food recalls, polls, contests, coupons, and freebies.
  • [March 19, 2020] - Effective Mar 17, this blog will no longer accept advertising. The reason is very simple. If I like a product, I will promote it without compensation. If I don't like a product, I will have no problem saying so.
  • [March 17, 2020] - A return to blogging! Stay tuned for new tips, resources and all things food related.
  • [February 1, 2016] - An interesting report on why you should always choose organic tea verses non-organic: Toxic Tea (pdf format)
  • Sticky Post - Warning: 4ever Recap reusable canning lids. The reports are growing daily of these lids losing their seal during storage. Some have lost their entire season's worth of canning to these seal failures! [Update: 4ever Recap appears to be out of business.]

Popular Posts

Tuesday, January 31, 2012

Mom's Basic Meatloaf

My apologies for not posting as much. It has been a week now working on painting the kitchen.  Let me tell you it has been a bit more complicated than I originally thought it would be but just wait until you see it!  We absolutely love the colour...so rich and bold making the floor and appliances pop.  Today we (one of our kid's partner) worked on the final touches.  I will be doing the finer detail edging using an artist's brush then will be putting the kitchen back together so my normal cooking will resume tomorrow.  Oh, and if you are wondering what colour I painted the kitchen, look at my plates :)

Mom's basic meatloaf
Meatloaf was one of the last meals made in our kitchen before prepping it for painting.  I think basic meatloaf was one of the very first dishes I learned to make as a newlywed.  Many complain that their meatloaf is too dry but I have never had that problem.  I use 1 egg per pound of lean ground beef.  That's my secret.  When combined with the other liquid ingredients and dry bread crumbs the results are consistently moist and tasty meatloaf.  I modify my basic meatloaf recipe to create unique meatloaves by adding shredded vegetables, turning into a roll with filling or even making mini meatloaves but the basic meatloaf base remains the same.

Mom's Basic Meatloaf
recipe by: Garden Gnome

3 lb lean ground beef
3 eggs
1 c dry bread crumbs
1 tbsp prepared yellow mustard
¼ c ketchup or Heinz 57 Sauce
½ tbsp garlic pepper

Beat eggs.  Combine all of the ingredients mixing well.  Fold into a loaf pan, patting down slightly and smoothing the top.  Bake at 175ºC (350ºF) to an internal temperature of 71ºC (160ºF), about 40 minutes.  Remove from the oven.  Cover with tinfoil and let rest 10 minutes.  Remove from the loaf pan.  Slice for serving. 


Monday, January 30, 2012

Frugal Kitchens 101 - Kitchen Textiles

Frugal Kitchens 101

There is a rather large number of various textiles (eg. t-towels, serviettes, table cloths) required in any kitchen.  Each serves a specific purpose although some can serve multiple purposes.  As with all kitchen associated items, textiles range in price from free to very expensive, natural to synthetic fiber, plain utilitarian to decorative only, and low to high maintenance.  The number of textiles required is dependent on your cooking style, family size and whether or not you do a lot of entertaining.  Here's a listing of the textiles in our kitchen and how I've dealt with acquiring them frugally.  I should note that all of my textiles are washable, most are natural fiber.  I don't use fabric softener on them as that reduces the absorption nor do I use chlorine bleach as that is a lung irritant that weakens fabric.

  • dishcloths - I use two types of dishcloths in the kitchen.  The first are utilitarian, plain white, 100% cotton wash cloths bought in a package of 24 on sale at K-mart for $3.99 (regularly $4.99).  I use these in place of paper towels whenever possible.  The second type of dishcloth is handmade (either crochet or knit eyelet edge or knit plain edge) using Bernat Handicraft cotton.  One 340 g ball costs $8.99 and makes 4 dishcloths.  I use these cloths for hand-washing dishes, pots and pan.  The heavier texture and durability make the handmade dishcloths are my frugal.  Making them keeps my hands busy while watch television as well.
  • t-towels - I do a lot of cooking and canning which translates into needed a large number to t-towels.  During a canning session I can easily use six or more t-towels.  My t-towels are actually cotton bar mop towels (white ridged with blue stripe) bought at Sam's Club in a 24 pk for $12.88.  These ultra absorbent towels are used for drying hand-washed dishes but see the largest portion of their use during bulk cooking and canning sessions.  I don't worry about staining.  If the staining is quite bad the towel is put into the garage where it is used for washing vehicles and other household cleaning.  I have about a dozen waffle weave cotton t-towels as well.  They are beyond ancient but still in good condition.  
  • oven mitts -  I have a pair of waffle weave cotton oven mitts, a pair of silicone oven mitt and a silicone pot grabber.  I prefer using the cotton mitts while my husband prefers the silicone.  The silicone will outlast the cotton and there is no staining concerns.  The silicone set cost about $20 on sale but should not need replacing.
  • hot pad/trivets - I use padded cotton hot pads at our vacation home but for regular use at home I use cork trivets bought at IKEA about 9 years ago, a package of 3 for $3.99.  Cork is very durable.  I had a large rectangular cork hot pad bought from IKEA back in the 1980's that finally had to be thrown out just last year.  Cork is my preferred surface for placing filled jars just out of the canner.  Both cotton and cork hot pads are subject to staining.
  • serviettes - I use re-usable linen and cotton serviettes but I still use paper serviettes for larger scale entertaining.  Some of the linen serviettes were a wedding gift years ago, others have been acquired at yard sales, and others I have made.  I prefer vintage and handmade.  Fabric ends can be found at ridiculously low prices and it only takes a few minutes to sew up a few serviettes.  The downside to linen is it does need to be ironed.
  • tablecloths - When our kids were young, I used fleece backed vinyl tablecloths that I made.  Most tablecloths hang down around the table edge but I saw this as a safety hazard so put an elastic edge on the tablecloths (sort of like a giant shower cap) so they would fit snuggly on the table with no danger of being pulled by curious little hands.  Most of my tablecloths now are homemade and I seldom use them as I like the beauty of my wood tables to show.  At one time I had a custom cut piece of glass made for the dinning table but gave up using that as well.  While glass is not a textile, it is an option if you want to enjoy the look of your wood table without damaging it through daily use.
  • curtains - I have not had actual curtains in any of my kitchens (19 in total including RV and vacation home) in over 30 years of marriage because I simply do not like curtains.  I have used homemade fabric valances to soften the look of mini blinds and roll down shades but not curtains.  Curtains are easy to make taking only basic sewing skills.  Making them yourself is a way to get a custom look while saving money.
  • rugs/mats - I use a rubber backed, non-slip, low pile mat in front of the patio door but only seasonal.  Our last house opened to the back yard via patio doors making the shiny ceramic floor a slipping hazard during wet weather so I used a runner style mat that spanned the patio doors.  The kitchen in this house opens to the deck via patio doors and the marble tile creates a slipping hazard especially if someone comes in with wet feet from the pool.  I will put a mat down once the deck and pool is being used.  I have found that Walmart and K-mart tend to have less expensive mats for this purpose, usually in the $7 to $10 price range.  I don't use any mats near the counters or other entrances to the kitchen as they present a tripping hazard during canning and bulk cooking sessions.


Thursday, January 26, 2012

Kitchen Quick Tips - End Water Spots on Chrome Surfaces

kitchen quick tips

End water spots on chrome surfaces by rubbing with a piece of wax paper, coated side down.  This will remove white spots while leaving a thin coating that acts as a varnish to repel water spots from occurring.  Repeat as needed.


Wednesday, January 25, 2012

Honey Dijon Salmon Fillets

Salmon is rich in Omega-3 fatty acids making it a good food to include in any healthy diet.  Salmon is available year round as fresh, frozen or canned sourced from wild or farmed.  However, wild salmon is superior to farmed salmon.  It is very important to read the label as some farmed salmon is dyed to the characteristic pinkish colour and may be high in dioxins and PCB (polychlorinated biphenyl).  Even though wild salmon may be slightly lower in Omega-3 fatty acids, the frugal choice between wild or farmed salmon is wild. 

honey dijon salmon fillets with zucchine melody

Salmon has a stronger flavour that pairs nicely with maple syrup or honey as well as stronger herbs like dill or rosemary but it also pairs nicely with citrus and creamy type sauces.  It can be smoked for a delectable treat, used in dips or as the meat portion of a meal and as a filling for sandwiches.   We typically enjoy salmon three or more times per month.  We love salmon baked or grilled usually without a lot of added flavours but raw, unpasteurized honey (the only kind I use) really adds a sparkle to salmon. 

I made honey dijon salmon fillets served with zucchini melody for dinner.  This wonderfully delectable meal was quick and easy to prepare while being healthy.  Honestly, for those gardeners complaining about having too much zucchini, please ship them to me!  I can't wait to be harvesting zucchini from our new garden beds.  Just a tip for those growing zucchini, harvest when about 8 - inches long and deliciously tender. 

Honey Dijon Salmon Fillets
recipe by: Garden Gnome

½ c unpasteurized honey
1 tsp dijon mustard
¼ tsp fresh ground black pepper
1 tbsp butter
2 tbsp sliced almonds
2 salmon fillets

Mix the honey, mustard and pepper together.  Place salmon fillets in oven proof baking dish.  Dab butter equally over the fillets.  Pour the honey mixture over the fillets.  Bake at 350ºF until salmon is cooked through (opaque).  Remove from oven.  Plate then garnish with sliced almonds.

Servings: 2


Monday, January 23, 2012

Frugal Kitchens 101 - A Mouse in the House

Frugal Kitchens 101

We have been happily married for over 30 years and while I did have to deal with mice in my childhood home, I was very fortunate to not have to deal with them until we moved to a rural location.  I have extensive experience with lab mice (they really don't like pap smears!) and pet mice,  I'm sorry but I do not tolerate wild mice in home.  Wild mice are vectors of disease while contaminating foods and surfaces.  I find nothing cute about them so take a very aggressive approach to rodent control.  They are nasty little, destructive critters!  Our second last house had a farmer's field behind and water in the front as did our last house.  This house backs onto a small farmer's field.  When the crops come off the mice come in.  It is a given.  I did the house walk-around, sealing every crack I could find here and when the crops came off though I was in the clear yet when we arrived home from vacation on December 21, there were mouse droppings in the pantry.  There were no signs of it getting into any food but aside from a few packages, all the food in the pantry is protected and when we checked the traps yesterday they were completely clean of the peanut butter!  My husband reset then with cheese, securing it tightly under the bait area.  This morning there was a mouse in one of the traps.

Rodents (eg. mice, rats, squirrels) can be a potential problem in any dwelling regardless of the age, style or location of the home.  They can create an health and safety hazard as well a fire hazard if they chew on the electrical wiring.  However, some locations such as those within a close proximity to crop fields are more prone to rodents getting indoors.  Older homes may be more prone as quite often they are not sealed as well.  If you live in a location where there is an existing higher rodent population (eg. inner city) there is a greater likelihood of a rodent getting into your house.  If one or more rodents get into your house there are four steps that must be followed:

  • clean-up and removal - A mouse in the living area of the house is easier to deal with than one in the attic or walls.  Mice and rats are nocturnal so turn off the lights and television then listen for the pitter patter of little feet.  That will give you an idea what area of the house the rodent is in.  If you see the tell tale signs of rodent droppings, mark the location then vacuum them up and set traps in that area near the perimeter of the room which is the normal path mice take.  Do not sweep up rodent droppings as that can cause virii or bacteria to become airborne.  If the infestation is bad, call in an exterminator especially if dealing with mice in the walls or larger infestations.
  • seal rodents out - Seal all holes or other sources of entry for mice.  Pay particular attention to where wires and pipes enter or exit your house, under the eaves and where the house sits on the foundation.  Caulk all cracks, crevices and holes.  If the hole is larger, patch it with the appropriate material then seal well. 
  • remove all food sources 
    • All food should be stored in glass, metal or heavy plastic containers.  Be aware that plastic can allow food odours to escape attracting rodents and rodents can chew through plastic.  All boxed or packaged foods can be stored in non-food grade plastic as the food itself will not come into direct contact with the plastic.  There are several styles of plastic totes and bins with lids that will help protect your food.  Be sure the lid snaps on tightly though.  An alternative to bins is to use a metal storage locker that rodents cannot get into.  Use a metal breadbox to protect breads and rolls or put them into the microwave for storage.  Use food grade plastic to store foods that will come into direct contact with the plastic.  Heavy plastic pails can be found at doughnut shops and restaurants, usually free for the asking.  This is a good source for large glass pickle jars suitable for dry storage as well. 
    • Floors and countertops must be kept squeaky clean, free of any crumbs as should your stove surface even under the burners where crumbs can accumulate.  The best tools to ensure no crumbs is the vacuum cleaner, electric broom or hand held mini vac.  
    • Maintain a food in the kitchen only policy.  That will keep any crumbs confined to one area of the house making it easier to clean.  During an active infestation, put away all foods including your candy dish and fruit bowl.  Once the potential for infestation has been eliminated, they can be brought out again.
    • Protect root vegetables, squashes and apples in your pantry by placing in a mesh box.  This is a box constructed using a wood frame and solid bottom with finer weave carpenter's cloth for the sides and lid.  The food smells may attract any rodents in the house but they will not be able to get to the food.  This box is best set up after eliminating any infestation and sealing your house.
    • Remove any garbage and food unneeded leftovers from the kitchen and place in secure garbage bin until garbage collection day.  Use a bungie cord if necessary to keep rodents out of your garbage bins.
  • prevention - I tend to declare a rodent infestation over once all signs of the rodent are gone.  However, once a rodent has got into your house it pays to continue with a good prevention plan.  Here are a few tips to help you keep mice out of your house:
    • habitat removal - Remove any tall grasses including ornamental grasses and English Ivy from garden beds around your house.  Both provide nesting areas for rodents.
    • feeding the birds - Feeding birds using any type of seed will attract rodents who are happy to help with the ground clean-up.  Any bird feeders should be kept well away from the house and seed droppings should be kept cleaned up.
    • bait - In some locations, the regular use of poisonous rodent bait will help control the rodent population.  However, this is not a method I recommend on an ongoing basis.  It presents a danger to children and pets, as well as hawks and owls that feed on the rodents.  Instead, use the laws of nature to attract rodent predators that will keep the rodent population in check reducing the risk of them getting indoors without using poison.
    • electronic rodent deterrents - These are electronic devices that emit a sound frequency and/or use your household wiring to create a vibration that mice do not like.  There has been some debate as to their efficacy but I have had excellent luck with them.  I use six indoor (Weitech, Victor, Global Instruments) electronic devices all sonic with one sonic/vibration.  Simply plug in the device where it will not be obstructed to keep rodents out of the protected zone.  I plug them in on the first signs of mice in the house and leave them plugged in until I am sure the mice are gone and I've done a complete perimeter check for any entry points.  I also plug them in a few days before the crops come off and leave them on for a couple of weeks.  These devices use the same amount of electricity as a night light which isn't much but we don't really need them on year round.  In some locations though, leaving the electronic devices on year round may be wise.
    • the Scarecrow - The Scarecrow is a motion activated device that sprays a stream of water while making a startling noise to drive away pests including the two legged kind in the garden or other protected area.  From experience they are very effective against cats, raccoons, rabbits, squirrels, dogs and meter readers snitching tomatoes.  I would think they would be effective against rats as well but can't say for certain as I have no experience with deterring rats.
    • attract natural predators - Cats are good predators for mice but not all cats are hunters.  You really need a cat with inborn hunting tendencies.  Snakes, owls and hawks are all good predators to attract into your garden to keep the local mice population at bay.
    • don't let your guard down - Even if you have sealed your house to prevent rodents from getting it, remember rodents tend to chew their way indoors if there is no easy point of entry.  Keep an eye out for any signs that a rodent has been trying to get into your house and block that point of entry as well.  If you get snowfall, watch for any rodent tracks near your house and take immediate preventative measures if you see any tracks.


Sunday, January 22, 2012

Wilton Cake Release Clone Recipe

Many turn to spray oils to help with their baking however, I don't like to use aerosol sprays due to additives.  They tend to be a lung irritant, they are expensive and they are not eco-friendly.  I use a health mister which is a reusable spray bottle filled with your oil of choice.  However, when it comes to baking cakes you need a bit more of a release agent even if using silicone bakeware.  Here is a clone recipe for Wilton Cake Release.  It is quick and easy to make but not very photogenic (sorry, no picture).  The cake release will keep nicely in the pantry without refrigeration.  I make it a 1 cup total measure but if you do a lot of cake and muffin baking you may need to make a larger batch.  This recipe will cost you only pennies, well under $1 depending on how much you make in comparison to Wilton Cake Release at $5.99 per can.

Wilton Cake Release
recipe by:  unknown

1 pt light flavoured vegetable oil
1 pt organic, unbleached flour
1 pt vegetable shortening

Place the ingredients in a food blender.  Blend until smooth and creamy.  Scoop into an airtight container for shelf storage.  Use a pastry brush to coat the pan then use the pan as normal.  


Friday, January 20, 2012

Spaghetti with Broccoli-Garlic Sauce

I have been looking for heart healthy, lower cholesterol meals so was quite pleased to find a copy of Weight Watcher's Smart Choices Recipe Collection( 1992) at the local thrift store for 25¢.  This binder style cookbook is chock full of delicious recipes all meeting the Weight Watcher's guidelines for losing weight.  Each recipe has a beautiful colour photograph along with the nutritional information per serving.  At the back of the binder, the previous owner added in several pages from McCall's Cooking School which is a nice bonus!

Neither of us are watching our weight or on any type of diet restriction but we do try to eat mainly healthy, home cooked meals.  There is room to improve our diets though.  Our biggest culinary vices are larger portions of red meat, cheese and butter.  We have been reducing the portion size of red meat as well as having a meatless dinner once a week and fish at least once a week.  Butter adds a lot of flavour and it is only used in cooking for that purpose.  We very, very seldom use butter as a spread.   The cheeses remain a vice but we are cutting back on them as well.   Offsetting our vices is our tendency to eat a lot of vegetables including some type of salad with dinner and often just a salad for lunch.  We very seldom indulge in desserts and for the most part our snacks tend to be healthy (eg. popcorn, nuts, fruits).  That being said, a recipe book full of delicious, healthy and low cholesterol recipes is certainly a welcomed addition to my recipe book collection.

spaghetti with broccoli garlic sauce
One of the first things I do with any new or new to me cookbook is browse through it from cover to cover tagging recipes I want to try with post-it-note.  I doubt I have a recipe book without tags!  I was always very particular about never writing or highlighting in my post-secondary textbooks most of which I still have but take the opposite approach with my cookbooks.  I do record any changes I made, whether we liked the recipe and anything thing I would do different the next time.  Browsing through the Smart Choices Recipe Collection I came across a recipe called 
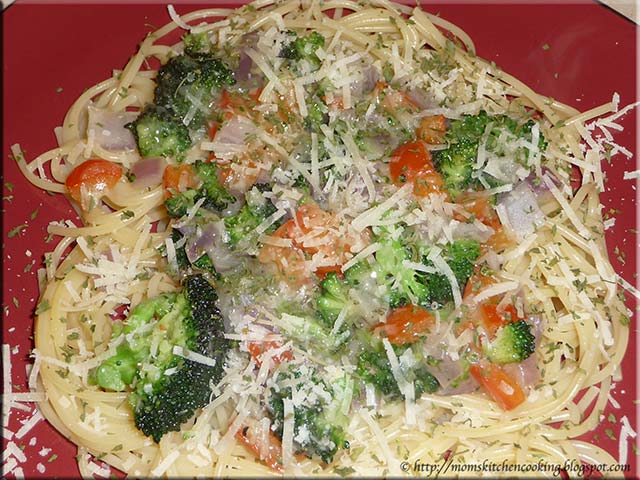
linguine with broccoli-garlic sauce (Pp. 28) that had wonderful eye appeal.  I took that healthy meal idea then personalized it into a very tasty, easy to prepare spaghetti with broccoli-garlic sauce.  My version uses butter for the added flavour but I reduced the amount of Parmesan cheese and used home canned defatted turkey stock so the total dietary cholesterol in my version was just slightly lower than the 32 mg even though I used a little butter.

Spaghetti with Broccoli-Garlic Sauce
recipe by:  Garden Gnome

2 c chopped broccoli florets
½ small red onion
¼ small red bell pepper
3 cloves garlic
½ c defatted turkey stock
1tbsp cornstarch
2 tbsp butter
1 tbsp extra virgin olive oil
pinch fresh ground pepper
2 tbsp fresh ground Parmesan cheese
½ tsp dried parsley flakes
6 oz dry spaghetti (about 1/3 of a 450 g package)*

Bring a large saucepan with salted water to a boil.  Add pasta and cook until al dente.   While the pasta is cooking, mince garlic cloves and chop vegetables.  Heat oil and butter in non-stick, ceramic coated fry pan.  Add garlic and heat through.  Stir in vegetables, cooking until the broccoli is a bright green.  Stir in the turkey stock.  Make a slurry with water or stock and the cornstarch.  Stir the slurry into the vegetable mixture cooking just to thicken.  Remove from heat.  Drain the spaghetti.  Place the spaghetti on plates for serving.  Top with the broccoli-garlic sauce.  Sprinkle pepper and parsley flakes on top of the sauce.  Garnish with the Parmesan cheese.

*Note:  I used about half of a 450 g (about 16 oz) package and cooked extra specifically for planned pasta leftovers.


Thursday, January 19, 2012

Kitchen Quick Tips - Dried Beans

kitchen quick tips

In general 1 cup (250 ml) of dried beans will give a yield of 2 cups of cooked beans (500 ml).  Smaller beans will give a slight lower amount while larger beans will give a slighter higher yield.


Wednesday, January 18, 2012

Pan Fried Cod with Corn Hash

During the holiday season I bought a couple of bags of McCain's frozen cubed hash browns to make a country breakfast casserole.  This is a nice, easy casserole that goes over well when having company for breakfast.  We have been enjoying fish a couple of times or more a week so I wanted something a bit different than the standard steamed potatoes with vegetable and side salad last week.  I came up with a rather easy yet tasty corn hash.

corn hash
The frozen cubed hash browns are definitely a convenience food and they are more expensive per ounce than whole potatoes.  However, they are inexpensive enough to keep a bag or two in the freezer as they work nicely for certain dishes, especially hashes.  These hash browns can be used as a side dish for any meal.

Corn Hash
recipe by: Garden Gnome

3 c frozen, cubed hash browns
1 medium onion
½ c cooked bacon pieces
1 c niblet corn
2 tbsp butter

Melt the butter over medium heat in fry pan.  Chop onion and add to the melted butter.  Cook until translucent.  Stir in remaining ingredients.  Continue cooking until hash browns are golden brown.  Serve as a side.


Tuesday, January 17, 2012

Turkey Chowder

We had a beautiful, almost 24 lb turkey as part of our Christmas dinner feast.  Turkey is always such a versatile and extremely frugal meat!  Not only does it give a lovely main meal the leftovers can be used in so many ways including creamed turkey casserole, one of our family favourites.   You can be sure there is always a canner full of turkey stock after we have turkey as well. 

turkey chowder
There's hot, open faced turkey sandwiches, turkey in salads, creamed turkey casserole, and turkey stock.  This time I decided to make a very quick and easy turkey chowder using leftover turkey.  The end result was a lovely, thick and yummy chowder just perfect for a cold winter's day!

Turkey Chowder
recipe by: Garden Gnome

3 medium baked potatoes
1 medium onion
2½  c cooked turkey
1¾  c turkey stock
2 c niblet corn
2 c milk
2 cans condensed mushroom soup
¼ tsp poultry seasoning
sea salt and fresh ground pepper to taste

Bake the potatoes (or use leftover baked potatoes) then cut into bite sized cubes.  Chop the onion and add to the potato in a large sauce pan.  Add remaining ingredients and warm through stirring often.  Ladle into serving bowls while hot.


Monday, January 16, 2012

Frugal Kitchens 101 - Frugal Kitchen Finds

Frugal Kitchens 101

My husband and I have always been heavily into re-using and repurposing household items.  You really do not need a lot of money to have a very well stocked kitchen!  I would honestly rather buy used any day as it keeps that item from finding it's way to the landfill and quite often brand new, never used or very close to it kitchen items can be found for a fraction of what they are worth.  For example, I found two fancy shaped Valtrompia bread tubes sold by The Pampered Chef, brand new and still in the original packaging at a thrift store.  The very kind lady gave them to me for a total of 50¢ and then felt bad that she was charging me too much!  I've bought dozens and dozens of canning jars used and one of my biggest expenditures when shopping the thrift stores is old cookbooks.  If you are willing to use previously used kitchen items, here is a list of where to find what:

  • thrift stores - Oh good gosh you never know what you can find in the thrift stores.  I go about once a month currently looking for glass inserts for canning jars but also older glass ovenware.  These stores are the place to look for small kitchen appliances like bread machines and yogurt makers at ridiculously low prices, often under $5 a piece.  You do need to know the value of new though as recently some thrift stores are charging more per canning jar than they would cost new.  They are one of the prime places to look for cookbooks, often going as cheap as 10¢ per book!  Seriously, I bought a huge Smart Choice recipe binder by Weigh Watchers, an antique mason jar and another specialty jar for $1.49 the other day.  There may be a small selection of cooking videos as well usually for 25¢,
  • yard sales - At one time my husband and I would spend Saturday morning visiting yard sales.  It was one of our forms of entertainment  We seldom do that anymore what with the price of gas combined with not really needing anything.  Yard sales are the perfect place to look for ultra cheap Tupperware, dishes, serving ware, canning jars and kitchen gadgets.
  • estate sales - Estate sales are similar to yard sales except the entire contents of the house are being sold.  This is where you can pick up nice small and larger kitchen appliances in good condition.  Estate sales are one of the prime resources for finding antique or vintage linens and tableware.
  • eBay - A surprising variety of kitchen related items are only as far away as a click of your mouse and quite often the prices are rock bottom.  eBay is ideal for finding kitchen gadgets, kitchenware and cookbooks ranging from brand new to used, vintage or antique.  While there are great deals to be had, there are two problems you need to be aware of.  First off, you are relying on the seller to actually ship the goods and for the most part sellers on eBay are quite good otherwise they don't last long but just be aware that some sellers are a bit on the dishonest side.  The second problem is shipping costs.  The buyer pays the shipping and handling charge (if any) but should be aware that shipping costs have increased in North America and shipping outside of North America can be rather costly.  While the item may be a steal, the shipping costs can make your purchase really not worth it.
  • online stores - Online stores can be a very frugal way to find the kitchen items you want for a fraction of the price.  Many online stores have a clearance section where you can get some really nice deals.  For the most part, the shipping and handling charges tend to quite reasonable but some online stores offer free shipping if you buy over a certain amount, usually $50.


Saturday, January 14, 2012

M & M Meat Shops Hot Dipz

M & M Meat Shops is a Canadian specialty frozen food store that I have mentioned before on this blog.  One of our friends owns a franchise so I do shop there from time to time but not on a larger scale basis.    The store is focused on foods for entertaining as well as individual serving sizes.  My three main purchases there are Atlantic wild salmon steaks, an oriental party appetizer mix and Asian style vegetables although from time to time I will try a different product for entertaining.  I doubt I spend much more than $150 a year there but what I do spend helps to support our friend.

hot dipz ready for oven
During the holiday season my husband picked up two of the Hot Dipz.  One was spinach, artichoke and cheese dip while the other was roasted garlic cheese dip.  The 8.8 oz dip comes frozen in a vacuum sealed pouch inside a small box.  Each dip costs $3.79 regular price but it does go on sale fairly often.

To warm the dip, you remove it from the pouch and place in a heat proof dish.  For this particular dip the instructions said to microwave on high for 2 minutes, stir then microwave on high for another two minutes.

hot dipz ready for serving
I make the vast majority of snack type dips from scratch but I have also buy a snack dip here and there.  As pre-made dips go, the M & M Hot Dipz are more than reasonably priced if not a bit lower in price than some dips in the dairy section.  The flavour of the spinach, artichoke and cheese dip was quite nice and it did get several compliments.  I served the dip with Tostitos Scoops, one of my favourite chips for dip.  The hot dip would have gone equally as well with pita bread wedges. 

All in all, I was quite pleased with the M & M Hot Dipz.  As a convenience product, the quality was quite good but then that is something I have come to expect from M&M Meat Shops.  Even though the price of food is a bit higher at M & M, the quality of the food is superior to most grocery store frozen foods focusing on entertaining or single serving size.  The Hot Dipz will be a product I keep a couple of packages on hand as something a bit different for entertaining.  I may even try experimenting with a homemade, freezable clone recipe.


Friday, January 13, 2012

Baked Cod with Bacon Wrapped Scallops

My husband and I both love our beef but we also eat fish once or twice a week, sometimes more often.  By far, we enjoy locally caught fish (eg. perch, bass, pickerel) on a regular basis.  Next to that is cod and Atlantic wild salmon.  Cod is traditionally used in beer battered, deep-fried, English style fish but cod can also be pan fried, baked or grilled.  I buy a good portion of the cod fillets we consume from Elite Gourmet Food Service.  True to their word, this is some of the best cod available. 

baked cod with bacon wrapped scallops
I made a simple seafood dinner consisting of baked cod and bacon wrapped Digby scallops.  Now, bacon wrapped scallops are usually served as an appetizer.  I decided to serve them as part of the main course instead along with a simple baked potato.  It was a very easy, oven based dinner that was surprising a lot more filling than it first appeared.  An orange sauce would have been nice on the cod which reminds me I need to can up a few jars.

Some of the very best scallops come from Digby, Nova Scotia.  I can order fresh scallops from the fisheries there that will arrive at my doorstep the following day for about $85 dollars with shipping which works out to $1 per scallop.  The local grocery store price is about $2 per scallop.  I can also buy from Elite Gourmet Food Services a 5 lb box for $115.  While that sounds expensive that box will last us for quite some time because we tend to use scallops as an accent flavour to add a bit of something special to the meal (aka a treat).  I should note that my husband could easily polish of a box of scallops or a couple of pounds when I buy them fresh.  I like the sweetness of scallops and while I do enjoy scallops, I do not share his enthusiasm for them.   

Cod is very, very easy to bake.  Simple place the cod fillets in a baking dish.  Top with a little butter and seasonings (optional) then bake at 350ºF until opague.  They are ready for serving.  Top with orange or lemon glaze or serve simply with homemade tartar sauce.


Simple Homemade Tartar Sauce
note: I do not measure

Miracle Whip or mayonnaise
prepared yellow mustard
sweet pickle relish

Place about 1 c of Miracle Whip in a mixing bowl.  Squeeze about a half tsp of mustard on top then about 2 tbsp of relish.  Mix well.  Adjust the flavour if necessary by adding more relish. 


Thursday, January 12, 2012

Kitchen Quick Tips - Corn on the Cob

kitchen quick tips

The best corn on the cob is picked the morning you buy it.  To delay the natural conversion of sugar in the kernels to starch, refrigerate the cobs until you are ready to cook it.


Wednesday, January 11, 2012

Hearty Blade Pot Roast with Brussels Sprouts

Pot roasts are the perfect wintertime, no muss, no fuss meal.  They are warm and comforting yet about as easy to make with very little prep work.  The nice thing about pot roast is you can use just about any cut of beef as well as any combination of vegetables desired.  A blade roast is typically used for a pot roast because it is a cheaper cut of meat with a lot of connective tissue that doesn't lend itself well to cooking using dry heat methods.  Not that it can't be done and in fact we like using a small blade roast on the grill.  We are in the process of eating from the freezer to use up the remaining meat before ordering our beef on the hoof shortly.  It's a good thing it is wintertime as I have a few roasts to use up!

heart blade pot roast with brussels sprouts
One way to tenderize tougher cuts of meat is to use an acidic ingredient.  Tomatoes are acidic enough to help tenderize beef.  One of my favourite tomato products for this purpose is tomato stock.  It tenderizes while adding a lovely, subtle flavour.  I decided to add a bit more of a pronounced tomato flavour to this pot roast using whole tomatoes instead.  Then I brought in the warm, comforting flavour of potatoes combined with the sweetness of whole Brussels sprouts. The tomato flavour not only accents the beef but highlights the Brussels sprouts.  The meal was a huge success! 

Hearty Blade Pot Roast with Brussels Sprouts
recipe by: Garden Gnome

3 lb blade roast
1 L home canned tomatoes
500 ml (2 c) water or tomato stock
1 bayleaf
1 medium onion
1 tsp Herbes de Provence
2 tbsp Worcestershire sauce
sea salt/fresh ground pepper
2 small poatoes
2 c Brussels sprouts

Place the roast in countertop roaster or if cooking in the oven, use a covered roasting pan.  Purée the tomatoes in food blender.  Pour the tomatoes over the roast.  Add bayleaf, sliced onion, Herbes de Provence, Worcestershire sauce, stock, salt and pepper.  Set temperature to 275ºF.  Cook for 2 hours.  Wash potatoes then cut into bite sized pieces.  Add to the roaster.  Continue cooking for 40 minutes or until potatoes are tender.  Trim and wash Brussels sprouts.  Pour over potatoes.  Cook until tender but not mushy.  Remove from roaster and serve hot.


Tuesday, January 10, 2012

Maple Herbed Roasted Chicken Breasts

My very first cookbook was Betty Crocker's Cookbook (circa 1969).  It remains my favourite recipe book for tried and true easy recipes for healthy meals.  In addition to my favourite cookbook, I have the newest Big Red Betty Crocker cookbook (2011),  Betty Crocker's New Cookbook (1996) and Betty Crocker Why It Works (2006).  Of interest is the 's is not always on the Betty Crocker cookbooks and it does not appear on the Betty Crocker products.  I am not sure why but at any rate I love the cookbooks.

maple herbed roasted chicken breasts
I've been working my way through the Betty Crocker Why It Works cookbook written by Kevin Ryan, PhD.  This is an amazing cookbook with lots of great recipes, each with an explanation as to why certain ingredients pair nicely or why the method works.  I decided to make the maple-thyme roasted chicken breasts on page 74.  However, my version took a different path.  I substituted herbes de provence for the thyme, omitted the vegetable oil, reduced the amount of butter used and changed the method entirely.

Pictured is my version of the dish using the great Canadian flavours of real maple syrup and old fashioned chili sauce paired with home canned green beans.  Home canned green beans is a Canadian favourite, right up there with dill pickles, strawberry jam, applesauce, peaches and old fashioned chili sauce from the canning pot.  The chicken was absolutely delighful!  It was nice an moist with a lot of flavour.  This is a definite keeper recipe.  The meat was lower in fat than the original recipe that when combined with the sides made for a delicious, healthy meal.

Maple Herbed Roasted Chicken Breasts
modified from: Kevin Ryan, PhD, Betty Crocker Why It Works, Maple-Thyme Roasted Chicken Breasts. Pp. 74.

4 large, bone in skin on chicken breasts
⅓ c pure maple syrup
2 tbsp balsamic vinegar
½ tsp sea salt
2 tbsp cold butter
1 tbsp Herbes de Provence
¼ tsp ground pepper

Pre-heat oven to 425ºF.  Place the chicken in a baking pan, skin side up.  Mix the remaining ingredients together.  Pour over the chicken.  Place a ½ tbsp of cold butter on top of each chicken breast.  Roast chicken uncovered for 35 minutes, basting with the sauce using a pastry brush every 15 minutes.  Brush again just before serving.  Serve additional sauce in a dipping bowl if desired.


Monday, January 09, 2012

Frugal Kitchens 101 - Giving Back

Frugal Kitchens 101

Part of the reason for being frugal in the kitchen is to give back to others via food donations and the sharing of knowledge.  My husband and I did the annual pantry clean-out.  We are rather good at keeping the foods in our very well stocked pantry rotating but even the best organized pantries suffer from a bit of food being pushed to the back.  We set up two boxes - one toss and the other to donate.  Anything past it's expiry date or over the two year comfort level for home canned foods was tossed.  Thank goodness that was not much, not more than a few store bought cans of food and 1 case of 250 ml jars of home canned food that somehow had got pushed to the back of the old pantry before we moved.  We ended up about a grocery bag full of food to be discarded which is unfortunate but given the size of our pantry stores is to be expected but still any food wastage really bothers me.

Next up on our list of pantry organizing was to fill the donation box.  My husband and I are very, very fortunate to have a multitude of skills (eg. canning, freezing, foraging, gardening, fishing, hunting) that enable us to always have an abundance of food in our pantry.  We are also very fortunate to have the necessary equipment to preserve a wide variety of foods.  The reality is not everyone is as fortunate so we make it a point to donate to our local food banks.  Unfortunately they will not take home canned foods so I buy things like dried beans, rices, pastas, Jello/pudding mixes and tuna when on sale.  It doesn't take much, only $5 or $10 out of what I would spend on ourselves when I'm at the grocery store and believe me that is not often.  I very seldom use coupons myself but tuck whatever coupons I have into the donation box.  I even tuck recipes in with some of the items so whoever gets that item knows how to use it.  The donation box always sits in the pantry waiting for another item to be added, as a constant reminder of how very fortunate we are.  Each time the box is filled we take it to the local food bank.

I am giving back in another way in 2012.  I'm volunteering most mornings at one of our local schools helping with the breakfast club.  The breakfast club is open to any hungry child, no questions asked.  Hungry children cannot learn so I firmly believe that helping to feed the hungry is a worthwhile use of my time.  Finally, I am donating a bit of time towards the moms and tots program.  Many of the younger moms do not have the necessary skills needed for running a household and some of them do not have family support to help them learn those skill.

It should be a wonderful 2012.  Being frugal at home with our food dollars helps us to help others doing a bit of volunteering to give back to our community.  I am looking into all the details of trying to get a community kitchen up and running.  I'm not talking about a simple hand-out kitchen either.  The community kitchen I envision is all about self-help.   I have my proposal ready for the meeting a week from Wednesday.  Here's hoping! That's what it is all about, helping others to become a bit more self sufficient.


Friday, January 06, 2012

Another Canning Opportunity - Carrots

I learned very quickly in my younger canning days to make hay while the sun shined.  As a frugal home canner I tend to take advantage of any good sale I see on cannable foods year round.  This time of year the frugal canning choices tend to be citrus fruits, some meats and poultry.  We arrived home from our vacation home with only two days left to do the grocery shopping and prep for Christmas.  During our grocery shopping excursion I spotted a deal on carrots I could not turn down.  They were on sale 10 lb for $1.75.  At that price, it did not matter how tired I was I knew a bag was coming home for me to can!

ten pounds of carrots
The locally grown carrots were gorgeous looking, nice big carrots.  I used a couple for the crudite tray during our Christmas celebrations then a couple of days later poured the rest into the sink to wash for canning.  The carrots would easily have kept in the crisper for later use.  However, canning them up would help replenish my pantry stock of carrots.

We don't use a lot of canned carrots as is but rather as an ingredient in other dishes and most times it is mashed so you don't even know carrots are in the dish.  Home canned carrots ends up being a real convenience product in the pantry.  I was completely out so this was a very welcomed canning session.


carrots prepped for canning
Preparing carrots for home canning is quite easy.  Simply wash, peel then cut as desired and wash again.  Carrots are generally tapered.  What I do is cut the smaller portion of the taper into coins then dice the larger end.  Quite frankly for my use of the home canned carrots it makes no never mind as most times the carrots are mashed as an ingredient but from a processing aspect it does.  Larger carrot coin sections take up more jar space and use a bit longer processing time.  The standard processing time is based on 1 - inch coins or smaller.  Dicing the larger pieces means I can process at the same time without compromising the safety of the final product. 


jars of home canned carrots
Here is where home canning really pays off.  The 10 lb bag of carrots cost $1.75.  I ended up with six 500 ml (pint) jars each of diced and coined carrots.  I used a dozen snap lids at a cost of $1.25 and about 15¢ in natural gas for processing the carrots for a total cost of $3.15 or about 26¢ per jar.  Had I used the Tattler reusable lids or glass inserts the cost for the lids would have been very close to zero since I've used them enough to recoup the initial cost.  This would have brought the cost per jar down to 16¢.  Either way the home canned carrots are considerably less expensive than store bought.  I really should have bought two bags of the carrots.  Hopefully, I will have enough jars to last until I have carrots from the garden.


Thursday, January 05, 2012

Kitchen Quick Tips - Keep Mashed Potatoes Fluffy

kitchen quick tips

To keep mashed potatoes hot and fluffy until serving time, place a t-towel over the pot then cover with the lid.  The t-towel absorbs any condensation that forms in the pot so the potatoes don't get soggy.


Wednesday, January 04, 2012

Technorati

7HK36EYRECAX


Two Holiday Canning Opportunities

As a result of our house being on the market for 18 months and finally moving, my pantry stock needs replenishing.  That means I am taking advantage of every home canning opportunity I can now that we are back from our vacation home.  Between Christmas and New Year's I actually had three wonderful canning opportunities.  The first two will be covered in this post and the last one in Friday's post.

home canned turkey stock
We had a 22 lb turkey for our Christmas dinner.  It fed eleven of us nicely with lots of left-overs.  Some of the left-overs were used that week while the rest went into the freezer for later use.  The carcass went into the largest stock pot to make turkey stock.

Stock making is always a two day process for me if I intend canning it because I like to defat the stock before canning.  Pictured are the thirteen beautiful 500 ml (pint) jars of turkey stock fresh from the canner.  While have used the water bath canner, this was the first run of the pressure canner on my new gas stove.  I was pleasantly surprised at how much easier it was to maintain the pressure during processing!  The pressure canner worked flawlessly actually giving better results with a lot less fiddling trying to maintain the pressure.  I will never can on an electric stove again, well technically I will at our vacation home but that will not involve using a pressure canner.  It will be water bath canner only.


home canned orange cranberry sauce
In our corner of beautiful southwestern Ontario we tend to get fresh cranberries in time for our Thanksgiving (2nd Monday in October) and again just in time for Christmas.  I don't think they are great sellers here as the stores tend to bring them in, in limited quantities so if you want fresh you have to get to the stores early.  I usually buy a couple of extra bags to toss in the freezer.

I took an extra bag out of the freezer just in case I needed more sauce in addition to the fresh made sauce.  We didn't need that bag so I made an orange cranberry sauce to can.  I guestimated that the 340 g bag of thawed cranberries would give a yield of 3 cups or 3 - 250 ml (half-pint) jars.  The yield was just shy of that mark.  I processed all three jars anyway.  The next morning after cooling one of the full jars failed to seal.  I have no idea why.  I've had very few seal failures over my more than 30 years of canning so the occasional one doesn't bother me.  I removed the metal two piece lid from that jar and the partially filled jar, replacing them with plastic storage lids and popped the two jars into the freezer.  The remaining sealed jar went into the pantry.


Tuesday, January 03, 2012

New Year's Day Surf and Turf

My husband and I have long held the tradition of a grilled steak with lobster dinner affectionately known as surf and turf in the restaurants as our New Year's Day meal.  The surf (sea) portion is the lobster while the turf (land) portion is the steak.  We live in beautiful southwestern Ontario where the weather can be blizzard conditions on New Year's Day but that does not stop us from firing up the outdoor grill!  The whole day is focused of surf and turf foods so it is a day long feast fit for a king leaving us so stuffed that eating the next day is almost impossible.

crap meat dip appetizer
I made crabmeat dip as an appetizer.  This has has been a long time family favourite appetizer that I've been making it since the early 80's.  If I recall correctly I got the recipe from my husband's aunt who is actually the same age as he is.  She is every bit the sweetheart he is but that's another story.  This appetizer does make an appearance at many family functions throughout the year.  The dish is ever so easy to make a few hours ahead of time and as party dishes go is rather on the inexpensive side.  Once the topping is on the cream chees there is a tendency towards weepage.  The trick to preventing weeping is to press the crabmeat firmly to remove any liquid before making the topping.  Doesn't it look gorgeous on my new cheese server?

Cuban rock lobster tails
We bought a box of Cuban rock lobster tails from Elite Gourmet Food Service.  I have dealt with this company for several years now and while the prices are on the higher end, the quality supreme.  A box of 8 - 7 oz lobster tails cost $139 or $17.38 each.  Considering a T-bone steak was being served with each lobster tail the entrée cost per person was about $28 including potato and salad.  Before you splutter at the cost, this was actually a frugal meal.  If we wanted surf and turf, we would have to drive at least an hour each way, with the price of travel adding to the cost of the meal.  A nice surf and turf dinner in our area costs about $30 plus appetizer, drinks and gratuity.  At home the appetizers and drinks cost next to nothing but the cook always appreciates a gratuity (hugs or kisses only LOL)! A a meal goes, it is on the expensive side but it is once a year and this is the reason frugal meals are served the rest of the year.

our New Year's day surf and turf dinner
It was rainy and cold threatening freezing rain yesterday when my husband bravely went out to start up the grill.  We have a charcoal and propane combination grill so I expected he would use propane.  Nope!  He fired up the charcoal side then once the coals were going put the potatoes on.  Shortly before putting the steaks on he added an apple wood smoking puck.  The steaks were grilled to medium rare.

I have cooked a lot of live lobster but not frozen lobster tails.  I boiled the lobster tails in salt water 1 minute per ounce.  The tails curled during cooking but they still tasted heavenly!  The next time I boil them I will use the skewer trick to keep the lobster tail straight for presentation.  Doesn't our surf and turf dinner look devine?  What a way to welcome 2012!

To boil frozen lobster tails:  Thaw the lobster tails in the refrigerator 8 to 10 hours or cover them with cold water in the sink to thaw faster.  Bring salted water (I used about a quart per tail and good splash of sea salt) to a boil.  Place the lobster tails in the boiling water and cook 1 minute per ounce of tail.  Drain and serve with hot melted butter.

Note: to prevent the lobster tail from curling, run a skewer from one end to another.  Split the soft shell and place skewered tails in the boiling water.  Cook as above.  Remove skewer for serving.


Monday, January 02, 2012

Frugal Kitchens 101 - The Pantry in 2011

Frugal Kitchens 101

I have often spoken of the benefits of a well stocked pantry on this blog.  Here it is 2012 almost seven years after I started this blog and I am still tooting that same horn.  The holiday season is now past us and within a few days life will be getting back to normal.  I actually spent a couple of canning sessions restocking my pantry between Christmas and New Years.  You see, our house had been on the market for 18 months before it finally sold and being rather frugal I decided moving empty jars and emptier freezers would not put my food stock at risk so for that period of time we did a lot of eating from the pantry.  Trust me as a food blogger it made things a bit more challenging to find foodie blog fodder but in the end we had a lot less food to move.  Just think of the logistics of moving a one to two year supply of food and how much extra work it is, not to consider the weather and damages during the move that would result in food spoilage.  Ok, so back to the well stocked pantry.


During the 18 months our house was on the market, the gardens were at a minimum so I had to actually buy some produce that I normally would grow.  What produce growing when we moved September 1 was left to the new owner although we could have added a clause so we could have it.   In the spring of 2011, I greatly reduced my canning taking a calculated risk that the house would sell.  Money that I would have spent in 2010 on buying produce as well as those needed to keep the pantry well stocked in food went into my food savings fund. 

When we moved here in September we already knew we would be a our vacation home for a total of six weeks before the end of the year so I made no real effort to start restocking.  Instead the focus was on organizing my new pantry.  In short, our well stocked pantry saved us an awful lot of money in 2010.  Yes, I do need to do a bit of restocking especially the home canned foods of which I have already started but essentially we at from our pantry supplies for most of the year supplementing with fresh produce and dairy as needed. 


A well stocked pantry serves as a hedge against unemployment, lean times, inflation and times such as ours when life is simply changing.  It gives you the peace of mind that if nothing else you can still eat.  I cannot stress enough the importance of a well stocked pantry.  Make having a well stocked pantry your goal for 2012!  Take one step closer to your food security in 2012.  You do not need a large expenditure to get a well stocked pantry and this blog is full of ideas for stocking your pantry on the frugal side.  Check the archives.  If you are not growing some of your own food now, this is a good time to start if only growing sprouts indoors along with a few herbs.  Remember, a well stocked pantry is frugal and it helps to keep you on the frugal pathway!


Sunday, January 01, 2012

A New Culinary Year Begins

Happy New Year


From our kitchen to yours, we would like to extend a warm New Year's greeting.  May your tables be laden with wonderful foods throughout 2012.  May your culinary experience in 2012 be fabulous, filled with delicious foods.  We have a lot of plans for this blog this coming year so please won't you join us in the new culinary year unfolding.

Today we celebrate a brand new year with our traditional surf & turf dinner.  On the surf side the appetizer will be crabmeat dip.  This is a family favourite served at most holiday gatherings for our family and friends.  On the turf side the meat will be grilled organic, hormone free T-bone steaks combined with the surf side of Cuban rock lobster tails served with baked potatoes and a side salad.  The outdoor grill will be used regardless of the weather but I am hoping there is a break in the rain while grilling the steaks.  Unlike our last home, the grill is not sheltered from the weather but grill we shall!