My photo
Ontario, Canada
I am a wife, mother and grandma who enjoys the many aspects of homemaking. A variety of interests and hobbies combined with travel keep me active. They reflect the importance of family, friends, home and good food.
Cook ingredients that you are used to cooking by other techniques, such as fish, chicken, or hamburgers. In other words be comfortable with the ingredients you are using.
--Bobby Flay

For Your Information

Please watch this area for important information like updates, food recalls, polls, contests, coupons, and freebies.
  • [March 19, 2020] - Effective Mar 17, this blog will no longer accept advertising. The reason is very simple. If I like a product, I will promote it without compensation. If I don't like a product, I will have no problem saying so.
  • [March 17, 2020] - A return to blogging! Stay tuned for new tips, resources and all things food related.
  • [February 1, 2016] - An interesting report on why you should always choose organic tea verses non-organic: Toxic Tea (pdf format)
  • Sticky Post - Warning: 4ever Recap reusable canning lids. The reports are growing daily of these lids losing their seal during storage. Some have lost their entire season's worth of canning to these seal failures! [Update: 4ever Recap appears to be out of business.]

Popular Posts

Tuesday, November 30, 2010

November's Keeper Recipes


It would be nice if I could look back over a month's worth of meals and say they are all keepers.  The reality is many are tried and true keepers to begin with while the rest are new recipes or new ways to cook a tried and true dish.  I thought I would introduce a new feature called monthly picks to highlight two new dishes or new cooking methods I tried that have made it into the keeper category.  That doesn't mean other dishes I made throughout the month aren't keepers only that the two chosen really impressed me in some way.  November's picks are beef noodle bowl and slow cooker rib roast.
  • beef noodle bowl - What really struck me about this dish was the versatility.  It was quick, easy and low cost to put together and yet easily modified.  This dish itself definitely falls into the category of comfort food.  It was rich with noodles and flavour, a definite family pleaser!
  • slow cooker rib roast - I make a lot of roasts using the oven, countertop roaster, grill and pressure cooker.  I had never used a slow cooker to cook a roast mainly because I am not a fan of slow cookers.  However, replacing our old slow cooker with a newer model has me learning a lot more about slow cookers.  I was pleasantly surprised to find that beef rib roast came out quite nice using a slow cooker!


Monday, November 29, 2010

Frugal Kitchens 101 - A Easy Soup Week

Frugal Kitchens 101

Soup is like one of the most frugal, homemade meals you can make.  It is inexpensive if not downright cheap!  Many will make a huge pot of soup then serve that soup several times throughout the week.  While this is very cost effective it can get rather boring.  Now don't get me wrong as this method does work and is extremely frugal but I have developed an variation that keeps the soup from ever getting boring.  In fact you can have a different soup nightly simply by modifying a few ingredients once you have the basics in the refrigerator.  This week's Frugal Kitchens 101 shares how to create variety in soups without breaking the budget.

My husband was away at hunt camp.  I wanted homemade soup but the idea of eating the same soup for the rest of the week wasn't very appealing.  True I could have canned or froze it but I wanted something warm and comforting for dinner but the last thing I wanted was boring even though it was soup based on many of the same ingredients.  The key to making this work is to keep the prepared ingredients separate until making the actual soup of the day. 

Cooked ahead:

  • broth - I made the beef broth like stock in the pressure cooker using 2 large soup bones.  I browned them first in a little olive oil then added the other ingredients as for stock but added 12 c of water and cooked in a pressure cooker for 30 minutes.  Once cooked I moved removed the soup bones with meat, strained the broth and set aside to cool for defatting.  You can use any type of broth you like as long as it is defatted.
  • meat - I cut the meat from the bone, shredding and removing fat as necessary.
  • pasta or rice or barley - Each night that I added pasta or rice or barley to the new soup pot.    All can be cooked quickly ahead of time the first of the week then the desired ingredient added to the soup pot.  At most make only 2 cups of either or 1 cup of each.
Prepared ahead:
  • frozen vegetables -  I used 2 c of a broccoli, cauliflower and carrot mix but any frozen vegetables can be used.  Pour the frozen vegetables into a food storage bowl and place in the refrigerator.
  • fresh vegetables -  Chop fresh onions, cherry tomatoes or any other desired fresh vegetable to sprinkle over the soup.  Place in a food storage container and put in the refrigerator.
  • beans - I used home canned black beans for one soup variation but you can use and canned bean desired.
Seasonings:
  • Worcestershire sauce, soy sauce, Maggi, salt, pepper as desired
Garnishes:
  • green onion, chives, grated Parmesan, or any other desired garnish
There should be at least 5 storage bowls for the refrigerator at this point.  Basically what you've set up is a mix and match system.  Now here is where it gets fun.  The first night add a few ladles of broth to a medium sized sauce pan,  stir in about 3 tbsp of meat and a 1/2 c of frozen vegetables.  Warm to just a low boil. Stir in 1/2 c or more of desired prepared pasta, rice or barley.  Stir in 2 - 3 tbsp beans as desired.  Season as desired with one listed or one of your choice.  Garnish and enjoy!  The next night start with broth then add desired ingredients perhaps changing out one or omitting one or changing the seasonings or garnishes.  When done this way you should be able to get five types of soup out of these ingredients depending on the number of people being served.


Sunday, November 28, 2010

Caesar Salad Presentation

As a foodie I like to pay attention to presentation when eating out.  Presentation goes well beyond what the food actually looks like.  Unique cutlery or serving pieces can accent even a mediocre dish, giving it eye appeal mixed with a bit of pizzaz. What's interesting is a bit of uniqueness goes a lot ways when it comes to food presentation.

Caesar salad presentation
A few days ago we were out for an afternoon of fun at the casino.  Well, more precisely my husband had a businessman's luncheon to attend so he dropped me off at the casino where he would meet up after the luncheon.  I decided to stop at the bar there to get a Caesar salad.  The salad was pretty much average and at $4.95 you couldn't expect much more although there were real pieces of bacon and fresh grated Parmesan cheese. 

Just look at the bowl design the Caesar salad was served in.  Isn't it interesting?  I took the picture with the bowl facing 90º turned just to give you an idea of the presentation.  The ecliptic bowl sat on a very distinct angle displaying the salad to the diner.  I think the presentation had great eye appeal.  It was a unique presentation that made the salad feel a bit special.  I may just have to look for similar salad bowls!


Saturday, November 27, 2010

Slow Cooker Pork Roast

We recently did our annual turkey runs taking advantage of the turkey sale prices during the week before the American Thanksgiving.  The deal we found involved buying $20 additional purchase per turkey and we bought 4 turkeys so making that $80 extra squeak was my primary goal.  I found a lovely 5 lb pork loin for $7 so that went into the cart.  I decided to divide the pork loin with half to be cured for pea meal bacon and the other half for a roast cooked in the slow cooker.

slow cooker pork roast
I decided to cook the pork loin in the same manner I would if cooking in the oven or countertop roaster so I could compare the result when cooked in the slow cooker.  I placed the pork loin in the slow cooker then covered with Diana Sauce and a few slices of onions.  I cooked the pork loin piece using the probe setting set to 71ºC (160ºF).  I served the pork loin slices with steamed carrots, calrose rice and baked beans.

The pork loin was cooked to perfection, juicy and tender.  It had a lovely flavour from the Diana Sauce but the sauce did not thicken as it does using other cooking methods.  That is one thing I am quickly learning about cooking in a slow cooker.  Liquids don't evapourate as they do in other cooking methods so if I want a thicker sauce I need to use a thickener.  There's nothing wrong with a thinner sauce though as I quite often make a thin gravy even when roasting meats.  Other than that the pork loin was very good!  


Friday, November 26, 2010

Harvesting Potatoes in Prince Edward Island

Many in Canada are so far out of touch of where their food comes from.  They don't realize that the food in the grocery stores comes from the hard work of Canadian farmers and producers.  If you ate today give thanks to the farmers and producers that made it possible.  I thought it would be interesting to show you how potatoes are harvested in Albany, Prince Edward Island with a video courtesy of my favourite Canadian funny man, Rick Mercer.

Canadians eat a lot of potatoes.  In fact each Canadian eats 154 lb of potatoes annually.  Potatoes make up for 50% of our vegetable intake each year.  The video shows how Innovator potatoes (a Yukon russet variety) are harvested.  A digger pulls the potatoes to the surface depositing them in straight rows ready for the harvester.  The Spudnick harvester goes along the rows of freshly dug potatoes lifting the potatoes onto a conveyor belt where dirt and stalks are removed.  They are then are transported through the boom into a truck that slowly drives beside the harvester.  Each truck takes about 6 minutes to load.  The potatoes are transported from the field to a large building via conveyor belt where rocks are hand picked from the potatoes moving along into storage.  Potatoes in the storage building are then transported to the bagging building where potatoes are bagged ready for shipping to grocery stores.

Just a couple of comments:  During harvest season, barring death, the farmer along with any family members working on the farm and other workers are glued to the farm.  The primary consideration is to get the crop harvested as quickly as possible to prevent any spoilage in the field.  The method for harvesting the potatoes is fairly close to the method for harvesting wheat, corn, soybeans, tomatoes, cucumbers, carrots, onions, beets and sugar beets.  There will are slight modifications to suit the vegetable or grain being harvested but the basics is the same.  Standing on the platform picking rocks from the potatoes can trigger motion sickness so it is not a job everyone can do.  The video shows one commercial potato farm operation but there are many more like this farm throughout Prince Edward Island and elsewhere in Canada.  I hope you enjoy the video as you learn a bit more about where your food comes from.


Thursday, November 25, 2010

Kitchen Quick Tips - Preventing Bacon From Sticking

kitchen quick tips

Bacon has a tendency to stick a bit while frying in some types of pans.  Sprinkle a little sugar in the fry pan when frying bacon to prevent it from sticking.


Wednesday, November 24, 2010

Slow Cooker Chicken with Rice

I'm on a new mission to find a few great slow cooker meals other than stew or chili.  Those two dishes have been my standard slow cooker meals.  Other than than that despite having 3 slow cookers they are only used for entertaining (keeping foods warm) and bulk cooking.  With the purchase of my new slow cooker I am looking to expand my slow cooker repertoire of recipes.  I would hazard a guess that like many of the 'recipes' I use those used for the slow cooker will be a toss that in type of recipe rather than a rigid no deviation recipe.

slow cooker chicken with rice
Ages ago when you bough a new small appliance it came with a nice manual and recipe book.  That is no longer!  The new slow cooker came with a flimsy basic how-to guide, probe cooking time for larger cuts of meat and very basic tips for slow cooking.  Obviously I was on my own.

I cooked a chicken dish for the second using chicken legs with the backs attached.  One of my pet peeves with with slow cooked meals is the lack of browning so I browned the chicken legs before putting in the slow cooker.  Then I poured in about 625 ml of home canned plain spaghetti sauce.  I set the slow cooker to cook for 4.5 hours then served the chicken on a bed of long grain white rice topped with sauce and fresh grated Parmesan cheese. 

The chicken was nice and tender yet very flavourful.  The next step is learning to cook the rice right in the slow cooker eliminating the use of the rice cooker.  Why run two small appliances if you can get away with running one?  I'm branching out here with a bit of experimenting so watch for some of the slow cooker recipes I come up with.


Tuesday, November 23, 2010

Salisbury Steak

Salisbury steak is minced beef formed into an elongated patty  to resemble a steak.  Like meatloaf it may contain other ingredients like bread crumbs as an extender but in order to be labeled as salisbury steak the mixture must contain a minimum of 65% meat.  Of that 25% can be pork.  The patties are usually served with gravy and mashed potatoes.  The meal is a popular commercially prepared frozen TV dinner.

salisbury steak
Salisbury steaks can be bought pre-made usually in the freezer section but some butcher shops make them as well.  The patties can easily be made at home as well.  I used pre-formed salisbury steak patties purchased from a local butcher shop as part of the boxed meats bought to support a school fundraiser. 

Rather than use an actual gravy I took a shot cut by using home canned plain spaghetti sauce.  I served the patties on a bed of sautéed cabbage.  This made for a tasty, quick, filling yet frugal entrée that took less than 15 minutes to prepare.


Monday, November 22, 2010

Frugal Kitchens 101 - Dried Cereals

Frugal Kitchens 101

Dried cereals are a big part of breakfast for many families.  Despite raising a larger family dried cereals never did and still do not play much of a role in our food choices.  Aside of the occasional box of dried cereal destined for squares, cookies, snack mix or muffins I seldom have dried cereal in the house.  Part of the reason for this is I really do no see dried cereals as being a frugal choice of food.  This week's Frugal Kitchens 101 will explore a few issues with dried cereals and how you can save if you still want to use dried cereals.

Dried cereals are one of the most heavily processed foods you can buy.  Many are so heavily laden with sugar they really should be declared a candy!  Some dried cereals especially one famous brand for helping you lose weight actually has high fructose corn syrup (HFCS) in it.  In additional to the horrendous amount and type of sweeteners in some dried cereals there are artificial flavours, artificial colourants and preservatives.  Dried cereals are also expensive giving very little food value for the dollar.  So that is the bad side of dried cereals.  On the plus side some dried cereals are quite good.  They are low in sugar, don't have HFCS, artificial anything or preservatives but those tend to be on the higher end with respect to cost and may be limited as to availability.

Now you know the pros and cons of dried cereal, how can you save money if you decide to buy dried cereal?  Here's a few tips:

  • avoid any cereal with a prize - I'm sorry you are just paying for whatever prize they stuffed in the box just to get you to buy the cereal.  Chances are very good neither is worth having.
  • generic cereal - Most grocery stores carry 4 generic cereals: corn flakes, puffed rice, puffed wheat and o shaped cereal.  These are every bit as good as the brand name and they are cheaper because the come in a bag rather than a box. 
  • bulk food stores - Bulk food stores usually have a limited range of dried cereals and some of them may even be brand name.  You save because the cereal is not boxed.
  • factory outlets -  Many factories have small factory outlets where their products are sold at a greatly discounted rate.  These stores are on premises so may be a bit out of your way.  The product will be the same as sold in the stores but there may be a flaw in printing on the package or the product will be bagged but not boxed or it will be in a bulk size box.  Check for food factory outlets in your area and areas you may be visiting.


Sunday, November 21, 2010

Slow Cooker Rib Roast

The crockpot aka slow cooker has never been my favourite small kitchen appliance.  The reason is I can get better results often cheaper using an alternative method.  For example a slow cooker costs me about 8¢ per kWh but because it runs anywhere from 6 to 8 hours can cost as much as 64¢ for the same meal I can cook in a pressure cooker in 40 minutes for about 20¢.  So in terms of electricity usage the slow cooker has never been the end all be all for me and since I'm usually home it isn't really a convenience appliance.  As a result the slow cookers (I have 3) ended up being used mainly for bulk cooking sessions and entertaining but occasionally soups and stews.  Well times are changing and with the new TOU electricity rates, I am reconsidering the slow cooker as another appliance to help save a little money in the kitchen.

old Rival crockpot
I honestly never know whether to call it a crockpot or slow cooker.  Clearly my old Rival was a crockpot.  Crockpot is a trade name as far as I can tell whereas slow cooker refers to all appliances similar to a crockpot that do the same thing but can't use the trade name.  Pictured is my old Rival and I do mean old.  I was trying to figure out just how old this slow cooker is.  I think it dates back to the mid 1980's.  There is nothing fancy about it. The temperature settings of low, high and off.  The crock is removable for easy cleaning a considerable improvement over my first crockpot where the crock was not removable.  Circled is the patch job my husband did on the cord several years back.  The cord came into contact with a hot burner baring the wires so my husband wrapped it with electrical tape.

With the onset of the rising electricity rates I started doing a bit of research.  It helped to that in order to rent our vacation home out when we weren't there a slow cooker was mandatory.  I started looking at slow cookers from a different perspective.  A couple of weeks ago Canadian Tire had the Hamilton Beach programmable slow cooker with meat probe on sale for $39.99 (half price) so I finally decided to act.  They were out of stock so gave a rain check for the sale price.  My husband brought home the new slow cooker yesterday.

Now this is a gorgeous looking slow cooker with programmable features.  Once the cooking time is finished it automatically switches to the keep warm feature so food is not over cooked but hot, ready for serving.   It also has to locking clips (hard to see but one under the right handle) for securing the lid tightly for travel.  The crock is removable and there is a spoon rest in the lid handle.  What I really like is unlike the Rival the lid is glass so there won't be any discolouration over time.  Checking through Cook's Illustrated (Nov/Dec 2009) I found that this particular slow cooker performed well in their test and is recommended as their best buy.  The sad thing is I likely paid a lot more for the Rival with less features than I paid for the new slow cooker. 

Hamilton Beach slow cooker rib roast dinner
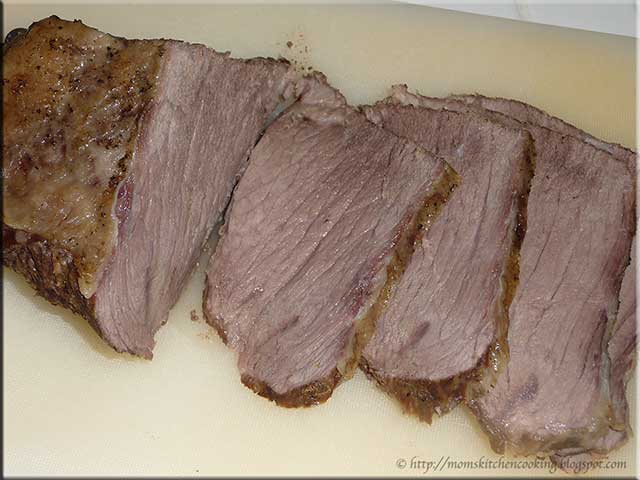
The first meal in the new slow cooker was tried and true, a meal that has been done in the oven, on the grill, in the countertop roaster and now the slow cooker.  I thawed a rib roast so I could use the meat probe.  I put the roast in the crock added a little water, seasonings, potatoes and onions then set the probe to the desired temperature (63ºC/145ºF).  Both of us had our doubts because this was a nice looking roast that we knew would cook up nicely in the oven or countertop roaster.

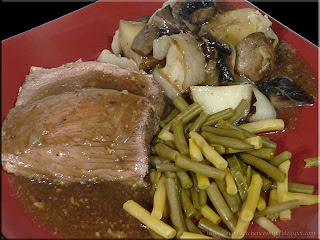
My husband was sure that the roast would be cooked to well but instead the roast ended up being medium, just nicely pink on the inside.  I served the roast with home canned green and wax beans, potatoes, onions and portabello mushrooms topped with a thin gravy.  The meat was tender and flavourful, nicely done so I am impressed.

Had I cooked the roast in the oven it would have cost about $1.20.  Cooking it in the countertop roaster would have cost about 90¢ and cooking it in the slow cooker cost about 20¢. Clearly in this case the slow cooker was the winner with respect to conserving electricity although the same meal cooked in a pressure cooker would have cost 16¢ in electricity.  Now this is not always going to be the case especially when using the slow cooker during mid-peak and on-peak hours and the slow cooker will not give the same results as the oven or countertop roaster but so far it is looking rather impressive.  Watch for a lot more slow cooker recipes as I do a bit of experimenting!


Saturday, November 20, 2010

Pork Steak with Mushroom Sauce (New Non-Stick Wok)

[Note: not a paid review]

Every so often kitchen equipment needs replacing as a result of breakage, failure or functioning inadequately.  This year has been the year for replacing a few things.  Much of the focus has been on replacing plastic with glass.  We tend to do a bit of research to find the best possible replace then keep an eye out for a good sale.  We had a large non-stick wok that served us well for many years.  Like most non-stick cookware the coating finally started going.  We searched everywhere and yet never found one like it.  The one we were trying to replace was quite heavy and bowl shaped but all the newer ones we found were so lightweight they would not stand-up well.

using the new wok
A few days ago my husband came home with a Paderno 30 cm wok.  It was the familiar bowl shape and quite heavy weight carbon steel.  Of interest is the coating that is double silicone rather than the traditional non-stick (eg. Teflon) coating.  This removes the issue with off gassing caused by higher temperatures experienced with traditional non-stick coatings.  As with all non-stick, it is recommended washing this pan in the dishwasher.

I decided to test out the new wok with a family favourite, pork chops or steaks with mushroom sauce.  This is a dish that can be done in the slow cooker but the best results are slow cooking on the stove.  A bowl shaped wok is ideal for cooking this dish.  Once the meat is browned then the sauce is added then allowed to reduce and caramelize.

pork steak with mushroom sauce dinner
I was quite impressed the performance of this wok!  I was able to brown the pork steaks nicely.  The sauce reduced as normal wih a bit less caramelization.  I served the pork steak over a bed of egg noodles topped with the sauce and garnished with parsley flakes.

First impressions of this pan are quite favourable.  It performed as expected.  Clean-up was a breeze!  I did notice a difference in the silicone coating though but in a good way.  In comparison to Teflon coated pan, the silicone coating on this pan is very smooth and slick (slippery).  This means even less oil is needed when cooking.

Home Hardware runs a sale on Paderno a couple of times a year.  This is the time my husband checks out what they have to offer then buys a piece of two if we need it.  The original price of this wok was $39.99 so definitely not on the high end of the scale for a piece of kitchen equipment especially given the quality.  He bought the wok on sale for $19.99.  This underscores that a kitchen can be equipped quite frugally if you have the patience to wait for the sales.


Friday, November 19, 2010

Left-over Easy Peasy Turkey Dinner

Turkey is one of my favourite frugal meats.  Not only can I get several meals out of one turkey I can also get several jars of home canned stock from the carcass.  Any time I cook a turkey I like to put enough turkey for a meal for two along with a cup or so of gravy into a freezer container then freeze for later use.  This makes for a wonderful meal quick start that only needs to be thawed and reheated.

leftover turkey dinner
A few days ago I pulled a container of turkey with gravy from the freezer.  I decided to make a left-over meal surrounding the turkey.  I used one jar of  homemade stove top stuffing from the pantry then added left-over mashed squash and cabbage.  The only component of the meal needing actual cooking which was quite minimal was the cabbage that was simply cooked to translucent in olive oil and butter.  It was an easy, low prep and low cook meal that was quite yummy!  Better still the meal was extremely low cost so quite low cost taking less than 15 minutes to put on the table.

This is the type of meal every busy home cook needs to keep on hand.  Using the quick start meat with gravy it is as simple as adding a couple of left-over sides or even adding cooked noodles with vegetables for a very quick, inexpensive meal.  It becomes a sanity saver during the week as you really don't have to think of what to serve with the meat and gravy, just raid the pantry, and at the same time you are saving on the cost and temptation of eating out or ordering take-out.


Thursday, November 18, 2010

Kitchen Quick Tips - Bacon Bits

kitchen quick tips

Make your own bacon bits by slicing across the strips to form small pieces.  Fry until crispy then drain well.  Divide into 1 c portions and freeze until needed.  To use simply thaw. 


Wednesday, November 17, 2010

Rump Roast (Beef)

In many ways, the cut of meat determines how it should be cooked.  This is important with most cuts of meats.  For example it would be a huge waste of money to stew prime rib, not that you couldn't just a waste of money when a much cheaper cut of meat could be used for stewing.  Even though we pay a flat rate across all cuts of our beef bought on the hoof, I still try to cook the various cuts in the most appropriate method that will best enhance their flavour and texture.

sliced rump roast
Rump roast is cut from the bottom round or fleshy hindquarter of the animal (beef, moose, elk or venison).  It is usually boneless.  Rump roast is considered a lower-quality cut of meat.  It lacks both fat and marbling resulting in a less flavourful and tender cut of meat prone to drying out if improperly cooked. 

Rump roast can be placed on a rack for cooking to allow juices to drip to the bottom of the pan.  The juices can then be used to baste and for making gravy.  Instead of this method I placed the rump roast in a roasting pan then poured tomato stock into the bottom of the pan, seasoned the roast lightly with garlic pepper and Worcestershire sauce then topped with Spanish onion wedges.  I covered and cooked the roast at 120ºC (250ºF) about 2 hours then added carrots, red potatoes and cabbage then adjusted the heat to 175ºC (350ºF), covered and continued cooking until the outside of the roast was nicely browned. 

rump roast dinner
The tomato stock provides nice flavour while tenderizing the meat.  The vegetables also help tenderize the meat via steam created while they are cooking.  Cabbage is an underused, frugal vegetable that when cooked this way has a wonderful sweetness without smelling up the kitchen.  Rump roast should rest about 5 minutes before cutting.  This roast slices ever so nicely!  Left-overs are ideal for roast beef sandwiches the following day.

Our rump roast dinner was scrumptious!  I served it simply with the roast beef slices and roasted vegetables topped with a thin pan gravy made from the drippings.  I used a cornstarch slurry to thicken the gravy.  It gives a silkier, thinner, clearer result than a flour slurry would.    It was a feast fit for the kings!


Tuesday, November 16, 2010

Old Canning Jars and Lids are Still Quite Usable

Finding canning supplies can be a bit more difficult than it seems.  Canning fell out of favour with the advent of modern canning factories and women helping in the war effort.  During the 1950's home freezers made it a lot easier to store food without the work so canning became something done by farm wives and some religious sects.  Canning became a bit more popular during the mid-1970's recession in Canada but it wasn't until the y2K scare that it really started taking off again.  As a result of the current economic downturn, canning has once again become a very popular domestic activity but what is more pronounced is a focus on canning low acid foods (eg. meats, vegetables, soups, beans, etc) using a pressure canner as a way to curb the rising costs of food.  Canning is not just about jams and pickles anymore!

Like many home canners I have a good supply of old canning jars and lids.  With the exception of some of my clearly antique mason jars that are on display, my older jars are in daily use.  The beauty of using old mason jars is quite often you can find them for free.  Simply adding the rubber gasket allows dried foods to stay on the shelf protected from humidity, insects and rodents.  Barring breakage the jars can be used indefinitely for dry food storage.  They are a very frugal solution for food storage!

1944 Crown mason jars
The USDA warns not to use mason jars with zinc rings for home canning because there is not an easy way to tell if the jar has sealed.  They also state there is a higher incidence for seal failure.  Yet across North America the very same Crown jars as pictured remain in use for canning purposes today.  The rubber rings (gaskets) are still manufactured by Viceroy Rubber & Plastics Limited in Toronto, Ontario and distributed throughout Canada by Home Hardware and Canadian Tire although they can also be found in other small stores.  Notice how the rubber gasket goes onto the jar then the lid sits on top of the gasket?

I use my older Crown and Corona jars with zinc lids for dry storage however, if I had to I would not hesitate to use them for any high acid foods processed in a boiling water bath canner (BWB).   Old glass gets a bit brittle and older jars have a few more character flaws in the glass so I would not use them in the pressure canner.  While finding the old jars and getting the rubber gaskets is not a problem, finding the glass lids and zinc rings can be depending on where you live.

No. 10 glass top Presto lids
Despite the warning by the USDA to only use the single use, 2 piece snap lids there really is no reason why glass lids cannot be used.  Pictured is the Presto glass top inserts manufactured by the Owens-Illinois glass company in both Toledo, Ohio and San Francisco, CA for the Cupples Co of St. Louis, MO in the late 1920s through the 1940s.  There are the glass precursor to the Tattler reusable lids I tested in the summer.  Notice how the rubber gasket goes onto lid not the jar as pictured above?  This means the glass inserts can be used on modern canning jars just the same as the Tattler lids.  Unlike the Tattler lids, there is no potential problem with staining which I recently found out that roasted tomato sauce stains the Tattler lids.  However, they will not give a slightly visible indication of seal like the Tattler lids do.  They are used exactly like the Tattler lids including the ¼ - inch turn back before processing then full tightening after processing.  These lids are thicker than the Tattlers so require special bands but you really only need enough bands to process a canner full as they are removed once the food has cooled.  If the jar has not sealed the lid will easily pop off like the Tattler lids.

The real problem with the glass inserts is finding the rubber gaskets as they are no longer being made.  Some have reported success using the Tattler rubber gaskets with the glass inserts but my observation is the Tattler gaskets are thinner in thickness with a narrower sealing area so there will be a lot more fiddling to get the gasket to seat well to prevent seal failures.  The best advice is to find old stock of the rubber seals that can be re-used several times.  Used gaskets will work as well providing they are not damaged or stretched.  One work-around solution I found was to buy the rubber seal material to cut the gaskets myself.


Monday, November 15, 2010

Frugal Kitchens 101 - Honey

Frugal Kitchens 101

White sugar is likely one of most common sweeteners home cooks use.  The problem with sugar is it adds sweet and bulk but no real flavour.  This is desirable when cooking some foods like cookies or jams but the flavour of other foods can be enhanced by using another sweetener.  One of my favourite sweeteners to use is unpasteurized honey.  This week's Frugal Kitchens 101 focuses on honey.

Honey really is the nectar of the Gods.  I don't mean that pasteurized, homogenized honey sold in the stores either.  It lacks both flavour and texture because it is a blend of many kinds of honey then heat treated (pasteurized) to kill off any nasties.  The reality is there is absolutely no reason to pasteurize honey other than the convenience of the food industry.  Honey is has natural anti-biotic tendencies and is shelf stable for eons without ever spoiling.  Natural raw honey on the other hand is packed full of flavour ranging from very mild to quite pronounced.  It also ranges in price from inexpensive (about $7 per L (32 oz) to $10 for 1 lb (16 oz).  It is usually sold as liquid or in the comb.

Honey takes its colouring and flavouring from what the bees are gathering nectar from.  In the spring the honey will be very light, pale amber and mild flavourd.  In the late fall it will be a very dark amber  with a more pronounced, distinctive flavour.  Honey can be very regional as well like the sour-wood honey I bought on our road trip that is a very rare honey harvested only a few days in the fall in the southern Appalachian Mountains or the buckwheat honey I buy from Pennsylvania.  Most of my honey though comes from local beekeepers right here in Ontario.

At one time getting unpasteurized honey meant visiting local beekeepers or farm stands.  By all means those sources are still available.  However, for those living in urban areas not wishing to do a lot of driving an excellent source for unpasteurized honey is health food stores.   Unpasteurized honey can also be found at various ethnic, Amish an Mennonite shops as well as flea markets and farmer's markets.    There are two things to consider when using honey.  Infants under the age of 1 should not be given raw honey because very minute chance of botulism.  While this is extremely unlikely don't take the chance.  Local honey is by far better if you have seasonal allergies because you are less likely to react to the honey.  I have year round and seasonal allergies yet have not had a problem with honeys from other location but this is something to be aware of just in case.

Honey can be substituted for sugar.  It is hydrophyllic meaning honey attracts moisture and because it is a liquid it will behave a bit different than sugar would in a recipe.  In general when substituting honey for sugar use half the amount of honey called for in the recipe.  If substituting in bread recipes you may have to add a little extra flour to compensate for the additional moisture.  If using honey in jam or jelly making you will need to use a low methoxy pectin like Pomona's rather than regular pectins.  If your honey comes in the comb, carefully poke or press down slightly on one side of the comb to release the honey.  Continue as needed.  The comb is wax and while you can eat it it would be best not to.

Honey should be stored in a cool, dark location away from bright light.  It is normal for honey to crystallize during long storage.  If this happens set the jar into a pan of hot water for the crystals to disolve.  Some sources recommend microwaving the honey but this may according to other sources damage the honey. 


Sunday, November 14, 2010

Cod with Potatoes and Squash Cooked in Foil

Cooking in foil packets is a frugal method that results in moist, tender foods with a lower cooking time.  Clean-up is minimal with the foil being put into the recycle bin if allowable or tossed.  Individual vegetable sides or an entire entrée can be cooked in foil packets making this method ideal for outdoor cooking on the grill or over an open fire.

foil potato and squash packets
The nice thing about using foil is it can be formed to the shape of the food.  Using a foil packet is my favourite method for cooking acorn squash.  I cut the squash in half and scoop out the seeds.  Then I place about a teaspoon of butter and a little salt in the hollow,  then wrap each half in foil.  Pictured are the squash and potatoes I cooked in foil packets.

I quartered the potatoes then placed on a sheet of tin foil.  I drizzled a little olive oil over the potatoes, added about a tablespoon of butter then sprinkled with sea salt and fresh ground pepper.  I sealed the packet tightly and placed in on a baking sheet along with the squash.  I baked the squash and potatoes at 180ºC (350ºF) for 35 minutes.  Once the squash was cooked I unwrapped in and mashed the resulting liquid in the centre into the squash pulp.

cod dinner with potatoes and squash cooked in foil packets
Squash seems to be one of those vegetables that just doesn't get a lot of attention.  Yet it is an extremely frugal vegetable when bought in season.  Locally acorn squash is priced at 5 for $1.25 or 25¢ each.  Other squash (eg. butternut, spaghetti, crooked neck) are priced anywhere from $1 to $3 each in season.  That makes squash a very frugal side dish but squash can also be used in place of pumpkin (also a squash) to make pies, quick breads or muffins and soups.  Mashed squash can be frozen in muffin tins for individual serving sizes.  Squash soup also freezes nicely.

It was a bit larger meal starting with shrimp cocktail as the appetizer.  I served the foil cooked mashed squash and red potatoes with steamed spinach and pan fried Atlantic cod loins as the entrée with a small side salad.  I have to say these are some of the best cod loins we have ever found!  They are delivered right to our door.  I just bought a second box of them because we enjoy them so much.


Saturday, November 13, 2010

Personalizing Homemade Pizza

Homemade pizza compete with ingredients made from scratch have been a family tradition since our kids were young.  I'd put the dough into the breadmachine then my husband would form it into a large rectangular crust and each of our kids would top their piece as they wanted.  It was always a lot of fun!

homemade pizza fresh from the oven
My husband and I have kept this tradition when we make homemade pizza.  We usually use a homemade tomato based pizza sauce but not always.  The homemade pizza we recently made looked a little odd from its normal patchwork look but since the kids weren't home we went a little plainer.  My husband didn't want a lot of toppings on his just mushrooms, peameal bacon, onions and cheese while I wanted more (spinach, olives, fresh tomatoes).  So I made a kicked up  slice for me while my husband topped the rest of the pizza a bit more plainly.  He planned on taking the leftover pizza to the office for lunch the next day.  One of our kids is helping out in the office so I've been sending lunch for two.  Homemade pizza warms up so nicely so it's perfect for lunch.

my pizza slice
I love experimenting with pizza toppings and so far I don't thing I've come across one that I don't like.  My piece was about 6 - inch square and filled with great toppings.  If you haven't tried this method of building a pizza with your family, you will be surprised at how easy and fun it can be. 

The easiest way is to set out small bowls of favourite toppings for each family member to use on their slice as desired.  Once the dough is formed and the sauce spread let the fun begin.  It's funny too because kids have one idea of what their pizza slice will look like but the look changes when the pizza is cooked.  You can even make it a bit more challenging by voting on who's pizza slice looks the best.  I think this is just such a family fun time event to be shared making wonderful memories while enjoying geat food!


Friday, November 12, 2010

Another Batch of Frank's Hot Sauce Cone Recipe

The past couple of weeks I have been busy using up all the little bits of left-overs from the garden.  We finally had our first frost that killed off the remaining pepper and tomato plants but some of the herbs are still going strong along with the chard.  A few days ago I posted about the batch of Frank's Hot Sauce Clone recipe I made using cayenne peppers from my garden.  The sauce came out amazingly like Frank's!  I canned the sauce for longer term storage and just to see how canning would affect the flavour.

another batch of Frank's Hot Sauce clone recipe
A couple of days ago I used the rest of the cayenne peppers that had been left sitting on the counter to redden to make another batch of the Frank's clone.  The peppers were aged in that I had allowed them to sit for almost a week before using them so more in keeping with the original Frank's hot sauce.  There were more cayenne peppers so I ended up with about a litre of sauce.  I used garlic powder for this batch in keeping with the ingredients listed on the bottle of original Franks' hot sauce.

I am not above begging family and friends for any fancy bottles they are discarding.  Pictured is the resulting clone sauce poured into a fancy bottle and a mason jar.  Unlike the last batch I did not can the sauce.  Hot sauce is quite acidic so will keep nicely in the refrigerator without being canned.  The mason jar is on its way to a friend who is begging for hot sauce so hopefully it is enjoyed!  I really thought the fancy bottle was rather cute, what do you think?  


Thursday, November 11, 2010

Kitchen Quick Tips - Bacon

kitchen quick tips
The date stamp on vacuum-sealed bacon reflects the last date it should be sold.  Bacon should be used within one week of opening the package.  It can be frozen for up to a month if desired.


Wednesday, November 10, 2010

Beef Roulade Stuffed With Spinach and Provolone

During our first visit to our vacation home one of the meals we cooked at home was a deli prepared  stuffed flank steak.  At the time I though this would be a very easy dish to create at home.  The stuffed flank steak is officially called a roulade.  Roulade comes from the French word rouler that translates into roll.  Typically a roulade refers to meat rolled around a filling.

making beef roulade steps
I decided to try my hand at creating a roulade using a round steak with a little help from my husband who insisted on helping.   The first step with a roulade is pounding the meat thin using a mallet (1).  We placed the meat between two sheets of wax paper to pound it thin.  Once the meat was pounded thin we topped with washed fresh spinach and provolone cheese slices (2). We  rolled the meat jelly roll (a sweet cake based roulade) fashion starting with the narrowest end.  The resulting roll (3) was then ready for slicing.  We used toothpicks to secure the slices for cooking (4).  Each slice was cut to about 1 - inch thick.

beef roulade ready for oven
One rather small round steak was enough for six generous roulade slices.  We placed the roulade slices on a Silpat® lined baking sheet.  The slices looked quite tasty!  Each slice was secured with a toothpick for baking.  We did not use any additional seasonings although sprinkling on something like garlic pepper would be a nice addition. 

We baked the roulade slices at 180ºC (350ºF) until medium well and the cheese was bubbly.  The slices did shrink a little with cooking but that's to be expected.  The cooking time was about 20 minutes.

beef roulade dinner with steamed vegetables
My gosh this was a lovely meal!  We served the beef roulade with steamed potatoes and rutabaga.  The cooked roulade slices were smaller than those from the flank steak but they were very filling and every bit as tasty!

What I thought was quite interesting is even though this was a round steak that we could have devoured between the two of us, there were left overs!  It's not like the stuffing was particularly filly but the entirety of slices made a huge difference.  There was certainly enough that we could easily have fed four people.  We had leftovers for the following day.  So this is an effective way to reduce meat per serving without noticing the amount of meat has been reduced. 


Tuesday, November 09, 2010

Beef Orzo Soup

My husband was at hunt camp but I decided with the weather cooling I wanted a pot of homemade soup but what I didn't want was to get soup burnout.  This happens when you eat the same soup over and over for the entire week.  I came up with a way to have five nights of different soups simply by mixing and matching pre-cooked ingredients and adding in a fresh ingredient or two.   The first dish I made using the ingredients was the beef noodle bowl recently posted.

beef orzo soup
An upcoming Frugal Kitchens 101 (Nov. 29, 2010) will go into greater detail of the method I used for the five different soups.  Honestly it is such an easy method it falls under the duh moment as to why I didn't do this sooner!

Pictured is one of the soups I made that week featuring orzo.  This soup ended up being very different from the beef noodle bowl.  I used some of the same key ingredients but used orzo instead of chow mein noodles and I added in black beans.  I sprinkled in cherry tomato halves and chopped onion but omitted a garnish. 

This was a very tasty soup that was much appreciated on a chilly fall evening.  The interesting thing is by having the ingredients in the refrigerator individually it took me only the length of time to cook the orzo to put the soup together.  The only other prep I did was cut 3 cherry tomatoes and dice a slice of onion to toss on top.  Quite frankly this meal came in at under the 15 minute mark and did I tell you how yummy it was? 

A few things I should point out with respect to any of my homemade soups.  First my soups never have an actual recipe.  They are always toss this in, toss that in and see what happens.  There are always my tried and true basic ingredients but I'm not afraid to experiment when it comes to soups.  Second, the number one requirement for any of my soups is nutrition.  That means I pack soups full of good, hearty ingredients.  Third my soups must look and taste good.  That means I'm looking for good, full bodied soups that get their flavours from with lots of bright colours.


Monday, November 08, 2010

Frugal Kitchens 101 - Food in Uncertain Times (2)

Frugal Kitchens 101

It is true that we are living in trying economic times.  The sad thing is a lot of folk do not know how to go about securing a food source and even less so securing a sustainable food source to help get through the harder economic times.  Food banks and charitable organizations can only do so much so it is time for each individual to take responsiblity in establishing some type of a food stock that should at minimum be a 3 month supply.  As mentioned in the previous post my comfort level is a 12 month food supply but in reality it is an 18 to 24 month supply.  At the same time using a few new skills can greatly help with securing food.  This week's Frugal Kitchens 101 is an extension of last week's post where I focused on growing your own food.

A frugal homemaker should never have to resort to using a food bank or charitable organization (eg. soup kitchen) for their food supply.  Instead they will strive to have enough on hand to be able to help themselves and perhaps help others if the need arises.

  • couponing - If you use coupons when grocery shopping, take what ever savings and buy canned foods for your pantry.  It might not seem like a lot but everytime you add two or three cans to your pantry stock you are taking one more step toward preparedness.  While it isn't food sustainability it is one way to help getting towards that goal.
  • buy in bulk - Again you will be relying on commercial and local growing sources but this is necessary when first setting up a well stocked pantry and in come cases it will be the only way to stock certain foods.
  • grow your own - Grow as much food as you can yourself.  That includes growing indoors, outdoors, in urban and rural settings.  When it comes to vegetables focus on heirloom varieties so you can collect seeds to grow for the following year (sustainable).   Consider adding a protein source to the foods you grow.  More and more communities are allowing backyard chickens kept mainly for the eggs.  Rabbits are allowed pretty much anywhere including urban settings. 
  • barter - Trade your excess produce from your garden with another gardener who has an excess of another fruit or vegetable.  Produce can also be traded for eggs, honey, meat and maple syrup. 
  • learn new skills - Learning new skills like gardening, fishing, hunting, trapping and foraging can help to increase your food supply.  Learning new skills like canning, dehydrating and curing will help preserve some of your increased food supply for later use.  A surprising amount of food can be produced simply by growing your own but that can be easily supplemented with fish, hunting and foraging.  Foraging in particular may be as close as your own back door and a surprising number of edible weeds can be foraged in urban settings.   Preserving extra food is not difficult, expensive or time consuming but it is one of the best ways to add to your food stores.


Sunday, November 07, 2010

The Issue of Preservatives

If you have been following this blog you will know it is very much about making it at home if possible.  In most cases homemade is cheaper and in many cases the homemade product is healthier through less artificial flavours, colourants and preservatives.  So by all means and given the amount of home canning I do on a regular basis and given that home canning results in a healthier, less expensive product I am hesitant to to say that there are sometimes commercially canned may be the most frugal choice.

commercially canned dill pickles and olives
I grow a descent sized garden and what I don't grow I buy from local farmers, usually organic.  The past few years has been iffy with respect to pickling cucumbers.  At best I've managed to grow enough to make a good sized batch of freezer pickles. I've managed to siphon off enough for a batch or two of dill pickles but it has been really hard.  The real catch comes if I buy pickling cucumbers enough for 4 L jars I will pay around $8 which doesn't sound all that bad.  Except I can buy a 1 gal (a little over 4 L) for about $4 at Sam's Club.  In this case it makes sense to buy the jar from Sam's Club or does it? 

The Sam's Club jar contains sodium benzoate as a preservative.  Since the pickles will not be heated that isn't a concern but if they were heated sodium benzoate reduces to benzene, a known carcinogen.  The commercially canned pickles also contain polysorbate 80 (an emulsifier) and yellow 5.  While polysorbate 80 is not carcinogenic I question why it is there in the first place.  Yellow 5 is the food dye tartazine, an azo dye.  The problem with tartazine is it does cause allergic reactions especially in those sensitive or allergic to aspirin.  Tartazine is an asthma trigger and can cause outbreaks of hives.  As a person with allergies including food allergies suddenly that $4 jar of pickles does not look so appealing.  Well the jar looks rather good for later storage and the pickles will be used for those not sensitive.  In this case though the pickles were not a frugal choice.  Even though making my own would have cost more they would have resulted in a significantly safer product for those like me that are sensitive to food dyes and preservatives.

Sam's Club also sells premium olives in a two pack of 21 oz jars for about $5.  Since I have absolutely no ready source for raw olives I have no choice but to buy them.  The only preservative in the olives is potassium sorbate, the salt of sorbic acid.  Sorbic acid is an unsaturated carboxylic acid that occures naturally in some berries.  Potassium sorbate is a preservative used to inhibit molds and yeasts in cheese, wine, yogurt, dried meats, apple cide, dried fruits and baked goods as well as many personal care products.  It is aluse used as a wine stabilizer.  Potassium sorbate is non-irritating and non-sensitizing with allergic reactions being quite rare.  The olive contain no additional dyes or preservatives.  In this case the olives are a frugal choice for me. 

Now this is something to keep in mind.  If a product like the dill pickles have the potential to cause food related allergies they are best avoided entirely.  In this case the homemade version is the more frugal choice even if it ends up being more expensive.  On the other hand a product like the olives that is rather benign the commercial version is the frugal choice.  As a bit of an aside, many people experience side effects specifically from commercially canned foods than they realize.  Consider the person sensitive to tartazine, a couple of pickle slices might give a slight rash while a whole pickle might give a greater reaction BUT with allergies each exposure will give a stronger reaction.  So if you are looking for possible solutions to unexplained rashes, hives, or something similar start checking those food labels!


Saturday, November 06, 2010

Beef Noodle Bowl

Pasta is just one of those foods that is so versatile there is some version in most cultures.  It is inexpensive, can be easily be made from scratch with only 2 or three staples or can be purchased commercially made quite inexpensively.  Wheat based pastas are very popular but there are rice and gluten free pastas available as well.  Pasta is just one of those foods most people enjoy and there are so many ways to enjoy pasta!

3
Chow mein noodles can be found in the Asian section of most grocery stores.  Chow mein noodles are one of the key ingredients for many Chinese dishes.  They are boiled for 3 minutes then used as is for soup noodles or stir-fried for chow mein.  Not only are chow mein noodles quick cooking the ones I bought are egg free with 0% sodium and cholesterol.  In comparison to other pastas they are lower in calories at 280 cal per 1½ pieces (85 g) verses 320 cal per cup (85 g) of gemelli.  The noodles are pressed into 8 squares.  A serving size is 1½ squares per noodle bowl so a package that cost $1.29 will give 4 servings but there may be more servings when used for other dishes. 

beef noodle bowls
On one of our many visits to the Greater Toronto Area (GTA) we discovered noodle bowls at a Chinese restaurant in Chinatown.  A rice bowl is somewhat like a soup but the focus is on the noodles so there is little in the way of other ingredients.  The broth which can be beef, chicken or pork is usually clear.  The noodles are cooked separate from the broth then placed in a bowl using tongs.  The noodles should fill the bowl by at least half.  A generous spoonful of a vegetable with or without meat mixture is placed on top of the noodles then hot broth is added just enough to show slightly around the noodles.

This is an extremely inexpensive dish to make.  I used 2 beef soup bones to make the broth in the pressure cooker.  

Broth

2 lg soup bones
1 lg carrot
1 sm onion
1 stalk celery
1 clove garlic
1 bay leaf
1 tbsp olive oil
12 c water
1 tbsp worcestershire sauce
salt and pepper to taste


Heat oil in pressure cooker bottom.  Brown soup bones.  Add all ingredients except worcestershire sauce, salt and pepper.  Place lid on pressure cooker.  Bring to pressure.  Reduce heat to just maintain pressure and cook for 30 minutes.  Remove from heat and allow pressure to come to zero.  Remove bones and cut meat from them, shredding and defatting as necessary.  Strain the broth.   Return broth to pot.  Stir in worcestershire sauce, salt and pepper.


Beef Noodle Bowl


1½ squares chow mein noodles per person
2 c broccoli, cauliflower, carrot mix
meat from broth
broth
parsley flakes
green onion


Cook the chow mein noodles.  Heat the vegetable mix and meat in the broth.  Stir in two good pinches of parsley flakes.  Spoon drained noodles into bowl.  The bowl should be about half full of noodles.  Top with a couple of spoons of the vegetable and meat mixture.  Ladle hot broth over the vegetable, meat and noodles until just visible through the noodles.  Sprinkle with a few slices of green onion.  Garnish with green onion spike.


Friday, November 05, 2010

Ugly Fries

Poutine is a truly Canadian dish, uniquely French-Canadian cuisine.  There are three key ingredients to good poutine.  They are white cheese curds, real gravy not packaged* or from a tin and fresh-cut fries.  When I first wrote about poutine I mentioned that some call this wonderful side dish ugly fries.  In reality ugly fries while they resemble poutine are quite a bit different.

ugly fries
The only thing poutine and ugly fries have in common is the basic concept of topping French fried potatoes with cheese and gravy.  In a flavour comparison poutine wins hands down.  The reason is three fold.  Fresh-cut fries form the base and if you've ever had fry truck fries you will know how much better they taste than the anemic, thin fast food fries.  The potatoes must be fried in pure lard for an authentic taste.  French-Canadian gravy is very dark and thick with the consistency of molasses.  True poutine uses fresh white, cheddar cheese curds.


In comparison, ugly fries (pictured) are closer to American Gravy Cheese Fries.  The fries are cooked from frozen.  The gravy quite often comes from a tin can or a powdered mix.  The cheese is usually shredded mozzarella rather than cheddar but in this case the cheese was a mixture of shredded mozzarella and cheddar.  While the taste is not authentic poutine, ugly fries are quite popular.

*Some in Quebec use a packaged vegan gravy by Warwick.  It is one of the best poutine gravy mixes available.


Thursday, November 04, 2010

Kitchen Quick Tips - Storing Cottage Cheese

kitchen quick tips

Extend the shelf life of cottage cheese by storing the container upside down before and after opening.  


Wednesday, November 03, 2010

Backyard Chicken Eggs

Our neighbours a couple of doors down have laying hens. I had full intentions of having laying hens this year but decided against it with the house being on the market. Raising laying hens mainly for the purpose of egg production is a growing backyard activity across Canada and many US communities. Some municipalities have enacted by-laws against raising backyard chickens while other are embracing the notion. And why not? Unlike dogs, chickens make very little noise and in fact most times no one will even know chickens are in your backyard. Chickens are easy to keep, low maintenance and don't smell. In most cases your neighbours won't even know you have chickens. A small flock of 4 laying hens will produce about 4 eggs per day so that is a rather good return on your investment. It is a good way to inexpensively add protein to your diet while increasing your self sufficiency.  Many backyard chicken owner get quite attached to their hens, fondly referring to them as their girls.

backyard chicken eggs
Backyard chickens will give white or brown eggs depending on the chicken species. The only difference is the colour of the shell. Seriously the eggs taste the same. The real difference is the difference in the taste of backyard chicken eggs in comparison to store bought eggs. The yolk in backyard chickens eggs is almost orange as pictured. It is considerably deeper coloured than store bought eggs. Part of the reason for this is backyard chickens tend to be free range within the confines of the backyard. That means their diet is a lot more varied than chickens producing store bought eggs. Most times backyard chickens are not grain fed other than during winter months and even then only if absolutely necessary.

backyard chicken egg yolks
Pictured are the cracked backyard chicken eggs.  Just look at how beautiful and richly coloured those yolks are.  That depth of colour translates into wonderfully flavoured eggs.  I grew up with farm fresh eggs delivered right to our door every week by the egg lady.  Adjusting to store bought eggs was a bit difficult.  I went back to buying farm fresh eggs every time I got the chance.  When our kids were younger I even had an egg lady of my own who delivered eggs every 2 weeks.  Once you switch to farm fresh eggs you won't go back to store bought unless absolutely necessary.  However, backyard chicken eggs are even fresher.  They can be used in your favourite recipes within minutes of being gathered.

scrambled eggs
The difference in flavour is undeniable! Backyard chicken eggs like free range chicken eggs have a wonderful flavour that well out weighs store bought eggs.  The reason being backyard chicken eggs are considerably fresher.  Better yet you know what they have been fed.  Backyard chickens tend to be healthier than commercially raised laying hens.

Scrambled eggs are one of the easiest ways to prepare eggs.  I scramble eggs plain with no water or milk added cooked in a non-stick fry pan with just a dab of butter then lightly seasoned with fresh ground salt and pepper.  The beautiful deep yolk colour of the backyard chicken eggs is not lost with cooking.  Let me tell you these eggs were delicious!


Tuesday, November 02, 2010

Gremelli with Meat Sauce

Pasta comes in so many shapes and sizes it would be hard pressed to find one that does not appeal.  Not only is pasta one of those staples pretty much everyone likes, pasta is extremely versatile.  It can be served plain, with any number of sauces raning from very simple to complex, as or in a casserole, in soups, as a salad as well as hot or cold.  Various pasta shapes have different cooking times to al dente so if in a hurry I choose a quicker cooking pasta like angel hair.  Experimenting with various pasta shapes is fun so I'm always on the look-out for a different shape to try.  I came across gemelli that looked a bit interesting.

gemelli with meat sauce
Gemelli is the Italian word for twins.    Even though this pasta appears to be twin tubes twisted around each other they are a single s-shaped strand twisted into a spiral.  Gemelli is great with any sauce but can also be used in pasta salads or casseroles.  This pasta cooks to al dente in 9 minutes. 

Rather than top the cooked gemelli with sauce as I often do with pasta, I mixed it with homemade meat sauce then plated.  This gave the gemelli a chance to grab and hold the sauce.  A light sprinkling of fresh ground Parmesan cheese and parsley flakes completed the dish.


Monday, November 01, 2010

Frugal Kitchens 101 - Food in Uncertain Times (1)

Frugal Kitchens 101

I've been follow a discussion on one of the forums that I participate in on food in uncertain times.  According to one source the 5 foods that should be grown for sustainable living are: potatoes, corn, squash, beans and eggs.  Of course I had to do a short write-up on my gardening blog but I want to take the topic into greater detail here.  This week's Frugal Kitchens 101 topic is Food in Uncertain Times.

Food is a basic necessity of life.  In times of stress and financial hardship regardless of the cause, food may be one of the few comforts left.  I personally feel that keeping a 1 year supply of food on hand is prudent and in my case it borders closer to 18 months to 2 year supply.  That being said, no food supply is considered sustainable if it cannot be replenished.  During the depression and war times every household was encouraged to have a victory garden.  The premis was taking responsibility for growing what you could yourself took the pressure off of the commercial food supply.  That still holds true today.  Unless you live in a building with no balcony and even then virtually every living space can be used to grow some of your own foods.  Growing can be done indoors, outdoors or both and it can be done using the new techiques for small space gardening. 

What you can grow depends on your space and climate but growing indoors can extend what you can feasibly grow as well.  In general most herbs and a wide range of vegetables can be grown in small spaces and indoors.  On the other hand some foods like wheat, rice, corn and potatoes really take up too much room for a home garden unless you have a lot of space. 

Here is a list of fruits and vegetables that I would consider necessary for sustainable living space permitting of course:

  • tomatoes 
  • peppers
  • lettuces
  • chards
  • onions
  • carrots
  • squash (including cucumber)
  • pole beans
  • peas
  • rutabaga
  • fruit bearing bushes 
  • fruit bearing trees
Some animals take up more room than others and depending on location may not be allowed by the municipality.  Consider too that animals are a 24/7 commitment so may not fit in with your lifestyle.  Here is a list of animals tthat would be nice to have for sustainable living in smaller spaces.  Of these rabbits should be rather easy to keep, low maintenance and allowable pretty much anywhere:
  • rabbits
  • chickens (laying hens only)
  • goat
  • fish (eg. trout)
Next week's Frugal Kitchens 101 will discuss food in uncertain times a bit further.