Cook ingredients that you are used to cooking by other techniques, such as fish, chicken, or hamburgers. In other words be comfortable with the ingredients you are using.
--Bobby Flay
For Your Information
Please watch this area for important information like updates, food recalls, polls, contests, coupons, and freebies.- [March 19, 2020] - Effective Mar 17, this blog will no longer accept advertising. The reason is very simple. If I like a product, I will promote it without compensation. If I don't like a product, I will have no problem saying so.
- [March 17, 2020] - A return to blogging! Stay tuned for new tips, resources and all things food related.
- [February 1, 2016] - An interesting report on why you should always choose organic tea verses non-organic: Toxic Tea (pdf format)
- Sticky Post - Warning: 4ever Recap reusable canning lids. The reports are growing daily of these lids losing their seal during storage. Some have lost their entire season's worth of canning to these seal failures! [Update: 4ever Recap appears to be out of business.]
Popular Posts
-
Asparagus, Yellow Wax Beans, Kentucky Wonder Pole Beans, Herb Glazed Carrots, Corn Natalie made a comment on yesterday's entry reques...
-
As a result of milder fall temperatures the pepper plants were still producing nicely through the mid portion of last week. The plants were...
-
Peameal bacon is a cured pork loin that has not been smoked. It is not to be confused with bacon sold as "Canadian Bacon" which i...
A deep fryer is a must for safely deep frying certain foods such as yeast doughnuts, fresh cut fries and English style beer battered fish. Sure you can use a pot of oil on the stove but this really is not the safe way to deep fry. One of the kitchen appliances we received as a wedding gift was a deep fryer. It was avocado green with a removable basket and glass lid that looked very much like the old style slow cookers. I quickly learned that deep fryers are a pain to clean and despite cleaning they tend to get gunky. Over the years the deep fryers were improved to use filters to help reduce odours. At the same time they still were a pain to clean and still got gunky. Fast forward to more recent times and if I recall correctly my fourth deep fryer, a nice Moulinex that served me well for almost 8 years. Despite all the changes in deep fryers, it was still a pain to clean, the oil still needed straining and it got gunky around the top.
A few weeks ago I found a 1 - inch long tan coloured threaded connector by the counter kick plate. I set it aside figuring it was important and we would soon find out which appliance it belonged to. It turns out it was too the deep fryer. The part would no longer stay on either causing the inner fryer compartment to be quite loose. My husband declared the fryer unsafe so it was time to look for a new fryer. This time I really knew what I didn't want in a fryer!
 T-FAL® Deep Fryer
Last Christmas we gifted parents of oldest grandbaby with a T-FAL® deep fryer. They had done the research and were very specific that was the fryer they wanted. They were telling us how pleased they were with the fryer. They made buttermilk fried chicken using the fryer when we visited last. I saw how the fryer worked and asked a lot of questions. My mind was made up, so it was just a matter of waiting for a sale. In the end, Canadian Tire had the fryer on sale so we sacrificed all of our Canadian Tire money so actual money spent was $22 CDN. Pictured is my new T-FAL® Ultimate EZ Clean Deep Fryer.
The fryer has a lot of nice features. It has a large capacity (1.2 kg) two position basket. The lid contains a permanent odor filter and viewing window for splatter free cooking. The adjustable thermostat is graded in both Fahrenheit and Celsius. Unlike other deep fryers the 1700 W ultra quick heating element is immersed directly into the oil. Cost to operate at our electric rates is 20¢ per hour. The frying bowl, lid and fryer basket are dishwasher safe for easy washing after each use so there should be no gunky build-up. The real selling feature was the automatic oil filtration system that drains the oil through a filter once it is cool enough into a storage oil box. The oil box can be stored in the fryer or refrigerator.
 Fresh Cut Fries
When testing out a new small kitchen appliance always test it against something you know what the outcome should be. We decided to test out the new fryer by making fresh cut fries. The fryer came with a bonus French fry cutter but we already had one so put the bonus one away as a spare. It took 3 L of 100% vegetable oil to get to the correct oil level. The oil was and still is on sale for $3.99 for the next week which is a $2 savings per jug so we will be stocking up.
I really like that this deep fryer has actual temperatures on the thermostat. The old deep fryer had pictures but no temperatures making it difficult to judge the frying temperature for other foods. True to its word there was no splattering. The fryer heated faster and the cook time was a couple minutes shorter than the old fryer as well. In terms of cost savings this is less than a penny but as part of the Every kW Counts it means we used less electricity to get the same results! As you can see the fryer did a lovely job of frying the fresh cut fries.
When we were finished frying, we set the fryer to auto-filter. I don't think it was a full 3 hours before the oil was filtered into the oil box. I dismantled the fryer and washed the parts by hand simply because I was already washing a few other things. I like the idea that the parts are dishwasher safe. Tonight's test will be ...!


Don't try to make candy including fudge on a rainy day or during periods of high humidity. Extra moisture in the air will cause the candy to fail.
What's in a name? While still a newlywed I made a casserole dish that had been handed through our family under the name of Shepherd's Pie. Imagine my shock when one of our guests told me it wasn't Shepherd's pie. She then went on to tell me what Shepherd's Pie was so I just had to try making it. The casserole was a huge hit the first time I served it! The casserole dish that was handed through our family has remained a family favourite but has since been renamed Hamburger Casserole or affectionately known as Mommy's Surprise.
In recent years I learned that Shepherd's Pie is traditionally made with lamb. The same dish made with game meat is called Hunter's Pie. I have not found an actual name for the dish made with beef as it is widely referred to as Shepherd's Pie. I also make similar casserole dishes using ground pork or ground chicken. I think these types of country casseroles using beef, pork or chicken are best described as Cottage Pies. They are simple, frugal, budget stretching meals that really is what down home cooking is all about!
 Rustic Cottage Pie
The beauty of country pies lies in their simplicity. They don't need to have fancy or expensive ingredients. Instead they should be kept simple but that doesn't mean they can't have a lot of flavour. I made the pictured country pie using lean ground beef. This yummy country pie had a rustic look because the top layer was on the chunkier side rather than the normal smooth mashed potato layer.
Rustic Cottage Pie
2 lb lean ground beef
½ medium onion
1½ c beef gravy*
1 c green beans (homecanned or canned)
1 c corn niblets
6 medium potatoes
3 carrots
½ c flavoured cream cheese
¼ c sour cream
milk
Wash potatoes and carrots. Peel carrots. Do not peel potatoes. Cut both into chunks. Steam until tender. Pour into KitchenAid® stand mixer bowl (or similar). Add cream cheese and sour cream. Use the beater paddle to beat into a chunky mixture. Chop onion. Brown the ground beef and onion. Drain. Stir in gravy. Pour the meat mixture into a casserole pan. Drain green beans and pour over meat mixture. Pour corn niblet on top. Spoon the potato mixture over the vegetable layer, spreading evenly. Bake at 180ºC (350ºF) until about 30 minutes or until potato mixture is lightly golden brown.
*If you do not have left-over gravy on hand, use the same amount of canned or powdered brown gravy mixed with 1½ c of water.

In general convenience foods are more expensive than homemade versions. They tend to be high in salt, sugar, artificial colourants/flavours and preservatives as well. That being said there are a few of the instants that I consider frugal additions in my pantry. Most of these instants fall into the category of emergency preparedness food items in the pantry as well. While all can be used for their intended purpose, they usually used as an ingredient in other dishes. All of these ingredients are relatively inexpensive must haves in the pantry.
- instant potatoes - Instant potatoes are an ideal thickener for soups and stews. In a pinch they substitute nicely for fresh mashed potatoes. They also are a good nutritious food for someone recovering from an illness. Buy a good quality instant potato. I prefer the instant potatoes that are powered rather than flaked but either will work. Protect from insects and humidity by stored in vacuum sealed mason jars.
- instant coffee - I wouldn't say instant coffee is as good as fresh brewed coffee but it will give you that morning caffeine boost. Instant coffee is often used as an ingredient for both flavour and colour. When using instant coffee as an ingredient you can use regular or decaffeinated. Stir a tbsp into the milk when making chocolate pudding to give you a mocha flavoured pudding. It is one of the ingredients in dark rye, some multi-grain and pumpernickel breads. Use instant coffee to boost the flavour of any chocolate batter (eg. cake, brownies). Add to bean soups, stews and chili to give both depth and colour.
- instant pudding/pie filling - Cooked puddings can be from scratch however instant pudding mix can be used as an ingredient in batters (eg. cake). The prepared pudding can also be used as an ingredient for quick to make summer desserts. The most common instant pie filling is lemon which basically is an instant form of lemon curd. Again this can be used as an ingredient.
- instant milk - At one time instant milk was always recommended as a way to save on milk costs. In recent years instant milk has fallen out of favour even with the frugalistas as a milk substitute or milk stretchers mainly because in most cases instant milk is no longer less expensive than fresh. Still instant milk is often used in baking. It is one of the secrets to getting a soft crust on home baked breads. Adding instant milk to the fresh milk when making yogurt will give a firmer, thicker yogurt without dramatically increasing the fat content.
- jello/gelatin - Jello and gelatin are pantry staples not only because they can be used to make inexpensive dishes and deserts but because they are a great way to get extra fluids into someone recovering from an illness. Keep several boxes on hand including unflavoured gelatin. Unflavoured gelatin can be used for meat dishes, salads and thickening yogurt. There are several recipes online for using jello/gelatin in jam making as well.
- instant gravy - Instant gravy wouldn't be something I would recommend using as a substitute for homemade gravy. However, it is good for those times where you just need an ounce or two of gravy and do not have any homemade gravy on hand. I find it generally works well for hamburger where you might just want to thicken a little.
- powdered cheese - Powdered cheese really is an emergency preparedness food item but it is a good item to have on hand. Powdered Parmesan cheese can add a punch of flavour to salads and sandwiches for those times you are out of fresh Parmesan. Powdered cheddar cheese can be used to make give that vegetable dip a little twist or to make homemade versions of cheese and macaroni. Powdered cheeses can be added to bread dough for a different flavour as well. The main advantage of powdered cheese is it is a shelf stable product.
- powdered eggs - Powdered eggs are another emergency preparedness food item. In a pinch they can be used to make scrambled eggs simply by mixing with water and cooking. A good way to use them is as an ingredient when baking. The main advantage of powdered eggs is it is a shelf stable product so no refrigeration is needed.
Whenever we get together with the kids good food is always a guarantee! That's just what foodies do! The kids made a finger licking good fried chicken for dinner our last trip there. You just can't go wrong with fried chicken! I think everyone has their own way to fry chicken whether it be on the stovetop or in a deep fryer. Quite often fried chicken is coated as well so the possibilities are endless!
The choice to coat or not largely depends on the cut of chicken you are frying. I have deep fried chicken wings without a coating with excellent results. At the same time a thin, seasoned flour coating also gives excellent results. There are reasons for choosing stovetop frying over deep frying. While you can get flaky, crusty results by stovetop frying I think you get better results deep frying. The oil of choice should be light flavoured so as to let the flavour of the chicken shine through. Peanut oil gives gorgeous results but if you are concerned over peanut allergies use canola, soybean, sunflower or corn oil. If you are re-using the cooking oil filter it for storage. Make sure to heat your oil to the proper temperature for deep frying chicken of 185ºC to 190ºC (365ºF to 375ºF). Most modern deep fryers will have a setting for the proper temperature for frying chicken but it doesn't hurt to use a manual thermometer to make sure.
 Buttermilk Fried Chicken
The coating on the buttermilk fried chicken is golden brown and crispy with just the right amount of flavour. You will need to adjust the flavouring as desired. The accompanying potatoes were rich and creamy. They had a lovely flavour that was a bit different yet went well with the fried chicken. It was an excellent, tasty meal!
Neither of the following recipes have actual carved in stone measurements. The measurements are only a guideline. In general figure 1 medium to large potato and 2 to 3 pieces of chicken per adult. Tweak as desired.
Buttermilk Fried Chicken
2 c flour
2 c buttermilk
Montreal Chicken seasoning*
chicken seasoning*
Place the flour and seasoning in a bowl, mix well. Pour the buttermilk into another bowl. Pat the chicken dry. Dip the chicken into the buttermilk then into the flour mixtures. Deep fry at 185ºC to 190ºC (365ºF to 375ºF) until chicken is crispy and golden brown. Drain then serve.
*Substitute either with your favourite chicken herb/spice blend.
Ranch Potatoes
1 medium to large potato per person
chili powder
diced butter (about 1 tbsp total)
ranch dressing (about 3/4 c)
shredded cheddar cheese (about 1 cup)
Peel and cut the potatoes into bite sized pieces. Place in a greased baking pan. Sprinkle a little chili powder over the potatoes. Add 4 - 6 pieces of diced butter on top. Bake at 180ºC (350ºF) for one hour. Remove from oven. Pour the ranch dressing over the potatoes. Top with shredded cheese. Bake at the same temperature for 10 minutes or until cheese is bubbly. If desired you can turn the oven off and simply let the cheese melt with the residual heat in the oven.
Keep an aloe vera plant in your kitchen. Not only does it sooth minor burns, the aloe vera plant also absorbs household air pollutants improving your indoor air quality.
[Sorry, delayed due to Victoria Day holiday]
If you are looking for ways to save on your food dollars the most effective method is too cook from home from scratch. By scratch, I mean use the whole foods and raw ingredients to make a meal rather than high priced mixes and convenience foods. One of the biggest problems with home cooking is you can easily get into a rut, cooking the same foods in the same way so you end up getting bored. It's not as much about not wanting to cooking but more of a tired of cooking the same old thing. Whether you are just starting out learning to cook or you are an experienced home cook you will need to find cooking inspiration from time to time. What are good sources for cooking inspiration?
Here are some of the ways I find cooking inspiration:
- word of mouth - My kids, other family members and friends call and/or email me with details of dishes they enjoyed whether homemade or at a restaurant. They call me when they experiment with new ingredients or to tell me I simply have to try something they liked. This kind foodie talk helps to stimulate your interest in food. Sharing foodie talk is a great inspiration!
- printed materials (cookbooks/magazines) - This really is a traditional method of finding recipes. Anyone interested in cooking usually has a small collection of cookbooks. I prefer ones that have a picture of the finished dish. Older cookbooks often may or may not be illustrated but they usually do not have pictures of the finished dish. Still they can be quite useful for finding new recipes to try. Many including myself are turning to these older cookbooks especially those from the depression era because the recipes tend to be on the frugal side.
There are many sources for cookbooks/magazines including free magazines. While I have bought or been gifted with several new cookbooks, quite a few of the cookbooks in my collection were bought used. Good sources for used cookbooks are resale stores and yard sales with prices ranging from 25¢ to $1. Borrowing a cookbook from the library or a family or friend is a good way to try out a few new recipes without any cash outlay. The problem with borrowing is you don't have a hard copy but read down for my solution.
- television - There are a lot of good cooking shows on tv. I admit to be addicted to the food channel! It's on most afternoons especially when I'm looking for something just a bit different for dinner. I used to tape an entire afternoon of cooking shows for later viewing but now I tape only those I know I want to review based on the show's description. Now the new PVR receivers allow easy recording without using video tapes so that is an option as well. The downsides to television is some essential steps are not shown and it's not as convenient as a cookbook unless you have a television in your kitchen.
- video - I mentioned recording television cooking shows but there are also a lot of cooking videos available in various formats. Again resale stores and yard sales are great sources for cooking videos.
- restaurants - This is one of my favourite sources for cooking inspiration! Not only do I get a good visual as to the finished dish I get to smell and taste the finished dish. Trying to duplicate a dish I liked becomes the challenge.
- online - There are literally hundreds of thousands of cooking databases, cooking websites and blogs available online. In addition to that many manufacturers have websites that include a recipe section for using their products. Some websites allow you to search for a dish simply by the ingredients you want to use. YouTube and similar types of video sharing sites have great cooking video clips as well. Finally you can get digital cookbooks and videos for your handheld device (eg. Palm, iPod, iPod Touch etc.) either with no charge or for a small fee or you can upload you own cooking information to your handheld using the sync function. That means you can have your favourite dishes and food related topics at your fingertips even when away from home. The best part of online resources is they are basically free!
- experiment - When you do your grocery shopping, pick up one ingredient, herb, spice, fruit or vegetable you have not used before. It does not need to be expensive and in fact I suggest keeping the cost to just a couple of dollars. Keep it simple! Remember this is going to be a learning experience. When you get home go online and find a dish that uses the item you bought. Try to use it with foods you already have in your pantry or freezer.
Remember how you cook foods affects how they look and taste. Try a different way to cook a vegetable, meat, fish or poultry. If you always boil potatoes for mashing try steaming them for nicer results. If you always steam asparagus, try grilling or baking for a different result. This simple method helps to stimulate your imagination and keeps you interested in cooking. It costs nothing but can be very rewarding!
Previously if I wanted a copy of a recipe I either had to write it out in long form, photocopy it or buy the cookbook/magazine but that is now a thing of the past! Instead I use my digital camera to take a picture of the recipe. Save as digital images to use as desired. Transfer to a flash drive to use on your kitchen computer. Essentially this costs you nothing aside of your initial equipment and ink if you decide to print out the recipe. This works well for any printed material such as cookbooks and magazines. It also works well for taking pictures of restaurant menus that often highlight the key ingredients in the dish. It is an excellent way to capture the look and presentation of the dish. Most restaurants do not have a problem with you doing this but if in doubt just ask.
Make your own effective, low cost cleaning solution by mixing ½ c ammonia, ⅓ c vinegar, 2 tbsp baking soda and 1 gallon of water. This solution works great for cutting greasy build-up in kitchens.
One fringe benefit of blogging is you get to meet other bloggers. Several months ago I came across Everyday Living authored by tahtimbo. Since then his blog has become one of my favourites to visit. He often visits this blog as well. A couple of days ago tahtimbo commented on my Chicken Lettuce Tomato Pita Wraps asking if I had a tried and true recipe for a cucumber sauce like they have on gyros. I'm always happy to oblige! Tahtimbo, this one is for you!
 Tzatziki
The cucumber sauce for gyros is called Tzatziki. It is a Greek recipe often used for gyros but is versatile enough to use as a very tasty vegetable dip or as a salad dressing. Traditionally gyros are made using lamb but beef can be used as well. The flavour of Tzatziki just pairs nicely when used as a sauce for gyros.
Tzatziki can be bought pre-made in some stores in the refrigerator section. However, this has to be one of the easiest sauces to make! Using your own homemade yogurt makes this sauce extremely cost effective as well. Use a regular cucumber (eg. Straight Eight) rather than a seedless variety (eg. English cucumber).
Tzatziki
1 c plain yogurt
1 clove garlic
½ tsp salt
1 cucumber
dash white pepper (optional)
spritz extra virgin olive oil
Pour the yogurt into a cheesecloth lined strainer. Let drain a half hour. Peel and seed cucumber. Grate it. Sprinkle salt over the cucumber and let sit for 10 minutes. Drain. Finely grate the garlic. Stir garlic and cucumber into the yogurt. Add a dash of white pepper if desired and just a light spritz of olive oil. Mix in. Refrigerate ½ hour before using.
 Avocado Salad
One way to use Tzatziki is as a salad dressing. It is cool and refreshing with a lovely flavour. I made small side salads consisting of leaf lettuce, tomato slices and avocado slices topped with Tzatziki and garnished with shredded carrots and parsley. The quick and easy to make salads were delicious!
Method: You will need per person:
½ avocado
lemon juice
3 slices tomato
1 large leaf of lettuce
2 tbsp Tzatziki
Wash and dry lettuce. Slice the avocado halves into thirds. Drizzle avocado with lemon juice. Place tomato slices on bed of lettuce. Add the avocado slices. Top with Tzatziki. Garnish with shredded carrot and parsley.
One of the easiest ways to save money on your grocery bill is to shop the sales. That sounds like an obvious statement however, shopping the sales is a bit more complicated than the obvious. Today's Frugal Kitchens 101 will highlight some of the finer details of shopping food sales effectively. When it comes to sales most grocery store flyers are available online. Do that comparison shopping from the comforts of your computer not by driving around! Don't forget to use unit costs when comparing the sales as well. In many cases grocery stores have eliminated being able to pair coupons with sales so if you are a coupon shopper keep that in mind.
Things to keep in mind when shopping food sales:
- sales are cyclic: Grocery store sales follow a few trends. In general certain types of food will consistently go on sale just before holidays, certain events (eg. March break, back-to-school) or seasonal. For example one of the best times to stock up on baking items is just before Christmas; turkeys routinely go on sale just before Thankgiving; and hams go on sale just before Easter. Snacks, pastas and convenience foods go on sale just before March break and just before the kids go back to school. Some grocery stores run an annual $1 sale usually as spring approaches while others will run this type of sale both spring and fall. Local produce sales will follow the local growing season however, other produce such as mandarin oranges follow the season of availability in their country of origin. Meats too follow cycles. Farmers who do not want to over winter live stock put them up for sale meaning an influx of cheaper meats at butcher shops and abattoirs. Fish tends to be cheaper during the fishing season if you are shopping fisheries.
- loss leaders: For those not familiar with the term loss leader, it refers to a product the store will put on sale at a loss simply to get you in the door knowing that you will more than likely buy other products while you are there. A frugal shopper will cherry pick the loss leaders without buying anything else. This is why you will see stores put limits on loss leaders per purchase often worded as for example limit 2 per family purchase. Loss leaders tend to be staples like milk, butter and meats but they can also include other foods like certain sauces.
- cherry pick: Cherry picking refers to buying only those items on sale and especially to buying only those loss leaders. This can be a very inexpensive way to stock up on certain items but if there is a limit you will need to either take another person with you and split the shopping so you can get extra or make a few stops. If the option is making more than one stop consider the cost of doing so
- in store specials: Most grocery stores have in store specials either to promote the store or move certain perishable items quickly. Always budget an extra $20 to $40 to take advantage of these sales! One local store where we used to live always put fresh cut meat that hadn't been sold that morning on sale at 2 PM so I was able to get a lot of great deals. Other stores have cold bunkers (open refrigerator units) with in store meat specials. Meats and produce are guaranteed to be on sale late Saturday and Sunday before their new shipments come in Monday morning. One of our local grocery stores always reduces rotisserie chickens from $8 to $5 every evening at 6 PM.
- reduced for quick sale: Most grocery stores have a small section for items reduced for a quick sale. These are foods that are close to their sell by date or sometimes items with damaged packaging that does not affect the quality of the food. The items vary but generally range from produce to dressings, canned foods and left-over holiday specials.
One myth that has been widely perpetuated is that cooking from scratch takes a lot of time and effort. However, in many cases this is really the furthest thing from the truth. In reality this myth has been encouraged by the fast food industry and the manufacturers of convenience foods. But both have ulterior motives and that is to sell you a more expensive product to pad their profits. One way they do this is to convince you cooking from scratch takes too much time hoping you will buy into the myth. A nice home cooked meal from scratch can easily be make in short period of time for a fraction of the cost of either fast food or convenience foods.
 Ham with Diana Sauce
We have been eating mainly from our freezer and pantry stocks to free up some space. Our bulk meat purchases (beef, pork) will be ready to pick up the end of the week, fishing season is starting and fresh produce from the garden is just around the corner. A few nights ago I decided to cook up our last ham.
Ham is one of those meats many don't consider other than lunchmeat outside of special occasions. I don't understand this because any leftover ham can easily be sliced for sandwiches eliminating the need to buy expensive lunchmeat.
I cooked the ham starting from frozen in my countertop roaster in about 75 minutes. Had the ham been thawed it would have take about the same amount of time as the potatoes, 45 minutes so this is quite a doable meal to put together when you get home from work. By the time you have unwound dinner is ready. About 20 minutes before the ham was ready I simply poured a little Diana sauce ( honey garlic) over the ham. I didn't bother thickening the juices either choosing instead to just ladle a little over the ham.
 Ham Dinner
If you have been following this blog you already know there are a lot of preserving recipes here. What isn't always clear is how exactly we use some of these home canned or home frozen products. How to use some of the home preserved products is rather intuitive but what about the products like Old Fashioned Chili Sauce? So I am going to be making a bit more of an effort to show you how we use these products.
The meal as pictured was entirely from our pantry and freezers. I served the ham with whole potatoes cooked with the ham and home frozen nibblet corn. Topping the potatoes were a couple of generous scoops of the Old Fashioned Chili Sauce. This is a low fat alternative to butter, yogurt or sour cream and it has a lot of flavour! As long as I can remember chili sauce is always served with potatoes because it just pairs so nicely with potatoes whether baked, steamed or mashed. It really is a comfort food pairing on a cold, blustery Canadian winter evening!
One nice thing I like about eating out is the opportunity to discover new dishes. That's what makes being a foodie so much fun! Some of these dishes will be dishes I enjoy enough to try making them at home. Some of them are this is good but I think I could tweak to make it better. Occasionally I come across a dish that I try duplicating and becomes an instant hit with my family.
Years ago I discovered a BLT spinoff at a university pub called a CLT. It was and likely still is one of their most requested dishes yet it is a very simple, home style sandwich. Instead of using a tortilla as a wrap, the sandwich was based on a Greek style pita. The filling consisted simple of boneless, skinless chicken breast strips, iceberg lettuce, tomato and French dressing. The sandwich was pinned together with a toothpick then wrapped partially in thin tin foil. These wraps were an instant winner!
 Chicken Lettuce Tomato Pita Wrap
When I first started making the CLTs at home, I basically made them the same way as the pub did but it didn't take long before I started experimenting. Pictured is a CLT the way I make them now. They are extremely good and they are very filling!
CLTs are low fat the way I make them as well making this sandwich a nice, healthy choice. Use low or no fat salad dressing and mayo to reduce the fat further. They are a frugal, budget stretching sandwich as well since the focus is on the vegetables not the meat. One chicken breast will be enough meat for two wraps. Use Parmesan cheese for a lot of flavour without using a lot of cheese meaning less fat and cost. Finally if you make your own pitas substitute the fat with applesauce to further reduce the fat.
Method: The filling consists of: strips of lightly seasoned grilled or pan fried boneless, skinless chicken breast; chopped tomato, chopped red onion, leaf lettuce and shredded cheddar or Parmesan cheese. I use steamed homemade Greek style pocketless pitas but you can use store bought. I will be posting how to make pitas sometime this week so watch for that. Steaming the pitas serves two purposes. It warms the pita while making the pita more pliable for folding over the filling without breaking. Once the pita is warmed I spread with a little mayo, add the filling then drizzle just a little homemade vinaigrette over the filling. Then I fold the pita over the filling and secure with a toothpick. Serve with a small side salad.
rWe eat some type of salad almost daily and quite often make a dinner salad in place of a hot meal during the hot, muggy summer months. As a result I am a salad dressing junkie! More specifically I love experimenting with homemade salad dressings. I'm not above occasionally buying a bottle of commercially prepared salad dressing. What I don't like about commercially prepared salad dressing is the added preservatives, artificial colourants and artificial flavours. Homemade salad dressings cost 30% to 50% the cost of store bought Using the blender mason jar method I can easily make up a couple of homemade salad dressings to last the week. Vinaigrettes will keep well for 5 days in the refrigerator while sour cream or mayonnaise based dressings should be used within 3 days. I like making them in the 250 ml (half-pint) mason jars.
 New York Strip Steak
When you eat a lot of salads sometimes it is nice to change the presentation a little. Pictured is the dipped salad I paired with grilled New York Strip strip steak and steamed potatoes. I cannot take credit for the dipped salad idea as I came upon it watching oldest grandbaby who is a very accomplished dipper! It doesn't matter what the food is as long as there is some kind of dip. So that gave me the idea of serving salad fixings with the dip in a small dipping bowl basically an individual version of a vegetable tray. The salad dressing was a homemade Balsamic vinaigrette.
Vinaigrettes are very versatile yet extremely easy to make. The basic ingredients are 1 part vinegar to 3 parts oil, a binder (eg. mustard, honey, sugar), optional fruits or vegetables and optional seasonings. So just look at how many possibilities you can change ranging from using home flavoured vinegars to varying the oils to the binder and that isn't even considering the optional ingredients! Any vegetables used should be chopped fine and added after the oil, vinegars and binder is mixed. Add either dried or fresh chopped herbs, salt and pepper if desired. If you want a thicker dressing, thicken with an eighth tsp xanthan gum per cup of liquid using a blender before adding vegetables and herbs.
Balsamic Vinaigrette
recipe by: Garden Gnome
½ tbsp finely chopped onion
½ clove garlic, finely chopped
½ tbsp Dijon mustard
¼ tsp sea salt
1 tsp dried parsley
½ tbsp freshly squeezed lemon juice
½ tbsp balsamic vinegar
⅓ c extra virgin olive oil
pinch xanthan gum (optional)
Pour olive oil, lemon juice, mustard, salt and vinegar into a mason jar. Attach the blender base. Blend. Add xanthan gum if using to thicken. Blend until smooth. Remove from blender. Mix in vegetables and parsley. Shake before using. Pour into small salad pitcher for serving.
I like to clean as I go to save both time and energy. Keep one soapy wash cloth for wiping up counter spills and splatters as they happen. Keep a dry bar towel on the floor to wipe up any spills as they happen to prevent slipping accidents.
Becoming frugal in the kitchen means paying attention to those little things. Surprisingly they really do add up! Changing how you do the little things doesn't cost you any money and most take very little effort. It may take a bit of a mindset change but think of how much money over all you are saving! At the same time you are saving kWh something that is very important. Here's a few little things you can do that will help save you money in the kitchen.
- rinse those bottles: Rinse bottles and jars from sauces with a little water or stock or even milk depending on the sauce. This will get that last little bit out. Simply pour in a little liquid, cap and shake well then pour the resulting liquid into what ever you were using the sauce for. Each time you do this you are saving a fraction of a cent to a few pennies but over the year this simple practice will save you a few dollars.
- use a spatula: Use a spatula to get that last little bit peanut butter, mayonnaise and similar out of jars. Again this will save you money over the year.
- save those bits: Save those little bits of left-over foods. Use small glass covered bowls for that last ½ cup of vegetables. Toss these little bits of left-overs into homemade soups or stews. You can also save up enough that you can dry them for later use. If you are making a dish that calls for 1 tbsp of tomato paste, measure out the remaining tomato paste into an ice cube tray. Do the same thing for applesauce to be used as a substitute for fats in baking. Freeze for later use. Don't toss that last bit of bread out to the birds. Freeze it until you have enough bits to make croutons or bread crumbs.
- save those bones: Quite often you will end up with a bone or a few bones cut from meat you've cook. There's not enough to make a batch of stock so vacuum seal the bones until you have enough to make stock. NB. only use bones that have been cut from the meat prior to serving.
- save vegetable water: Use vegetable water to water your indoor houseplants. The water provides nutrients for the houseplants. You can also use vegetable water to water outdoor plants. Save some vegetable water to make vegetable stocks.
- choose steaming over boiling: This one simple change for preparing cooked vegetables will end up saving a lot of kWh over the year as well as giving you a more nutritious food.
- use a lid: Using a lid when cooking means you can turn down the heat AND cooking time is reduced so you save kWh in two ways! Not only is this eco-friendly cooking it saves you money on your cooking fuel costs!
Every cook has those times where they rely on the tried and true, family favourites and so it was with me for the past couple of weeks. There has been a lot going on lately and with our beef now at the abattoir's we have been focusing on eating from the freezer. Not that either are an excuse for not doing creative home cooking but that is how it has worked out. Unfortunately this is not really helpful for new posts on a home cooking blog. My most creative cooking the past week was making pita bread! While I took pictures of in the oven and the finished pitas, this is really something I would like to feature in greater detail from the forming so watch for that post likely later next week when I make another batch.
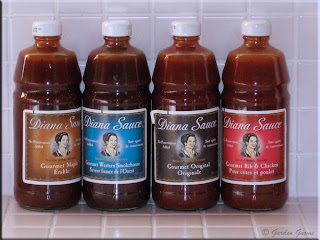 Diana Sauce
I seldom use commercially prepared sauces but when I do they tend to be gourmet style and preservative free. I also enjoy buying and using specialty sauces at various foodfests. I have often mentioned Diana Sauce® on this blog. Now this is one of my favourite commercially made sauces so I do use it a fair amount. That means I blog about it as part of recipes and methods. Diana Sauce® is distributed only in Canada so I do apologize to those trying to duplicate exactly my recipes or methods. Diana Sauce® is a gourmet sauce that has no preservatives something that is very important to us. It has a lovely, very smooth texture. It is available in 7 rich flavours. Pictured are some of the flavours I use the most: Maple, Original, Rib & Chicken and Western Smokehouse. Not pictured but another favourite is Honey Garlic. Despite being a gourmet sauce, Diana Sauce® is not expensive. It normally costs about $4 for a 500 ml (16 oz) bottle but is often on sale for $1.99 as a loss leader. I'll explain more about this in tomorrow's Frugal Kitchens 101.
I have been working on a homemade sauce that duplicated the original flavour but am still not quite there yet. I will tell you cheesecloth and xanthan gum are two key components for the texture. I am very close so will post the clone recipe as soon as I'm satisfied with it.
 Canning Chicken Stock
Just so you don't think I've been slacking off in the kitchen, a few days ago I decided to go through the freezers in preparation for our beef. We buy beef in bulk on the hoof so that is a large influx of of meat at one time. I make batches of stock several times a year but honestly unless it is a special recipe I do not make from scratch each time. I use my home canned stock instead.
The key to great stock is roasting the bones which ads a richness that can't be beat. I like saving up enough bones in the freezer to do this. Stock making is always a 2 day process and there is a reason for this especially when home canning the stock. The stock is made on day 1 but then must be cooled and defatted before the canning process can begin on day 2. Once the stock is defatted it can be further stained through cheesecloth for clarity or canned as it. The main reason for clarifying is for making soup where a clear stock is desirable. Other than that there is no reason to clarify.
I managed to get 13 - 500 ml jars of chicken stock from the batch, just one shy of a full canner load. It is more cost effective to run a full canner load but sometimes it doesn't work out that way. This was a nice addition to my pantry shelves.
One of the things I love about cooking is there is always the opportunity to learn how to cook using different methods. Shortly after buying our Jenn-Air JES9860AC I was already considering buying the radiant glass-ceramic cartridges but never acted on it. A couple of weeks ago I finally ordered them and waited anxiously for them to arrive. The cartridge system allows a plug and play system that is fully customizable. You can read more about my stove and the cartridges here if you are are interested.
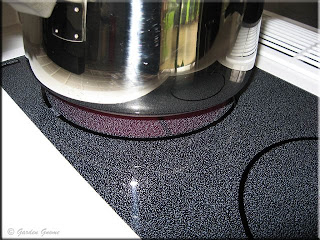 Radiant Cartridge
I was so excited when I finally had both cartridges since one was slightly delayed due to back order. So I waited until I had both then decided to see what they could do. Nothing in my kitchen gets a free ride so it either performs to my expectations or it is out of the kitchen!
I quickly realized that cooking on these cartridges would mean changing my cooking style. Unlike coil element the radiant elements heat instantly and they retain residual heat for quite some time after being turned off. Both of these qualities make the radiant cartridges energy efficient. However this means the burner must be turned off before the food is fully cooked yet the food is left on the burner to finish cooking using the residual heat. The exception to this is when you are cooking something milk based or delicate.
 Panfried Perch
I decided to test out the cartridges by steaming potatoes, warming homecanned green beans and pan frying perch. Adjusting how I used the elements was rather easy for the potatoes and beans. I was pleasantly surprised at how soon I could turn off the burner for both using the residual heat to finish the cooking. Rounding out the meal was panfried perch. Overall I was pleased with the performance of the radiant cartridges.
I have posted about panfried perch before. During the nicer weather I enjoy fishing so have several meals worth of perch, pickerel and bass in the freezers. Pan frying is a great way to prepare smaller fish fillets so it's something I know how to do quite well. However, pan frying on the radiant burner proved to be a bit more of a challenge so I will have to work on that a bit. As you can see the perch wasn't as quite as nicely browned as in the original post. I'm sure with a little tweaking I will be able to achieve the same results with panfried fish as I would achieve with the coil elements.


 T-FAL® Deep Fryer
 Fresh Cut Fries
 Rustic Cottage Pie
 Buttermilk Fried Chicken
 The Beef
 The Abattoir
 Pork Chops
 Chicken Medallions
 CounterCraft Grill
 Round Steak
 Tzatziki
 Avocado Salad
 Ham with Diana Sauce
 Ham Dinner
 Chicken Lettuce Tomato Pita Wrap
 New York Strip Steak
 Diana Sauce
 Canning Chicken Stock
 Radiant Cartridge
 Panfried Perch