My photo
Ontario, Canada
I am a wife, mother and grandma who enjoys the many aspects of homemaking. A variety of interests and hobbies combined with travel keep me active. They reflect the importance of family, friends, home and good food.
Cook ingredients that you are used to cooking by other techniques, such as fish, chicken, or hamburgers. In other words be comfortable with the ingredients you are using.
--Bobby Flay

For Your Information

Please watch this area for important information like updates, food recalls, polls, contests, coupons, and freebies.
  • [March 19, 2020] - Effective Mar 17, this blog will no longer accept advertising. The reason is very simple. If I like a product, I will promote it without compensation. If I don't like a product, I will have no problem saying so.
  • [March 17, 2020] - A return to blogging! Stay tuned for new tips, resources and all things food related.
  • [February 1, 2016] - An interesting report on why you should always choose organic tea verses non-organic: Toxic Tea (pdf format)
  • Sticky Post - Warning: 4ever Recap reusable canning lids. The reports are growing daily of these lids losing their seal during storage. Some have lost their entire season's worth of canning to these seal failures! [Update: 4ever Recap appears to be out of business.]

Popular Posts

Thursday, May 31, 2007

Hamburger Casserole with Caesar Salad

An update: If you have been following my blogs you will know that we tentatively bought another house and had our house listed for sale. Yesterday after many dealings with a very arrogant and demanding potential buyer, the conditions were lifted so our house is officially sold. Our new house will be officially sold to us as soon as the papers are initialed in about an hour. My new kitchen has been updated quite a bit but we will have to remove a built-in stovetop and oven so my stove will fit. I'll have more countertop and a lot more natural light. I can't wait to share some of the foods that will be prepared in my new kitchen. Until then I will be sharing some of the foods coming from my current kitchen. As always, I hope you enjoy!

The growing season is upon us and with the upcoming move, I'm doing more pantry and freezer cooking. The main goal is to reduce what we have to move as well as get ready for preserving this year's in season fruits and vegetables. As you know my pantry and freezers consist primarily of home preserved fruits and vegetables. However, store bought canned or frozen vegetables can easily be substituted in most of my recipes.
Hamburger Casserole

Hamburger casserole is one of those dishes I've been making from the time of being a new bride. It is a very frugal meal to make. I can still remember the first time I made it for my husband and him very carefully picking out every single pea. He has since reformed and will even eat peas raw now! This casserole really is just a mish mash done in layers. It's a perfect way to use up left-overs or homecanned foods. Any vegetable is fair game so adjust as you desire. Hamburger casserole is more of a method than a recipe. Note: A 500 ml jar is about one pint or 16 oz. If using store bought jars use 2 of the 10 oz cans per vegetable.

Hamburger Casserole
2 lb lean ground beef
2-3 large potatoes
1 500 ml jar homecanned carrots
1 500 ml jar homecanned green beans
2 cup frozen niblet corn
2 c lightly sauteed mushrooms
1 small chopped onion
1 500 ml jar homecanned pizza or spaghetti sauce
1 500 ml jar homecanned tomato soup
1 c milk
1/3 package (300 g) elbow noodles, cooked el dente
1-2 c cheese of your choice (usually cheddar)

Brown the ground beef. Drain and set aside. Microwave or steam the potatoes until just softening. Cut into about 1/4-inch slices and set aside. Drain vegetables. Spread the ground beef evenly on the bottom of a large roasting pan. Place one single layer of potato slices over the meat. Add the vegetables in layers. Pour the pizza or spaghetti sauce over the vegetables. Sprinkle on half the cheese. Cover with noodles. Mix milk and tomato soup together. Pour over noodles. Top with rest of cheese. Bake at 350ºF until cheese is melted and casserole is bubbly.
Serves 8 - 10

Caesar Salad

Caesar salad is a nice change from the many tossed and garden salads we eat. This is one of the few times that I will use a store bought salad dressing for a salad which doesn't happen very often. Besides Renée's Gourmet Caesar Dressing is a rich, creamy dressing that saves the time of making a Caesar dressing from scratch when I'm in a hurry.

The trick to Caesar Salad besides fresh ingredients is lemon. You can buy romaine lettuce already chopped and bagged for about $3 but most times you can by a head of romaine for about $1. There is a method to cutting romaine lettuce for salad but it is so simple you will wonder why you ever spent the extra money for pre-cut. Once the lettuce is cut, sprinkle it with fresh lemon juice. Add the dressing and toppings just before serving.

Caesar Salad

1 head fresh romaine lettuce
juice of 1 lemon
2-3 tbsp Renée's Gourmet Caesar Dressing
4 slices bacon, cut across the strips
2 tbsp fresh grated Parmesan cheese
homemade croutons

Cut the bacon slices across the strips. Fry to almost crisp. Drain and cool. Set aside. Wash the romaine lettuce and allow to drain. Turn the romaine lettuce on a cutting board so the long side faces you. Make four cuts from root end to tip about 1-inch apart without cutting through the root end. Now cut across these cuts at 1-inch intervals resulting in approximate squares of lettuce. Place the lettuce in a large bowl and toss with fresh lemon juice. Stir in the dressing and half of the Parmesan cheese. Place lettuce mixture onto salad plates. Top with Parmesan cheese, bacon pieces and homemade croutons. Garnish with lemon wedges.

Homemade croutons are oh so easy to make and a perfect way to use up bread bordering on becoming stale or homemade and artisan breads. Homemade croutons are lower in fats as well making them a healthier choice. You can use any seasoning you desire or leave them plain. What is a must have for this method is a Health Mister. This is a special bottle that is filled to a certain level then pumped so the oil forms a mist when sprayed. A health mister can be found at kitchen supply stores but I've seen them in regular department stores for around the $5 mark.

We don't use a lot of croutons so I make up a custom batch each time. However, you could make up a large batch then vacuum seal them in a mason jar for later use. I used lemon pepper to lightly season these croutons as they were to be used on Caesar salad.

Homemade Croutons

what you need:

  • 4-6 slices bread
  • olive oil (in Health Mister)
  • seasoning of your choice
Cut the bread slices into 1-inch squares. Mist lightly with olive oil. Sprinkle on seasoning. Toss and repeat. Place on cookie sheet. Bake at 350ºF until golden brown. Turn and bake until golden brown. Turn off the oven and let sit to cool. Use as desired or vacuum seal in mason jars.


Friday, May 25, 2007

Grilled Chicken Kabobs

We grill year round in good or not so good weather. Like the mailman rain, sleet or snow will not deter us from grilling! During the summer I use the grill much like an oven so any oven baked dish is fair game. Part of the fun of grilling is the creativity but our philosophy for the most part is KISS (keep it simple silly).

I had a craving for pineapple to the point I picked up a fresh one at the market even though I had no idea what to use it for. It sat nicely decorating the counter until the craving became stronger. Every time I caught a whiff of the pineapple smell the craving grew. So here's what I came up with.

Grilled Chicken Kabobs

Kabobs are just a fun way to grill and present food. They are perfect for entertaining as guests can assemble as they please. Simply set the components up in separate dishes and let your guests choose. Be sure the pieces are fairly similar in size for grilling times.

Wooden skewers are very inexpensive but because they are wood, they need to be soaked in water prior to using and they should be considered as disposable. I like leaving the grilled kabobs on the skewer for presentation. I used chicken pieces from the recent chicken session. These were about 1 inch pieces, three per kabob. Other ingredients included: red pepper, yellow pepper, whole mushrooms, red onions and fresh pineapple chunks. The kabobs were grilled on medium heat and brushed lightly with Italian dressing each time they were turned. The kabobs were served with arborio rice cooked in chicken stock, a dash of saffron then lightly stirred with butter along with a sweet and sour dipping sauce. Yummy and oh so simple!


Thursday, May 24, 2007

Victoria Day Weekend - My Husband's Burgers

Warning: This post may evoke serious cravings and incessant drooling! You may notice signs of addiction after one bite of these burgers.

We like to frequent a place that makes huge, delicious hamburgs served only with sides of sliced onions, dill pickles, ketchup and mustard. Cheese is optional. Several years ago my husband decided to duplicate these burgers at home. The rest is history. He has more than perfected the art of the homemade burger. These are simply the best burgers around! They are a real treat and once you see the size you will know why.

On the Grill

He starts out with fresh ground that day, lean ground beef. Then he mixes in his secret blend of spices and forms them into huge (about 1/2 lb) patties. He grills them on a hot grill flipping only once. One secret I learned from him is he never presses the patties down to flatten even though the the patties will shrink and thicken a little. The reason for not flattening is this will release all those yummy juices you want in the burger. Once the patties have been flipped and grilled to medium rare. He adds slices of real cheese, none of those processed cheese slices for these burgers! We've experimented with cheeses and have found cheddar, Asiago and Swiss to be among our favourites for these burgers. The hot, cheese laden patties are then place on fresh homemade, lightly toasted buns (my department).

Fully Loaded

I use a basic white bread recipe for the buns (in archives) but sometimes use a whole wheat recipe. While my husband is grilling the burgers, I get the condiments ready. I mix a little mustard with mayonnaise to spread on the top bun. Garden fresh lettuce and beefsteak tomatoes are standard but sometimes store bought has to do in the off season. The onions of choice are Spanish or red, normally uncooked but sometimes sauteed if there is a request. Mushrooms sauteed in butter and homemade dill pickles and hot pepper slices complete the condiments. Even though ketchup and mustard is offered it is seldom used. I include a side of potato chips but really a side is not needed.

Cut

This is a sloppily cut burger and not the best picture. I should have put a ruler beside it as a gauge. Fully topped with the pattie and condiments, the overall height is about six inches. I kid you not! Ladies, this is one burger you will need to cut into half. I can just barely finish a half but only if I'm really hungry.

The patties freeze nicely in case you have that craving for a huge burger or you have extras. If freezing, freeze one or two per bag and vacuum seal. Re-heat by placing the bag in boiling water until the burger is heated through, about 10 minutes. This will retain any juices making the burger taste as fresh as the day it was made.


Monday, May 21, 2007

Asparagus & Ham Brunch Bread

Asparagus is one vegetable I haven't experimented a lot with despite the fact we eat a lot of it. So when I saw the recipe for asparagus in the Ontario Foodland Gazette, I just had to try it. Everyone enjoyed this unique quick bread. The results and recipe follow.


Asparagus & Ham Brunch Bread
source: Foodland Ontario Gazette, 2007

3 c biscuit mix
1 tsp dried tarragon
1/2 tsp dry mustard
1/2 tsp white pepper
2 eggs, lightly beaten
1 1/2 c milk
2 lb fresh asparagus
1 c Black Forest ham, diced
1 c onion, diced
1 c fresh grated Parmesan cheese

Mix biscuit mix, tarragon, mustard and pepper in a larg bowl. Combine eggs and milk in another bowl. Pour over the dry mixture and stir until smooth. Spread half of mixture in greased 13' x 9' cake pan. Cut ends from asparagus. Arrange in a single layer over the batter. Sprinkle ham, onion and half the cheese over the asparagus. Top with the rest of the batter. Sprinkle with remaining cheese. Bake at 375ºF for 35 to 40 minutes or until golden brown. Let cool in pan on rack for 20 minues before serving warm or at room temperature.

Notes: The instructions said to divide the asparagus and ham in half then spred on the first layer, top with biscuit mix and top with the second half. I only did one layer of the vegetables and was happy with the results. I think sauteed mushrooms would be a nice addition.


Saturday, May 19, 2007

Home Canned Asparagus

Last year I planted five asparagus roots not realizing there would be a very good possibility of us moving this year. Asparagus takes three seasons to mature enough for picking so I won't see a crop from what I planted. Local asparagus is in season so I stopped at the farmer's market for some. The price this year is $1.49 per pound which isn't bad.

Fresh Asparagus

Fresh asparagus is best when the spears are young and tender. To keep the spears fresh until you use them, place cut ends into a tray with about an inch of water.

By far our preferred method of cooking asparagus is lightly steamed. Some vegetables are better preserved by other methods than canning. The reason usually is freezing or drying give better texture and flavour. Asparagus was one of those vegetables I had not canned due to very vivid memories of store bought canned asparagus that had a slimy, mushy texture and over cooked appearance. I decided to can a small batch of six jars this year to see the results. The amount of asparagus canned was roughly 3 bunches or about 1 1/2 lb.

Homecanned Asparagus

Canning asparagus is very easy but because it is a low acid food it must be processed in a pressure canner. Asparagus can be raw or hot packed but since the processing time is the same, I used raw pack. Raw pack is quicker and gives a better end product, in my opinion.

Method:
Wash and drain the asparagus. Cut the ends off and cut into 4-inch pieces. Pack into hot jars as tightly as possible without crushing the spears. Add 1/2 tsp (optional) salt to each pint. Pour boiling water over the vegetables leaving 1-inch headspace. Remove air bubbles. Wipe rim of jar then place two piece lids on. Process pints 30 minutes at 10 pounds pressure.


Thursday, May 17, 2007

Spaghetti with Roasted Tomato Sauce

When I'm canning seasonal produce like tomato products, the first thing I worry about is whether I've canned enough. The reason being is I want enough of that particular product to last until the next season or about a year. So when I tell someone I just finished canning 48 jars of roasted tomato sauce often the first question is "What are you going to do with that many jars?" Consider though that this amount would work out to four pints per month, roughly one per week. In reality I aim for the hundred mark for the roasted tomato sauce. The method for making and canning roasted tomato sauce can be found in the archives here.

The question of what to do with some home preserved foods is a common one. It comes up over and over. The trick to home preserving especially canning is to know what your family eating habits are. Yes, 32 jars of homemade dill pickles look wonderful and they are cheap but will you use that many jars in one year? So start with the end in mind always having some idea of how you are later going to use the product. Always adjust the amount preserved to reflect your family's needs. Many of the recipes I post use one or more home preserved foods. I'm going to try posting more ways to use up your home preserved foods

Spaghetti with Roasted Tomato Sauce

Spaghetti with roasted tomato sauce is one of my fast foods. It is very inexpensive, filling and can easily be made in 15 minutes. To borrow one of Rachel Ray's phrases, "how good is that?" It is meatless but I like to sprinkle a little fresh Parmesan cheese on top. Without the cheese the meal is vegetarian.

There are no real measurements for this meal so it can be adjusted for the number of people being served. I used:

1 pint roasted tomato sauce
2 handfuls fresh mushrooms, sliced
2 tbsp butter or olive oil
1/2 medium chopped onion
4 sprigs fresh parsley
about 6 pieces fresh chives
about 3-inch diameter spaghetti
splash of olive oil
a good pinch of sea salt
2 tbsp fresh grated Parmesan cheese

Bring water to a boil in a large sauce pan. At the same time, slice the mushrooms and sauté in butter or olive oil frypan. Chop the onions and cut the chives into small pieces. Add a splash of olive oil, salt and pasta to the water. Heat sauce in small saucepan. Remove mushrooms from heat. Cook pasta until el dente then drain. Place pasta on plate and top with sauce, onions, chives, mushrooms and Parmesan cheese (if desired). Garnish with fresh parsley.
Serves 4


Tuesday, May 15, 2007

Fried Chicken and Fresh Flavoured Butter

I'll bet you thought this post would be about chicken as well and it is but I wanted to share with you how to make fresh flavoured butters. I have more chicken recipes to share but now that the freezer and canning shelf are stocked, more chicken recipes will be coming as I make them.

Chive Butter

Flavoured butters are so easy to make! Most freeze nicely and can be used when cooking or for adding a little zip for vegetables. You can use fresh herbs or fruit to flavour the butter.

The method is the same. The equipment can be as simple as a mason jar with lid to fancier equipment like a Kitchen Aid® stand blender. I think I've used just about every piece of equipment out there. When the kids were young, the mason jar was a perfect get along game that tuckered them out.

What you will need:

2 c (500 ml) heavy whipping cream
1/4 c fresh chopped herbs
1/2 tsp sea salt (if desired)

For this batch I used the Kitchen Aid® stand blender and the whisk attachment set to 10 (high). The whipping cream thickens then will separate. Of all the methods the Kitchen Aid ® stand blender gives the drier end results. Once the butter is separated pour off the buttermilk and reserve. This is great used in soups, stews or baking. It freezes well so be sure to keep it. Taste the butter as this is what sweet butter should taste like. The butter then needs to be pressed. Take a spatula and press down on the butter releasing more butter milk. When pressing does not release any fluid the butter can be pressed into a mold as is, seasoned with sea salt or have fresh herbs or fruits stirred in then pressed into a mold. You can get really fancy and press into little candy molds, cool then release to impress your guests later too.

Note: Only add salt if you want salted butter, otherwise let the herbs shine through!

Some of our favourite combinations: lemon balm with lemon zest, a combination of citrus zest, thyme, rosemary, chives, cranberries and cranberries with citrus.

Fried Chicken

I fry chicken either on the stovetop or in a deep fryer. This particular batch was fried on the stovetop. I don't use any coatings for pan fried chicken. At most I might season a little either during the frying process or when draining. My secrets to crispy pan fried chicken are: a hot stainless steel pan with pre-heated peanut oil and cold chicken. The chicken is placed into the hot oil and allowed to fry until it moves freely from the pan with no sticking. A splatter screen helps to control any splatters. When the chicken moves freely, turn and fry on the other side. Then I remove the chicken from the pan and let drain on a paper towel lined rack before serving. The end result is mouth watering, lightly seasoned, juicy and crispy fried chicken.


Monday, May 14, 2007

Two Way Chicken Soup

As mentioned in previous entries, soups are one of the most frugal and versatile dishes you can make. They are true budget stretchers. The recipes for my homemade chicken noodle soup and chicken & dumplings are in the archives. I really wasn't planning on making soup during the recent chicken bulk cooking sessions but then I stumbled upon a segment of Paula's Home Cooking. She did her stock different than mine but I thought this was jumping board where I could be a little creative to see where it would lead. The results were worth it!

Paula made her stock using a whole chicken, bayleaf and onion then picked the chicken clean after simmering. Then she added the meat back to the stock along with carrot coins and potatoes along with noodles. When the vegetables were cooked she stirred in sherry, Parmesan cheese and heavy cream. That was all the inspiration I needed and it immediately dawned on me I could make a large batch of soup then divide it for two different tastes. That's what I did. I call the recipe Two Way Chicken Soup.

Two Way Chicken Soup

recipe inspired by Paula Deen host of Paula's Home Cooking on Food Network

Both soups start with my basic chicken stock. Once soup #1 is finished you then have the choice to divide for soup#1 and soup#2 or turn the entire soup into soup #2. Soup #1 is rich and flavourful, a wonderful soup on its own. It is low fat. Soup #2 is rich and creamy with a touch of elegance. Both are sure to please!

Stock:
my basic chicken stock
about one whole chicken's worth of bones
2 carrots, washed
2 stalks celery with leaves
1 medium onion, washed but unpeeled and quartered
1 bayleaf

Cover the chicken pieces and vegetables with enough water to be over the the mixture by about 4 inches. Bring to a boil then reduce to simmer. Simmer for about 40 minutes. Strain

Soup #1

stock
2 boneless, skinless chicken breasts cut into bite sized pieces
4 potatoes, peeled and cubed
3 carrots, cut into coins
2 stalks of celery, sliced
1 1/2 c frozen corn
2 c fresh mushrooms, quartered
1 onion, chopped

Combine ingredients and add water if necessary to cover by about 2 inches. Bring to a boil. Reduce heat to simmer and let simmer until the vegetables are almost cooked. Add:

1 tbsp Maggie Seasoning or Worcestershire Sauce
sea salt and pepper to taste
3-4 large handfuls broad egg noodles

Increase temperature to medium high. Continue cooking until noodles are el dente. Garnish with sliced green onions or chopped chives.

Soup #2

I trimmed down the fat a little in this soup by using 1/2 & 1/2 cream but you can use heavy cream if desired. Make stock then soup #1. If using the entire amount of soup #1 to make soup #2, stir in (adjust amounts if using half of soup #1):

1/4 c sherry
1 c shredded Parmesan cheese
2 c 1/2 & 1/2 cream

Return to heat to warm through. Garnish with a little grated Parmesan cheese


Sunday, May 13, 2007

Chicken Sausage (Rachel Ray's) & Grilled Chicken Strips

My husband picked up six more packages of chicken breasts (12 chicken breasts) before he left for his golfing weekend. He is back Sunday around lunchtime so that gave me plenty of time for experimenting. When I'm doing bulk cooking sessions I like to stick with the tried and true for our family but I also like to experiment a little when possible.

Grilled Chicken Sausage Patties

I was watching Rachel Ray yesterday. She was making breakfast sandwiches using ground chicken. I happened to have chicken breasts set aside for grinding so thought this would be good to try. This is one recipe I will be playing with a little more. The first results were not exactly what I was looking for but the taste will be quite pleasing with a little tweaking. Something just isn't meshing with the flavours for me so I need to play a bit more. This is a very low fat meat when cooked as I did on the indoor grill but you could fry it if you wanted to. These were grilled on a JennAir® grill cartridge that has wider grates. If your grill has narrow or rounded grates then these patties would be better pan fried.

Chicken Sausage (Rachel Ray's)
modified by Garden Gnome - all spice amounts have been modified as well as cooking method

4 chicken breasts
3/4 medium Granny Smith apple, peeled and chopped
1/2 small onion, chopped and sauteed
1/4 tsp fresh ground nutmeg
1/2 tsp cinnamon
1 tsp grilling seasoning*
3/4 tsp poultry seasoning
a good splash of 100% pure maple syrup

Remove the skin and bones from the chicken breasts. Grind the chicken breasts using the Kitchen Aid attachment or manual meat grinder. Stir in the other ingredients. Form into patties and this will be messy. A warning: they are not firm like burger patties. Place patties onto a hot grill. Flip using an egg flipper only when you can move the patty easily on the cooked side. When fully cooked remove from grill and serve along with eggs and potatoes by itself or place on a bun along with eggs to make a breakfast sandwich. These will freeze well.

*She didn't specify exactly what this was. I used Montreal Steak spice but while it gives the sausage a nice zip, the flavour just wasn't right.

A tried and true short cut I always have on hand is several bags of pre-cooked chicken strips. They are just so convenient especially during the hot months when you don't want to heat your kitchen by cooking. Any kind of barbeque type sauce or seasonings can be used or they can be left plain. I use them on wraps, sandwiches and salads.

Grilled Chicken Strips

Grilled chicken strips are very easy to make. They freeze nicely for later use in wraps or on salads.

Grilled Chicken Strips

2 - 4 chicken breasts
Dianna Sauce or your favourite barbeque sauce
grapeseed oil**

Remove the skin and bones from the chicken breasts. Rub the grates with a little grapeseed oil. Preheat your grill. Place the chicken breasts on the grill. Turn over when the chicken can be moved freely without sticking. Brush on a little sauce on the cooked side. When the other side is cooked, turn and brush on sauce. Let sit for about 5 minutes. Remove from grill. Allow to cook then cut into strips.

**Grapeseed oil is an ideal oil to use when grilling indoors. It has a high smoke point so you can grill at higher temperature without filling your house with smoke

To freeze: Flash freeze the strips on a cooking sheet. When frozen put the strips in vacuum seal bags and vacuum seal. If you do not have a vacuum sealer put the strips into freezer bags and press as much air out as possible.

To use: Thaw and use cold for sandwiches, wraps or salads. Re-heat in microwave if desired.


Tuesday, May 08, 2007

Chicken Stock Revisited

Anyone following this blog will know I've been focusing on chicken for the last almost two weeks. The sale ends on Wednesday so my husband picked up another twelve chicken breasts (4.286 kg, $18.64) yesterday and I told him to pick up more today. So it was a surprise when I saw someone was googling to find out why their chicken stock was not clear and stumbled upon my blog. I thought that would be a great post since I have been canning a lot of stock lately.

Quick Cool

I posted earlier on how I make stock. For those who do not wish to go back a couple of posts, I use chicken bones, skin, onion with skin on, celery, carrot and a bayleaf.

I wanted a clear chicken stock for part of this batch. By far the majority of he chicken stock I make is not clear as seen in the following picture. That doesn't bother me but there are sometimes you want a nice clear stock. The first trick to a clear stock is a quick cool. The way to do this is remove the stockpot from the burner and immediately immerse it in a sink filled with iced water.

The second trick to a clear stock is to remove all the chicken fat. Once well chilled, peel off the the chicken fat without disturbing the stock. When the fat has been removed, carefully pour the stock through a fine mesh strainer double lined with cheese cloth. Try not to disturb any solids during this process. Return the solids and water to make regular chicken stock.

Clarified and Regular Chicken Stock

This photo shows the difference between clarified and non-clarified chicken stock. I canned up seven pints of regular and six pints of clear chicken stock. As you can see the regular stock is cloudy likely due to a slower chill but the biggest factor to the cloudy appearance is I mush everything. Then I bring the much to a boil and pour the strained liquid into the stock. The clarified chicken stock has this step eliminated and a quick chill so the result is a much clearer appearance. As far as taste, both stocks are fairly similar but the regular may be just a bit stronger. The clear stock will be slightly lower in fat if that is a concern. Processing time for pints for both is 25 minutes at 10 lb pressure.


Saturday, May 05, 2007

Chicken Loaf

Continuing the chicken theme since chicken breasts are on sale until May 9, part of the second batch of chicken breasts were turned into chicken loaf. There is one recipe in the archives. I took this chicken loaf in a slightly different direction.

Chicken loaf is an easy to make budget stretcher. When cooled and sliced thin, it is perfect for a homemade lunchmeat.

Chicken Loaf

4 large chicken breasts
2 eggs
1 carrot, shredded
1 med onion, chopped fine
1 stalk celery, shredded
3 tbsp Dianna Gourmet Rib & Chicken Sauce
1 tsp honey mustard
dash sea salt
dash fresh ground pepper
3 cups dried bread crumbs

Remove the skin and bone from the chicken breasts. Cut into strips. Grind using the Kitchen Aid® attachment or manual food grinder on fine grind. Whisk eggs and stir into meat. Mix in the vegetables, sauce and mustard, salt and pepper into the meat. Pour in the bread crumbs and mix well. Place mixture into silicone loaf pan. Bake at 350ºF until firm and golden brown on top. Allow to rest for 10 minutes if slicing hot. Cool entirely to slice for lunchmeat.

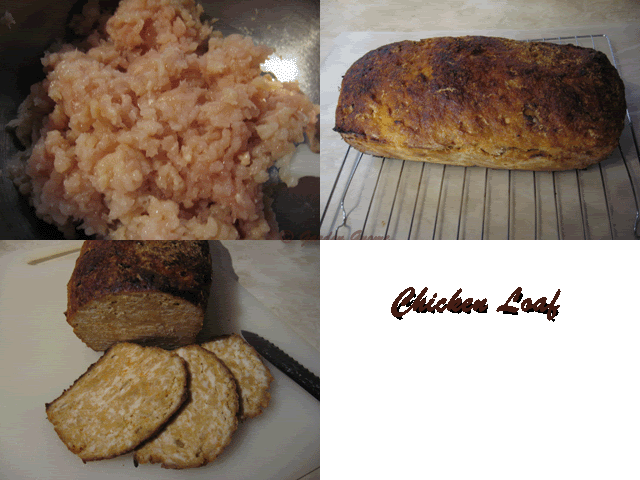
Chicken Loaf Sandwich

This picture is meant to wet your whistle and get your mouth watering. Chicken loaf is good served on a bed of leaf lettuce and swiss cheese. Top with sliced tomatoes, onions and honey mustard for a deletable sandwich! While this sandwich was made using store bought white bread, it lends itself nicely to homemade 12 grain or sourdough breads.


Friday, May 04, 2007

Stuffed Chicken Breasts

I'm now onto posting what I did with the second lot of chicken breasts but first I would like to address an email I received. The question was why trim your own chicken when you can buy it already trimmed. The bottom line is you can custom make your own cuts, grind your own meats and take advantage of sales. Ideally you can raise your own meat and poultry so knowing how to custom cut your meats is a real advantage.

I had eight lovely, meaty chicken breasts to work with so decided to do a fresh ground chicken for chickenloaf using four pieces. I'll post the pictures and recipe for the chickenloaf tomorrow. The other four were stuffed and the bones were reserved to make a large batch of homecanned stock tomorrow.

Stuffed chicken looks impressive and tastes scrumptious yet is very easy to make. It is one of those dishes that looks like you've spent a lot of time on it. They are sure to please anyone! Plan on one stuffed chicken breast per person. You can use your favourite stuffing or our family favourite bread stuffing (recipe follows). The potatoes in the photo are steamed reds drizzled with a little butter and fresh chopped chives.

Ingredients:

4 bone in, skin on chicken breasts
2 tsp butter
sea salt and fresh pepper
bread stuffing (or stuffing of your choice)

Method:

Place the chicken breast skin side down, thick end towards you. Slide your knife in and along the bone just slightly then using a little upward pressure on the bone with your other hand continue short cuts following the shape of the bone with your knife. Set the bones aside for stock. Turn the chicken breast over so the skin is now face up. If there is a large clump of fat at the narrow end of the piece, carefully slice it away without cutting into the meat. Place the chicken breast so the thick side faces you. Insert your knife or fingers between the skin and meat. Use a gentle motion to separate the skin from the meat without cutting the meat and leaving both ends intact forming a pocket. The chicken breast is now ready for stuffing.

Once stuffed, tuck the skin a little to hold the stuffing. Sprinkle with sea salt and fresh ground pepper. Place a dab (about 1/2 tsp) butter on top. Place the chicken breasts on a two piece broiling pan with just enough water in the bottom tray to prevent smoking. Bake at 325ºF convection heat (350ºF regular) for about 50 minutes (60 minutes) or until the skin is a deep golden brown and juices from the chicken are clear.

Bread Stuffing:

1/2 loaf bread, broke into chunks
1/2 medium onion, chopped
1 - 2 tsp poultry seasoning
sea salt
fresh ground pepper
2 tsp butter cut into small pieces

Place the bread chunks in a large bowl. Mix in the onion. Sprinkle with poultry seasoning. I don't measure so start with 1 tsp and add more to taste. Sprinkle with sea salt and fresh ground pepper. Mix well. Stir in butter pieces and mix again. The stuffing should be pressed together with one hand to form a ball about the size of your fist when stuffing chicken breasts or a whole chicken.


Wednesday, May 02, 2007

Chicken & Dumplings

Today's post is the final dish made from the first batch of chicken breasts that were on sale. Tomorrow, I will start a series of posts with what make from the second batch that start today.

Chicken & Dumplings

Chicken and dumplings are true comfort food. It is warm and filling while being easy and frugal to make. I make the soup from scratch using fresh ingredients. The dumplings are made using The Master Mix (Homemade 'bisquick' Substitute) or Bisquick baking mix. Either give a light, fluffy dumpling resembling clouds. I find it best to make only the number of dumplings you will use for that meal. While they can be kept for left-overs, they will absorb more of the liquid reducing their fluffiness. The soup portion will thicken with the addition of the dumplings leaving the left-overs more like a stew. This re-heats nicely as a stew or filling and fresh dumpling mix can be added if desired.

Chicken & Dumplings

2 boneless, skinless chicken breasts cut into bite size pieces
2 stocks celery, sliced
2-3 carrots, peeled and coined
1 medium onion, chopped
1 bay leaf or 2 sprigs thyme
1-2 c frozen corn niblets
4-5 potatoes, washed, unpeeled and cubed
1 quart (homemade) chicken stock (see last entry)
sea salt and pepper to taste

2 cups baking mix (Bisquit or homemade)
~ 1/2 - 3/4 c milk to make a lumpy thick mixture

Place the chicken and bay leaf in a large stockpot and cover with about 4 inches of water. You will need about 3 inches headspace once the dumpling mix has been added. Bring to a boil. Add celery, carrots, potatoes, onion and stock. Return to boil then reduce heat. Cover and let simmer until potatoes are soft. Stir in corn. Add water if necessary to ensure liquid is covering the meat and vegetables by about 3 inches while leaving a 3 inch headspace from the top rim of the stockpot. Bring to a boil then reduce to a medium simmer.

Mix the baking mix and milk with a fork to form a lumpy thick mixture. Do not over mix and do not add too much milk. Using a serving spoon, drop one spoonful of the dumpling mix at a time into the hot soup. Do not underestimate how much these will expand. The pot I use for a small batch is 10 inch diameter. This holds 4 large dumplings nicely. Cover the pot and allow to simmer for about 10 minutes, no peaking and no stirring! Remove the lid and check for any signs of raw dumpling mix. If there is, cover and leave for about 5 minutes. Remove from heat.

Using a large slotted spoon, carefully go in and under a dumpling then lift it onto a plate. Surround the dumpling with vegetable and chicken mix. Ladle a little of the thickened sauce over everything. Repeat for the other dumplings.


Tuesday, May 01, 2007

Lemon Peppered Chicken & More on Chicken

As promised, here are some of the things I made with the chicken breasts from the previous entry. One goal when buying meat or poultry on sale is preserving it for later use. I like to have just enough that I can process both cooked and raw in the same day. As you read through the methods for the following chicken preparations, you will notice I specify a few things: light olive oil, pre-heated stainless steel fry pan and vacuum sealing. As many of you who follow my blogs know, I strongly recommend using a vacuum sealer. For the new readers, I have the FoodSaver® V2480. The reason I recommend using a vacuum sealer can be found in the archives here along with a short video clip and usage. Keep checking back as I will be doing more chicken dishes to take advantage of this sale. My husband picked up another 3.56 kg of chicken breasts today at a total cost was $15.64 so I'll be posting as I make the dishes. Tomorrow's post, time permitting will be chicken & dumplings ala Garden Gnome style.

Lemon Peppered Chicken

Lemon Peppered chicken is very easy to make. When prepared the way I make it, the result is a flavourful and moist chicken. The finished chicken can be cooled, flash froze then vacuum sealed.

I start with a pre-heated stainless steel fry pan and light olive oil on high heat using bone-in, skin-on chicken breasts. The chicken is placed in the hot fry pan, skin side down and seared. The chicken is turned, seasoned with MSG-free Lemon Pepper Blend (Tone's) and seared on the bone side. Then I remove the chicken, drain and place on a two piece broiling pan with enough water in the bottom tray to prevent smoking. The chicken is baked at 350º F until the juices are clear when pressed or a slight give when pressed with the thumb.


Chicken for Strips, Vacuum Sealed Chicken, Chicken Stock

Chicken for Strips

I like to keep vacuum sealed chicken strips in the freezer. These can then be thawed and used either cold or warmed for wraps or salads. They are especially appreciated during the hot summer days when I don't want to heat up the kitchen by cooking. I preheat about 2 tbsp of light olive oil in a stainless steel fry pan. The boneless, skinless chicken breasts are placed in the pan when it is hot. I reduce the heat to medium high and let the chicken breasts cook until they can be moved on the pan without sticking. Then I turn the chicken breasts onto the uncooked side and repeat. Sometimes I add a seasoning like Old Bay at this point. When the chicken is finished cooking, I remove from the pan, cool, cut into strips, flash froze*, then vacuum seal.

Vacuum Sealed Chicken: Another nice thing to have on hand in your freezer is boneless, skinless chicken pieces. They are a homemade convenience item sure to please and unlike some chicken piece products, they are all chicken! I like to keep a few packages on hand. They can be made into chicken poppers (recipe to be posted later this week), chicken nuggets or added as an ingredient for other dishes. I flash freeze* them raw but they could easily be pre-cooked similar to the chicken strips.

*flash freezing: This method is used for freezing foods you want to keep separate or moist pre-cooked foods that are to be vacuum sealed. Spread the food onto a freezing tray. Allow to freeze then vacuum seal.


Chicken Stock

Now having to remove the skin and bones from such lovely chicken breasts is very easy. The first thought that came to mind is stock using the skin and bones. My chicken stock is fairly easy to make. I put the bones and bits in a large stockpot, cover with water by about 3 inches and bring to a boil, then reduce the heat. I add 2 stalks celery cut into 3 inch pieces, 2 carrots washed but not peeled cut into large chunks, one medium onion washed but skin still on (adds a natural yellow colour to the stock), and one bay leaf or a couple sprigs of thyme. I bring the mixture back to a boil then reduce the heat to simmer and let simmer for an hour or so adding filtered water as needed. The mixture is cooled and de-fatted. Then I strain the mixture placing the bone and vegetable pieces in another pot and returning the stock to the original pot. The bone mixture is again covered with water, brought to a hard boil, simmered about 10 minutes then strained into the original pot. Before bringing the original pot of stock to a boil for canning, I strain it twice through a fine mesh strainer lined with cheesecloth. The stock is then brought to a boil and ladled into hot jars. It is processed at 10 lb pressure 20 minutes for pints in a pressure canner. I like the pint size jars for stock because I tend to use the entire jar at once instead of having left overs.